Work with Lightrun Dynamic Logs in the VS Code IDE🔗
Prerequisites
To use the plugin, ensure that:
- An agent is attached your application.
- The plugin is installed in your local VS Code instance.
- The Plugin ia authentication against your Lightrun account.
- The source code file for your running application is opened in VS Code.
From the Lightrun plugin for VS Code, you can:
Add a Dynamic Log🔗
Note
Ensure that the default log message is valid and does not reference undefined variables, as this can cause runtime errors and a poor first-time experience. To evaluate expressions in log messages, wrap them in curly brackets (e.g., 2 + 3 = {2+3}).
-
To add a log, select one of these methods:
-
From the Agents or Tags tab.
- Open the Lightrun sidebar in VS Code.
- Go to the Agents or Tags tab and select an agent or tag.
-
Click the Add Action icon.

-
Select Add Log.
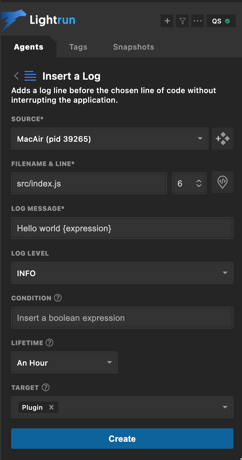
The Insert a Log dialog opens.
-
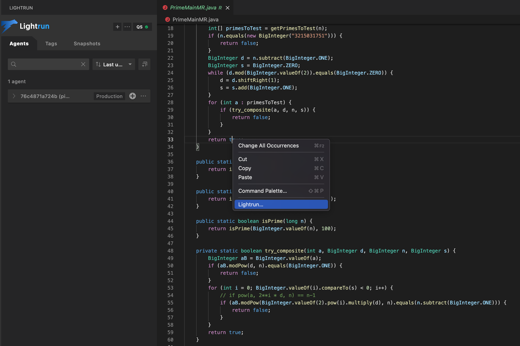
Directly from the Code line:
- Go to the line in your application source code where you'd like to insert the log. Make sure to use the source code version currently deployed to your remote app (where the agent is attached).
-
Right-click to open the VS Code context menu.
-
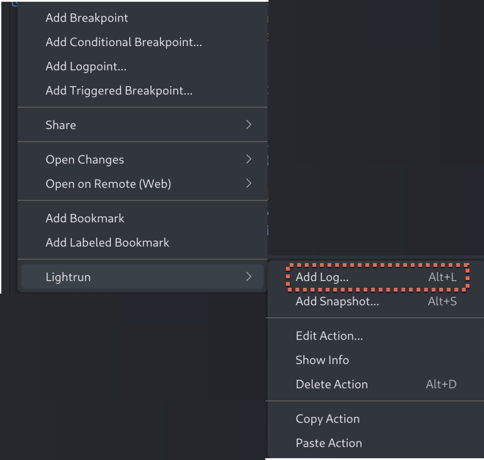
From the VS Code context menu, click Lightrun.
The VS Code Command Palette opens with a list of Lightrun plugin options.
-
From the Command Palette, select Add Log.
The Insert a Log dialog opens.
-
-
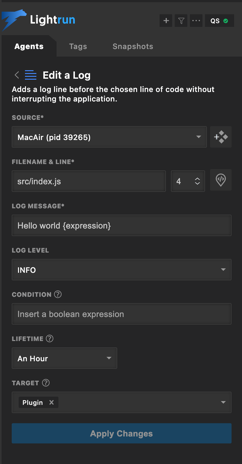
Set log parameters:
Enter the parameters in the Insert a Log dialog, as follows:
Fields Description Source From the available options in the dropdown list, bind the action to a specific agent, tag, or custom source.
Click the icon to create a new custom source.
Filename & line The source code file into which you're inserting the action. The default path is to the source code file from which you're currently working. Log message The actual log string. Use expressions such as My variable is {var}, including method invocations such as:Method value: {myMethod() + 5}.Log Level Select an appropriate log level: INFO, ERROR, DEBUG, WARN.
Once configured, logs can also be filtered by the LOG LEVEL attribute in the Lightrun console.Condition The condition of an ifstatement, used to limit the execution of the action.
For example, The conditionmyVar % 7 == 0limits the action (log, snapshot, metric) output so that it only prints for variables that are divisible by 7.Lifetime The time after which the action ceases to track code behavior and is automatically disabled; default = 1 hour. Target Select your preferred action output taget. You can pick either:
- Stdout - Logs are routed only to your application's standard output.
- Plugin - Logs appear in the Lightrun Console, the Lightrun Management Portal, and configured integrations.
or both options at once. -
Click Create to insert the dynamic log into your code.
Manage logs🔗
You can perform the following tasks when workint with logs.
View a Dynamic Log🔗
-
In the VS Code editor, a
 icon will appear next to the selected code line.
A new log action will appear under the selected source (agent or tag) in the Lightrun sidebar.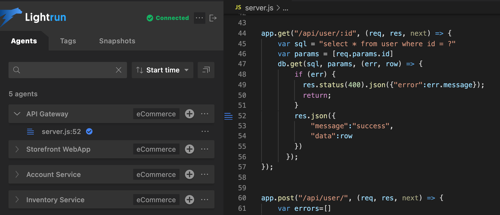
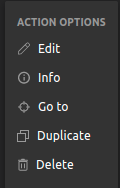
You can disable, delete, or edit a log directly in your IDE.
Edit Dynamic Log settings🔗
-
Click the menu icon ... next to the relevant log in the Lightrun sidebar.

-
Select Edit from the menu that appears to open the Edit a Log dialog.
The Edit a Log dialog is displayed.
-
Edit your log configuration data in the Edit a Log dialog.
Duplicate a Dynamic Log🔗
- Hover your cursor over the relevant log in the Lightrun sidebar.
-
Right-click and select Duplicate.
-
Go to the selected destination and right-click and select Duplicate.
Copy and paste a Dynamic Log🔗
-
Go to the line in your application source that contains the log to be copied. Make sure to use the source code version currently deployed to your remote app (where the agent is attached).
-
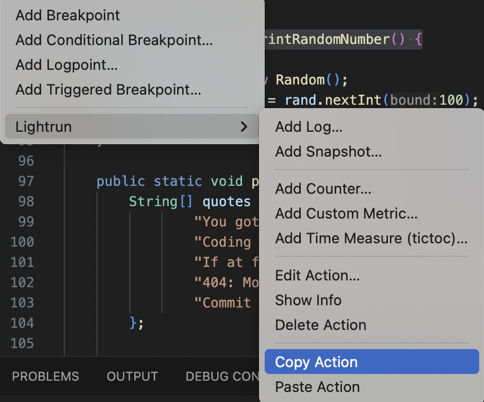
Right-click to open the VS Code context menu.
-
From the VS Code context menu, click Lightrun.
The VS Code Command Palette opens with a list of Lightrun plugin options.
-
From the Command Palette, select Copy Action.
-
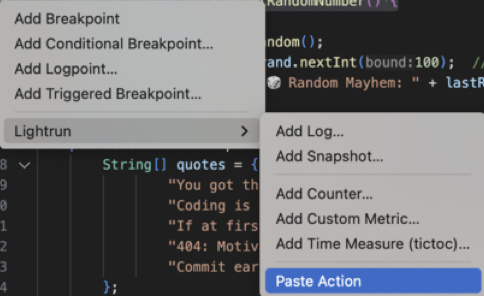
Go to the line inyour applicationsource code where you'd like to paste the copied log.
Disable a Dynamic Log🔗
- Hover your cursor over the relevant log in the Lightrun sidebar.
A toggle switch should appear.

- Click the toggle to switch from blue (on) to grey (off).
- To resume logging, click the toggle back to blue.
Delete a Dynamic Log🔗
-
Click the menu icon ... next to the log and click Delete