Configure SSO OIDC with Ping Identity for your organization🔗
🔒 Enterprise plan required. Contact Support for access.
Lightrun supports Single Sign-On (SSO) with OIDC (OpenID Connect protocol) using Ping Identity as your identity provider (IdP). Using OIDC, Lightrun functions as a service provider, receiving user authentication information from Ping Identity, which serves as the external identity provider. When SSO is enabled, Lightrun delegates authentication requests to the customer's IdP and grants users access to Lightrun in accordance with the IdPs response.
Once you have set up your SSO with OIDC, proceed to create your Lightrun users in the User Management page.
The process of setting up SSO involves these main stages:
- Setting up the Lightrun-OIDC integration in Ping Identity.
- Configuring and enabling SSO in the Lightrun Management Portal.
Set up the Lightrun OIDC integration in Ping Identity🔗
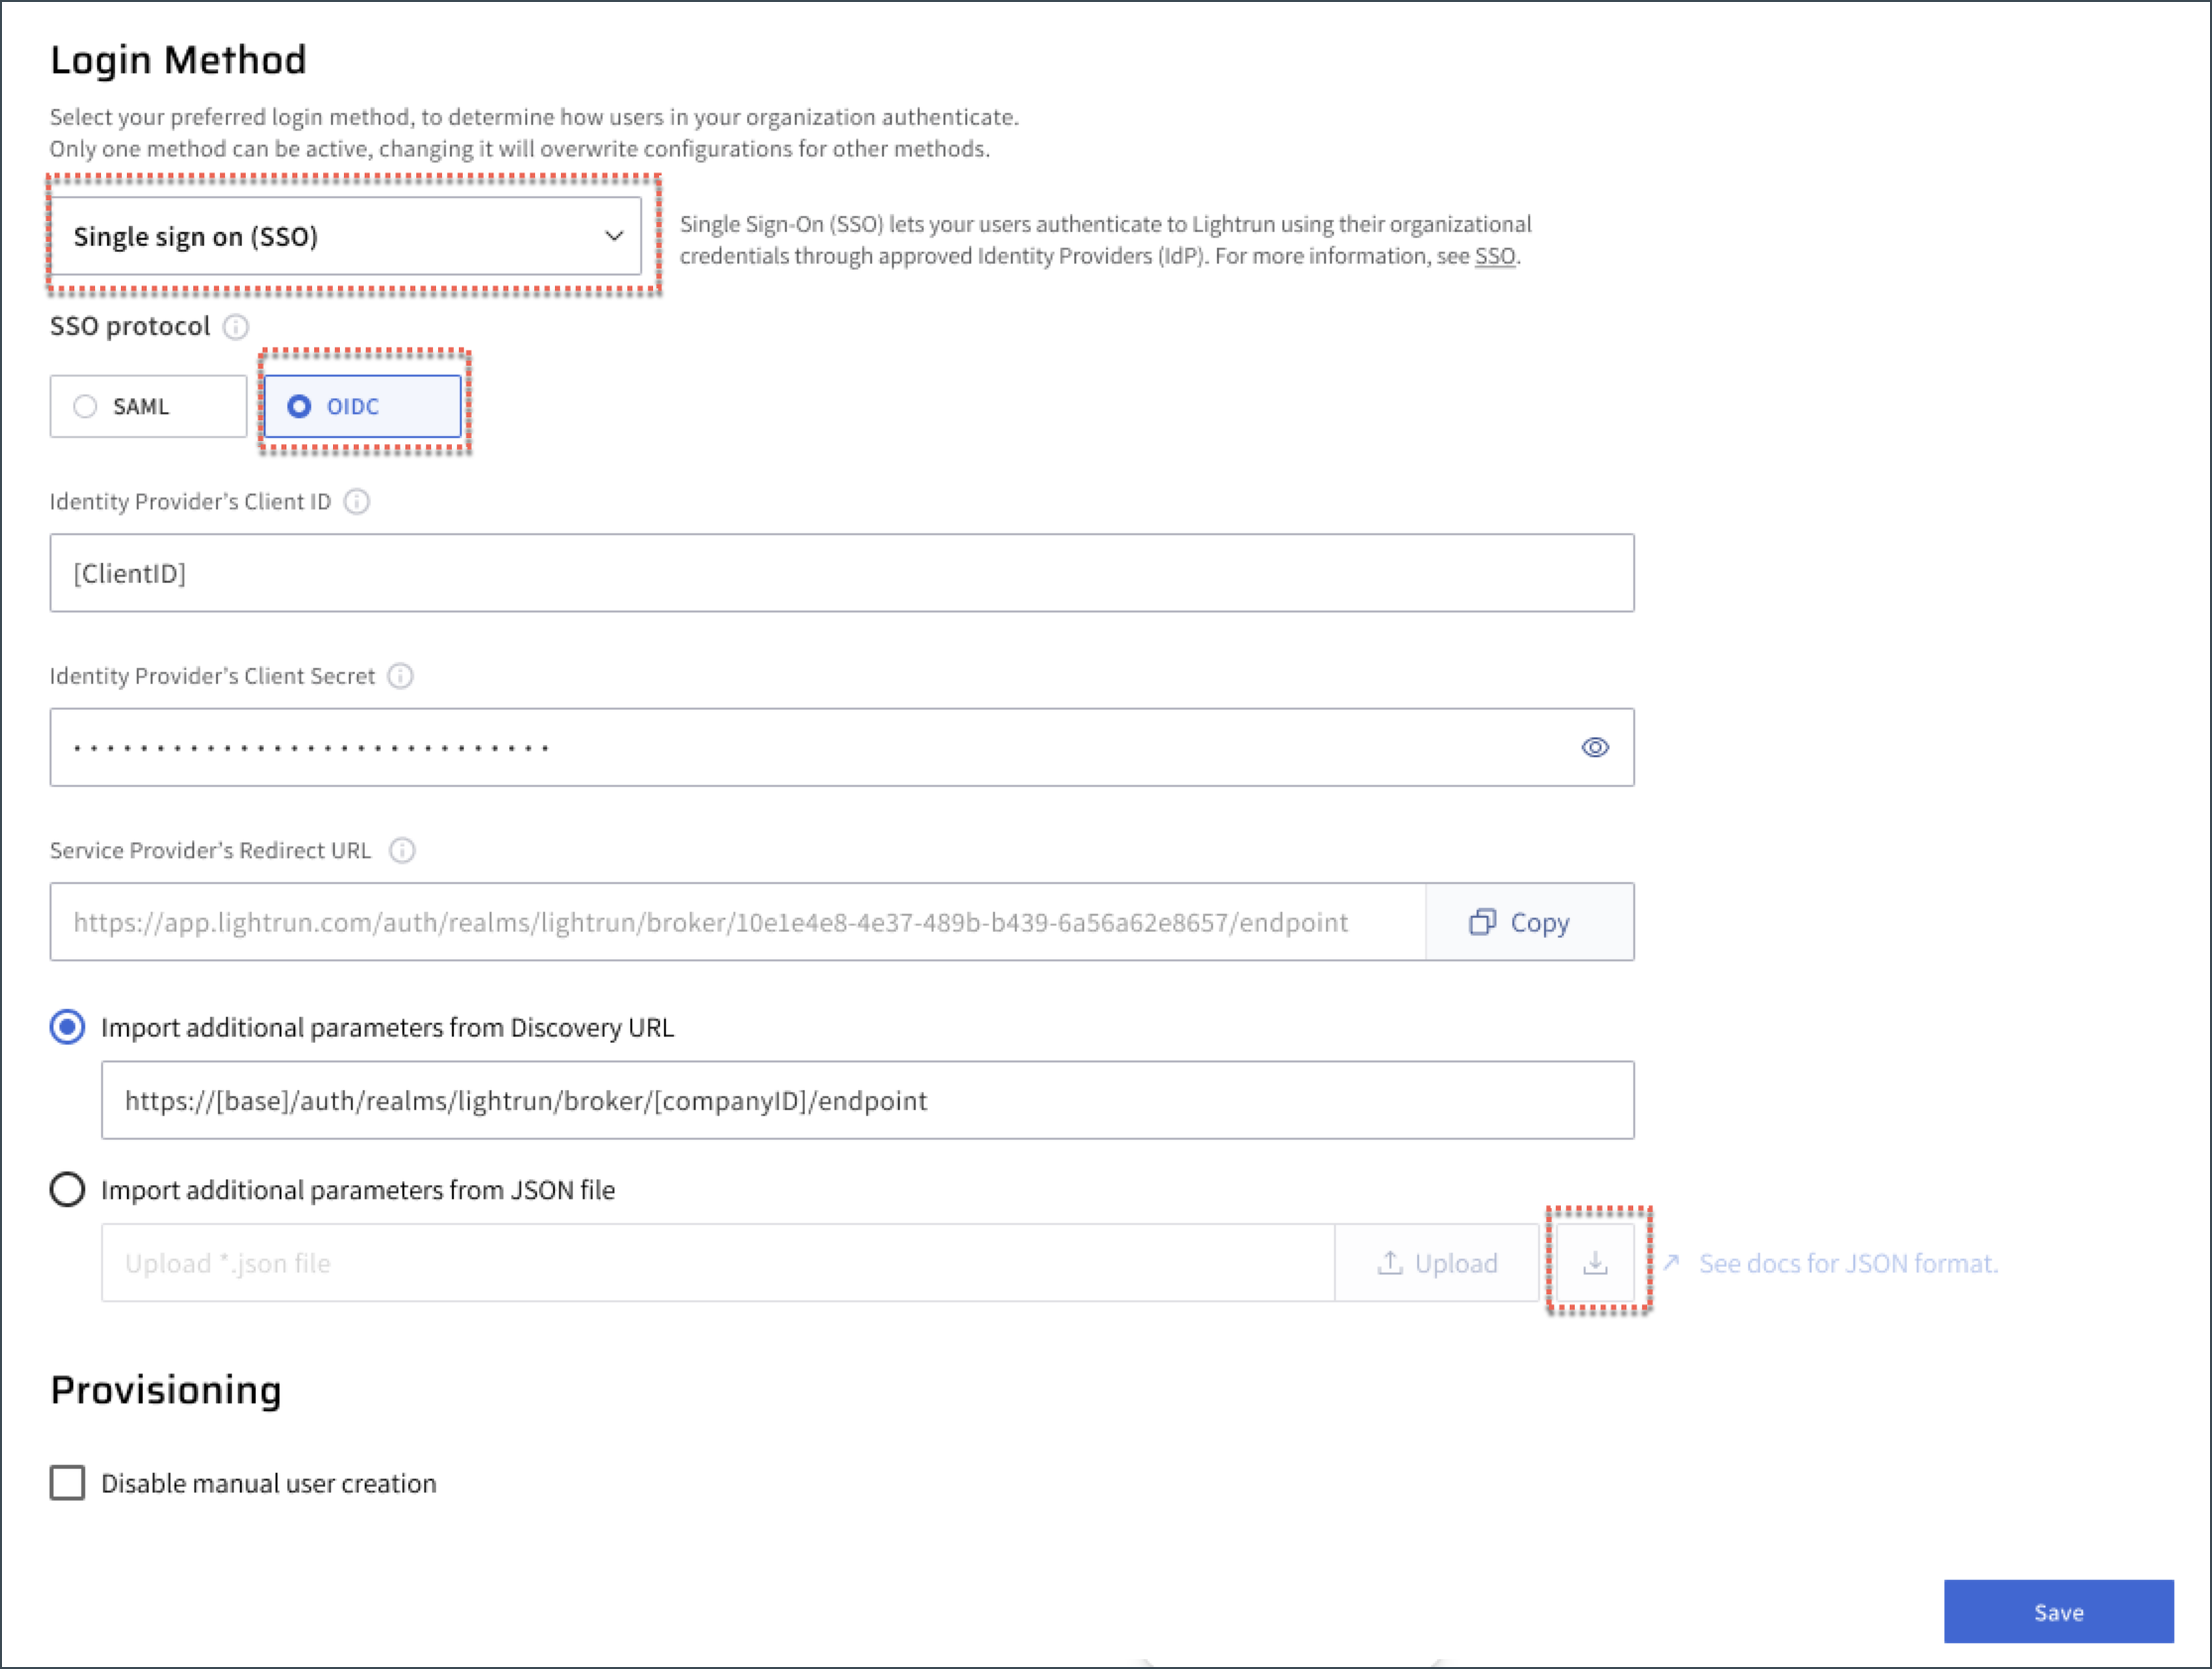
Step 1: Get Lightrun’s Redirection URL🔗
- Log in to your Lightrun Management Portal.
- Click Settings on the top right-hand side of menubar.
-
Set OIDC as your SSO Protocol based on your version:
-
For version 1.54 and higher.
- Navigate to the Identity Configuration > Login Method tab.
- From the list, select Single sign-on (SSO).
- Select OIDC as your SSO protocol.
- For version 1.53 and earlier.
- Navigate to the Identity and Access Management > Identity Configuration > Provisioning.
- Click SSO toggle to enable SSO.
- Select OIDC as your SSO Protocol.
-
-
From the Service Provider's Redirect URL field, click Copy.
This serves as the redirect URL used when configuring the identity provider. Note that at this point, SSO is not enabled with OIDC in Lightrun and will be activated in the next steps.
Step 2: Set up Lightrun Application in Ping Entity🔗
-
Create a new application for Lightrun in Ping.
Navigate to Connections > Applications and click the + (plus icon) to create the application.
-
In the Redirect URIs field, paste the URL you copied from the Lightrun SSO settings.
-
Click Edit.
The Edit Configuration page opens.
-
Click the Protocol OpenID Connect and validate that the Token Endpoint Authentication Method is set to Client Secret Post.
-
Edit the custom attribute mapping:
- Click the Attribute Mappings tab.
- Go to the Custom Attributes section and click Add Attribute.
-
Under
Attributessetsub, forPingOne MappingssetEmail Addressand forScopessetopenidas displayed in the following image.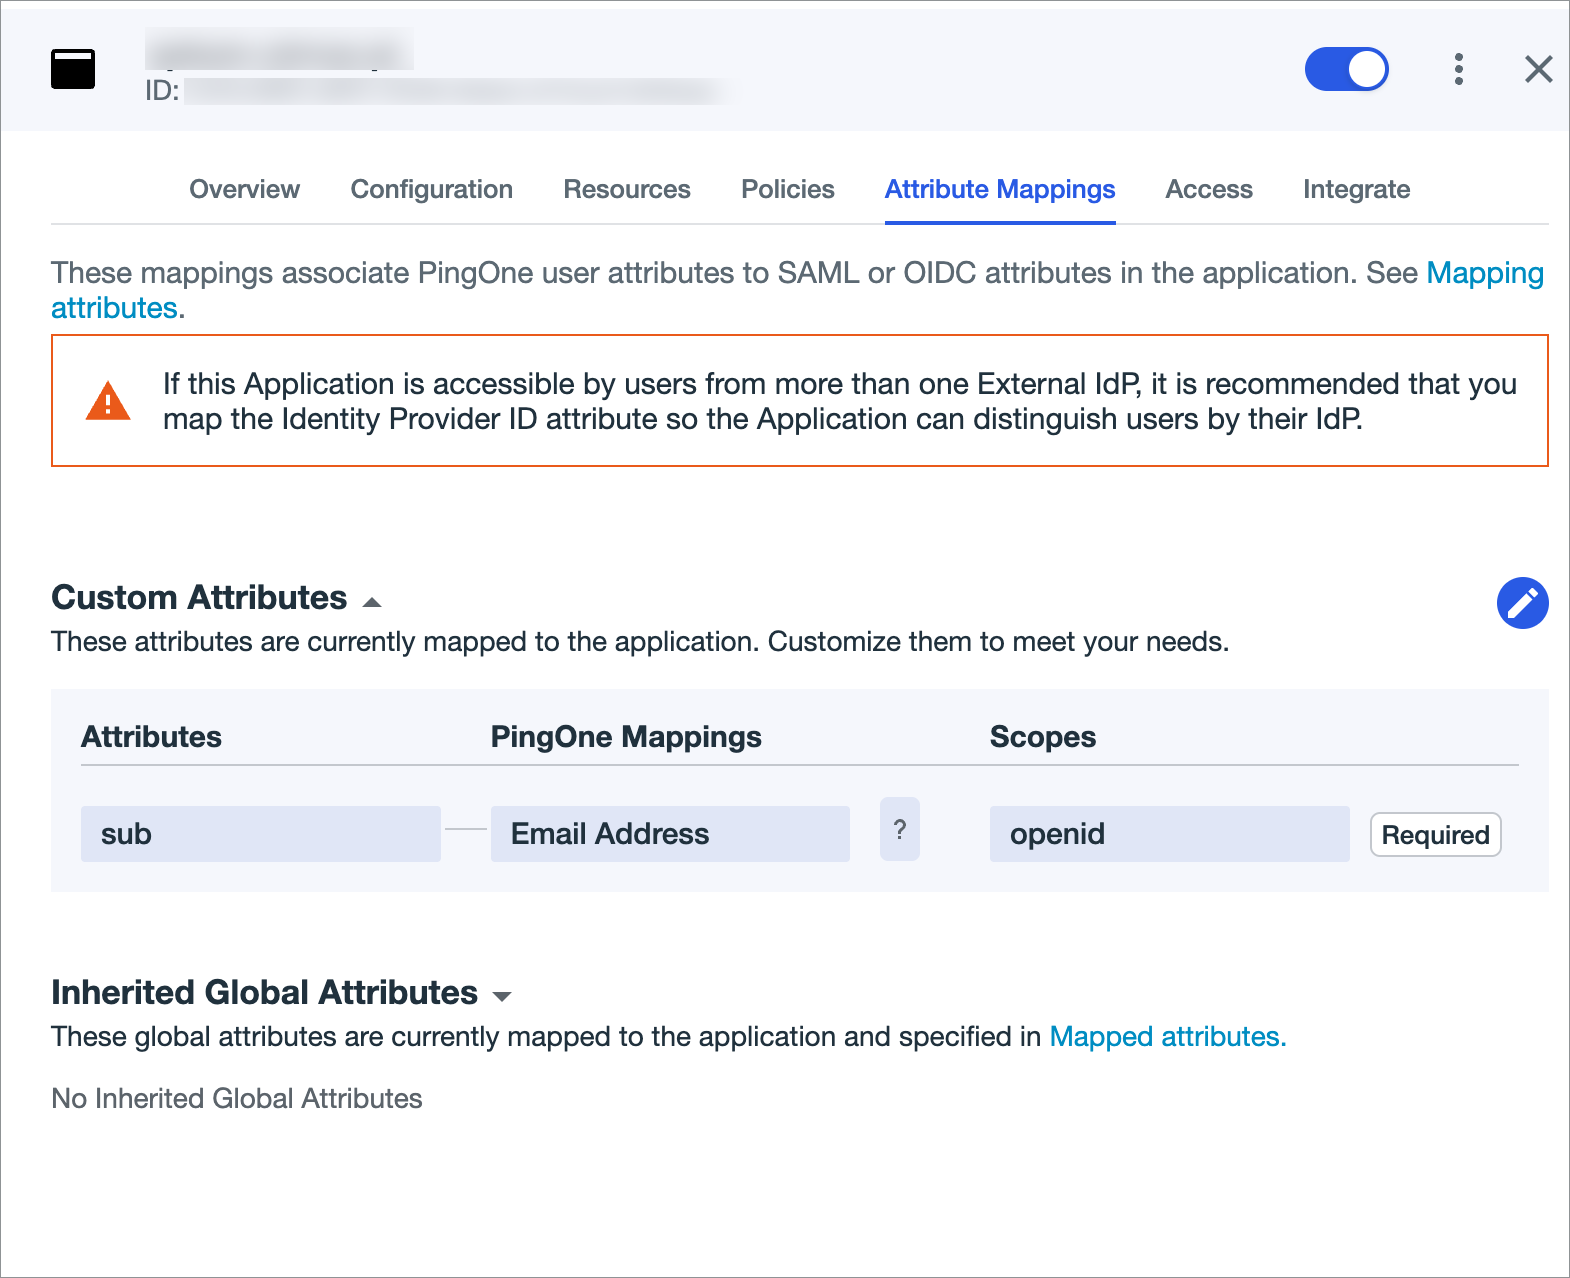
-
Click Save.
Step 3: Get Ping’s Identity Provider’s parameters🔗
-
In Ping Identity Management Portal, in the
application, click the General tab and copy the values for the Client ID and Client Secret to be pasted in the Lightrun Management Portal. 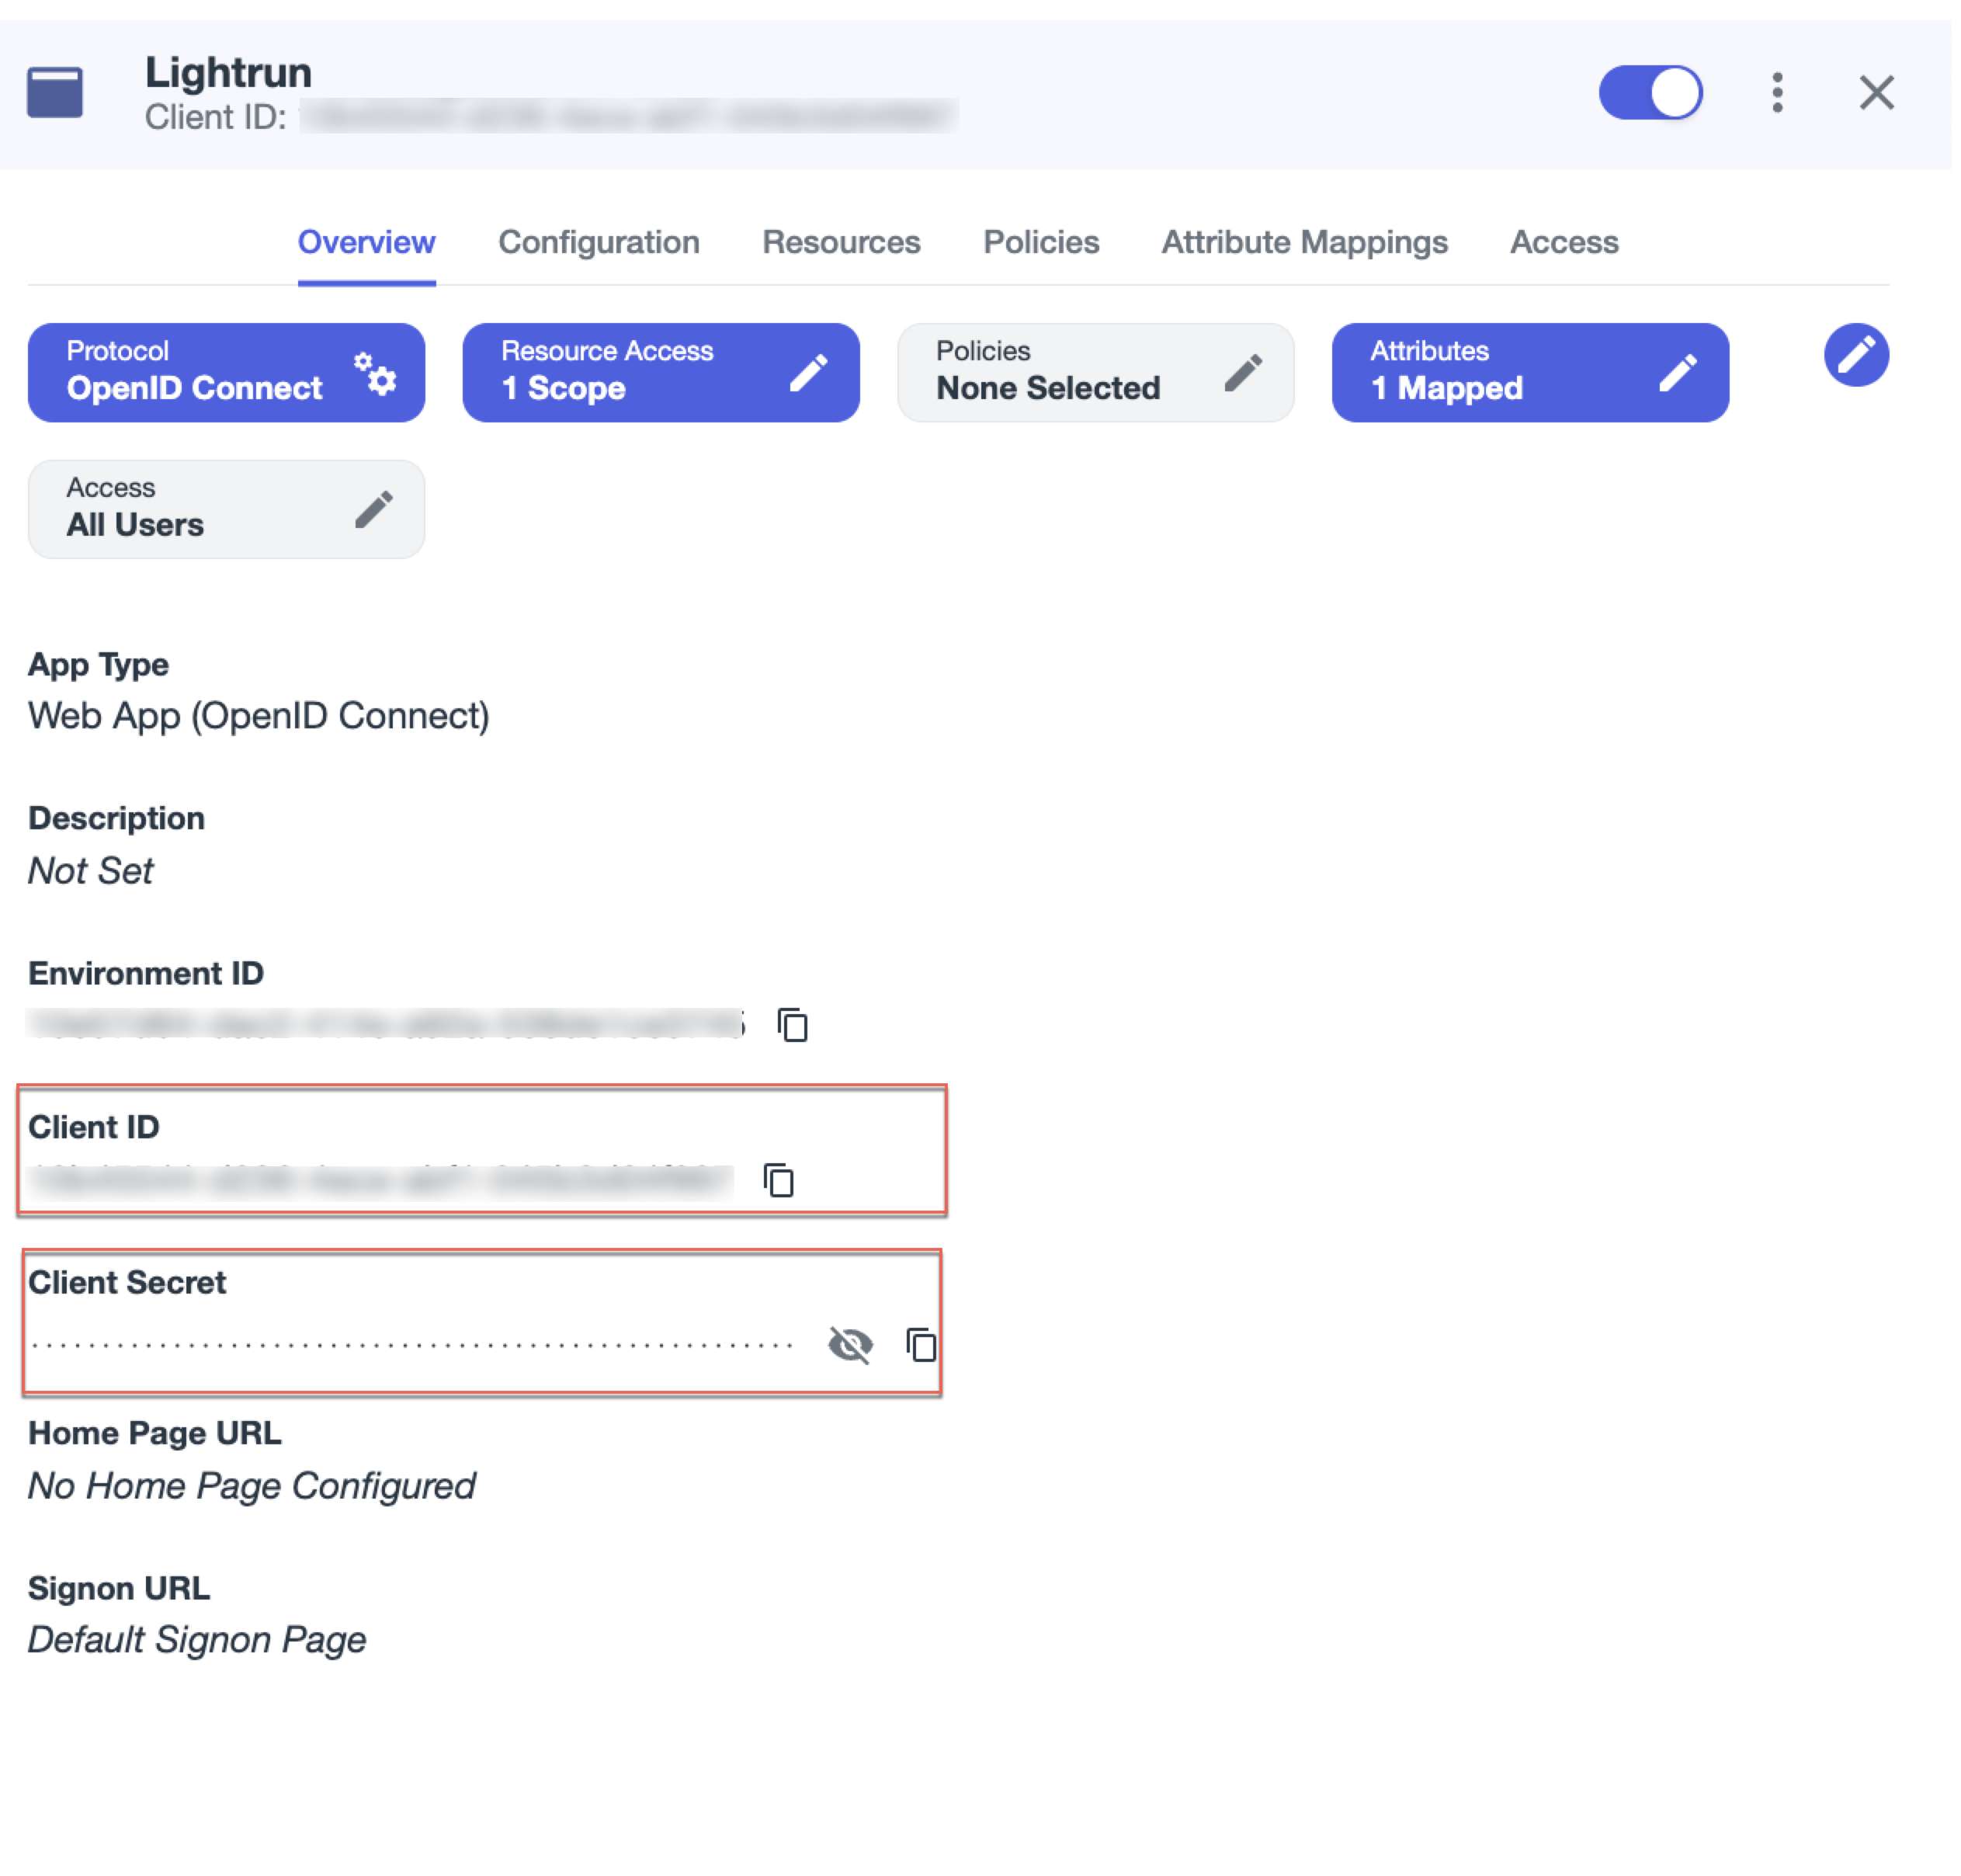
-
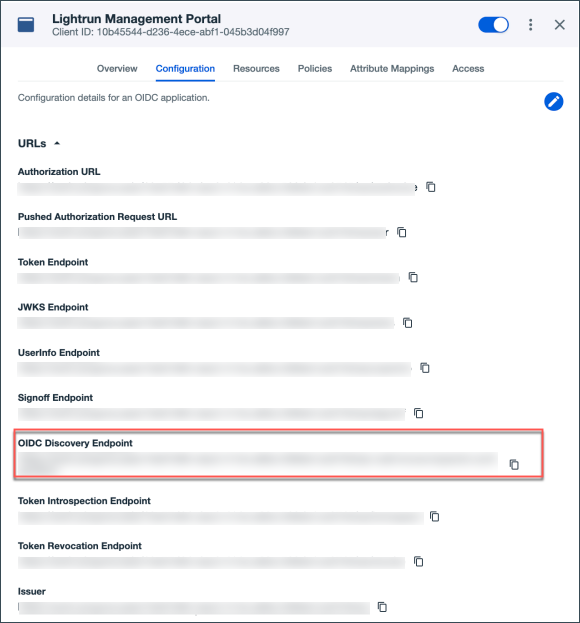
Proceed to click the Configuration tab and open the URLs tab.
This page contains the relevant URLs that will need to be placed in the Lightrun Management Portal for the SSO configuration.
-
Copy the OIDC Discovery Endpoint to the clipboard to be placed in the SSO page in the Lightrun Management Portal.
Proceed to configure the Lightrun OIDC settings in the Lightrun Management Portal.
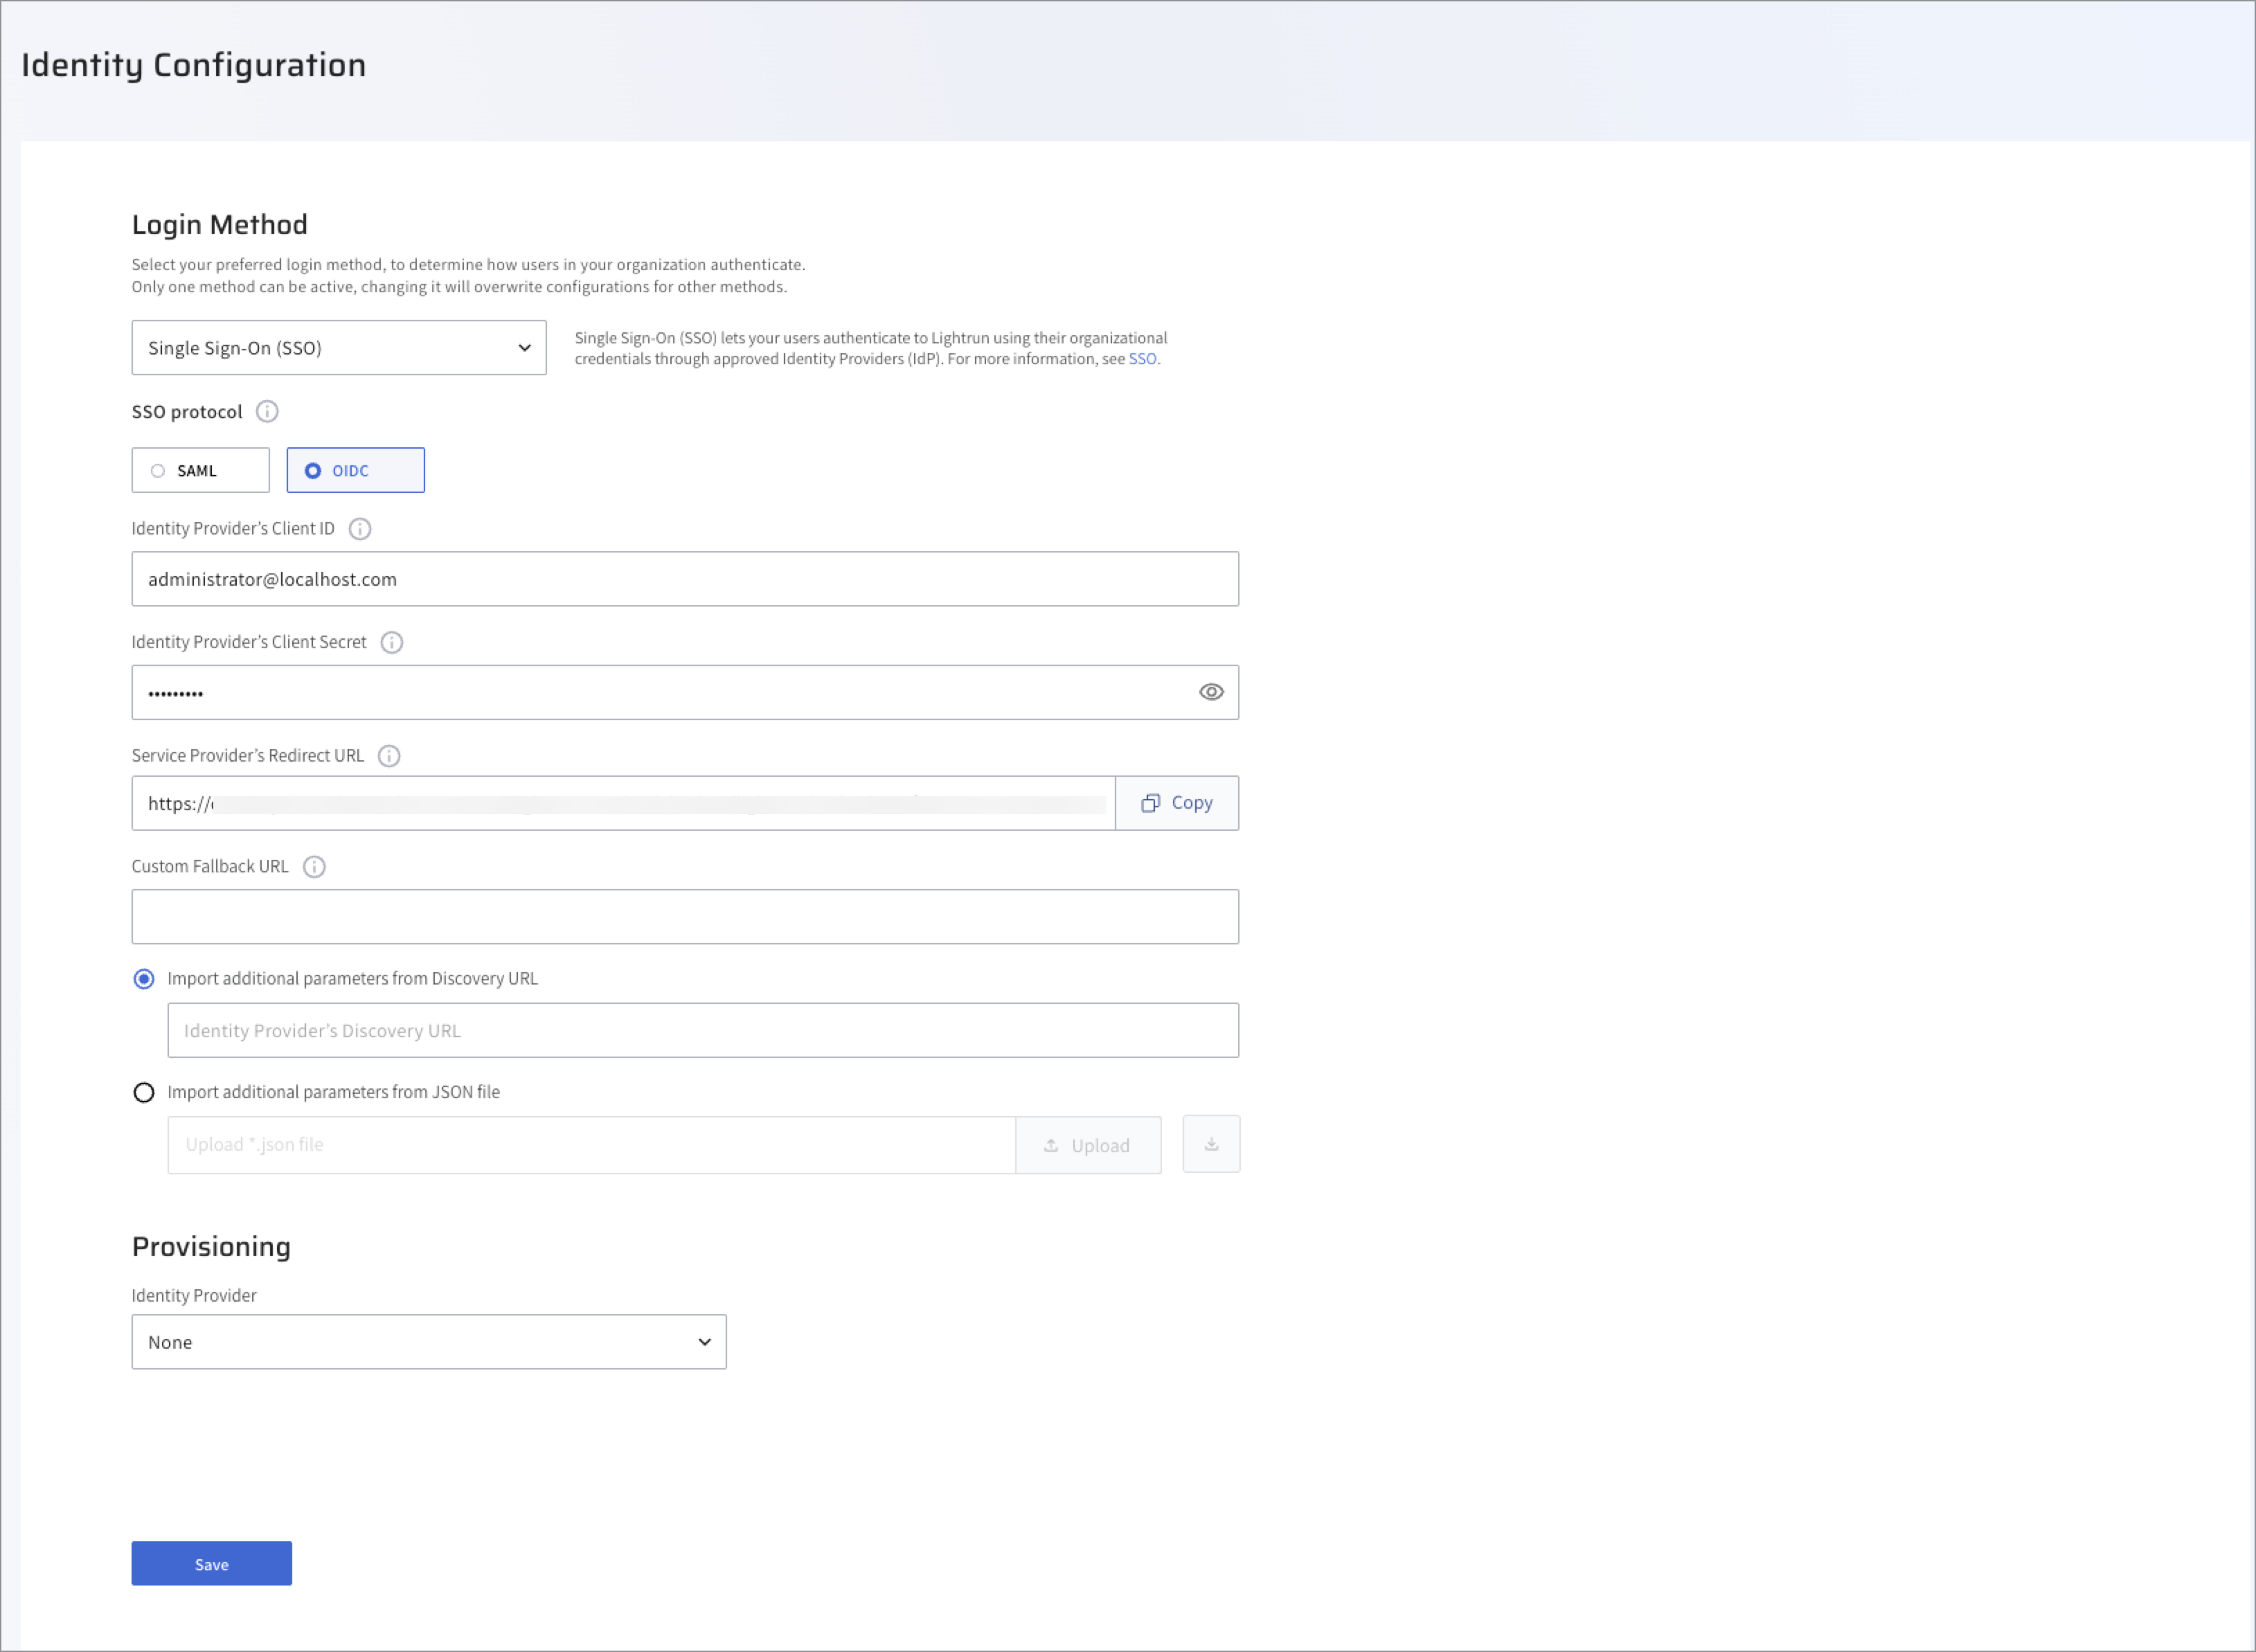
Step 4: Set up SSO OIDC Ping in Lightrun🔗
- Log in to the Lightrun Management Portal.
- Click Settings on the top right-hand side of menubar.
-
Set OIDC as your SSO Protocol based on your version:
- For version 1.54 and higher.
- Navigate to the Identity Configuration > Login Method tab.
- From the list, select Single Sign-On (SSO).
- Select OIDC as your SSO protocol.
- For version 1.53 and earlier.
- Navigate to the Identity and Access Management > Identity Configuration > Provisioning.
- Click SSO toggle to enable SSO.
- Select OIDC as your SSO Protocol.
- For version 1.54 and higher.
-
Paste the values you copied from Ping into the following fields.
- Identity Provider's Client ID: The unique identifier assigned to Lightrun by Ping.
- Identity Provider’s Client Secret: The secret key assigned to Lightrun by Ping for the OIDC authentication.
-
Provide the Identity Provider’s addiitional parameters.
Choose one of the following methods:
-
Select the Import additional parameters from Discovery URL option.
Enter the following URL, where
<CUSTOMER_NAME_HERE>is the domain name of your Ping setup, as follows:https://<CUSTOMER_NAME_HERE>.ping.com/.well-known/openid-configuration.
- [Supported from version 1.61] Select the Import additional parameters from JSON file option.
If your identity provider does not support discovery URLs, you can create using a JSON file that includes all necessary parameters and upload it to the SSO OIDC settings page.
a. Open a text editor (e.g., Notepad, VS Code).
b. Copy and paste the JSON structure as displayed as follows.
Example JSON format:{ "useJwksUrl": "true", "jwksUrl":"https://your-idp.com/.well-known/jwks.json", "authorizationUrl":"https://your-idp.com/oauth2/authorize", "tokenUrl": "https://your-idp.com/oauth2/token", "userInfoUrl": "https://your-idp.com/oauth2/userinfo", "logoutUrl": "https://your-idp.com/logout", "issuer": "https://your-idp.com", "defaultScope": "openid email profile" }Your JSON must include the following parameters:
Parameter Description useJwksUrlIndicates whether to use the JWKS URL for verifying tokens. Set to "true"to enable.jwksUrlThe URL to the JSON Web Key Set used to validate ID tokens. authorizationUrlThe URL used to initiate the login flow. tokenUrlThe URL used to exchange the authorization code for an access token. userInfoUrlThe URL to retrieve user profile information using the access token. logoutUrlThe URL to redirect users for logging out of the identity provider. issuerThe expected iss(issuer) claim in tokens. Must match what the identity provider issues.defaultScopeList of scopes requested during login. Typically includes openid,email, andprofile.c. Replace each placeholder (e.g.,
<your-issuer-url>) with actual values from your identity provider (such as Ping).d. Click Upload.
-
-
[Optional, supported from version 1.66] In the Custom Fallback URL field, enter a URL to redirect users to if the SSO login process cannot be completed. This is useful for guiding users to your company’s helpdesk, support portal, or an alternative login page. If left empty, users see a default error message.
-
Click Save.
Download a Ligthrun OIDC-Config JSON file🔗
- Log in to your Lightrun account.
- Click Settings on the top right-hand side of the menu bar.
- Navigate to the Identity Configuration > Login Method tab.
- From the list, select Single Sign-On (SSO).
- Select OIDC as your SSO protocol.
-
Under the Import additional parameters from JSON file field, click the download icon.