Provision users with LDAP🔗
🔒 Enterprise plan required. Contact Support for access.
Note
Provisioning users with LDAP is supported for self-hosted Lightrun deployments.
Lightrun supports integration with Lightweight Directory Access Protocol (LDAP) directories, allowing centralized management of users and groups through your existing directory service. You can map LDAP groups to Lightrun roles directly from your directory. Synchronization is periodic and configurable, so changes in the directory may take time to take effect. Lightrun supports provisioning, updating, deprovisioning, and deletion of users based on the synced data.
Prerequisite🔗
- SSO configuration: SSO must be enabled in the Identity Configuration page located under the Identity and Access Management tab. For more information, see SSO overview.
Set up LDAP provisioning in Lightrun🔗
- Log in to your Lightrun account.
- Navigate to the Identity and Access Management > Identity Configuration > Provisioning section.
-
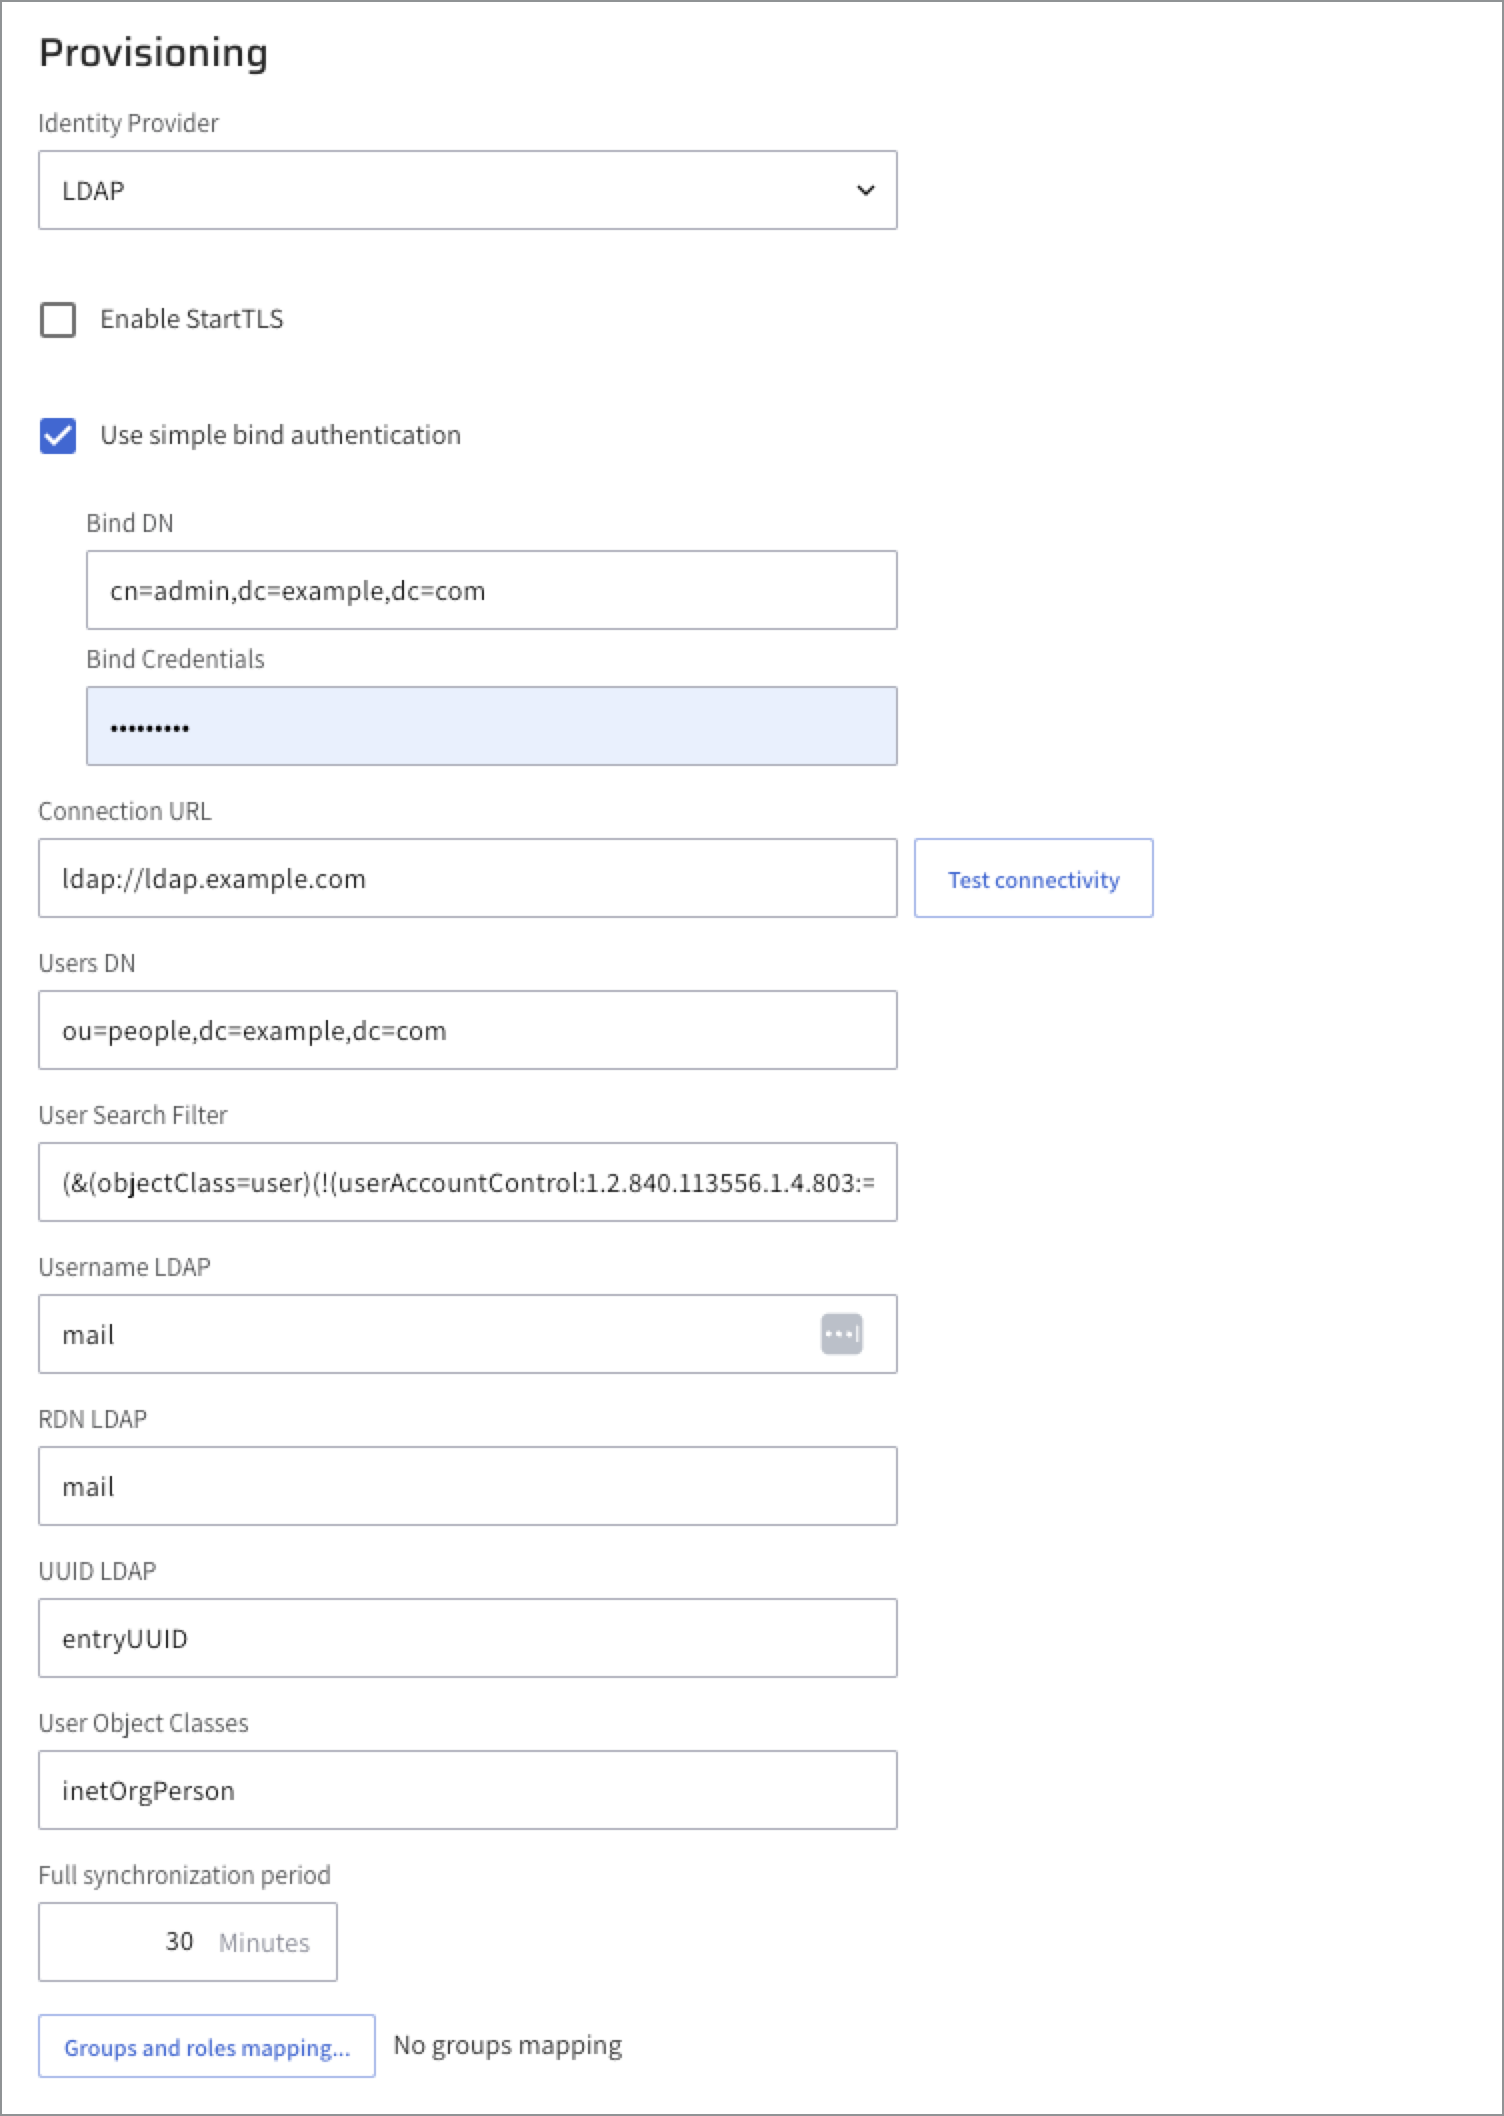
From the Identity Provider drop-down list, select LDAP.
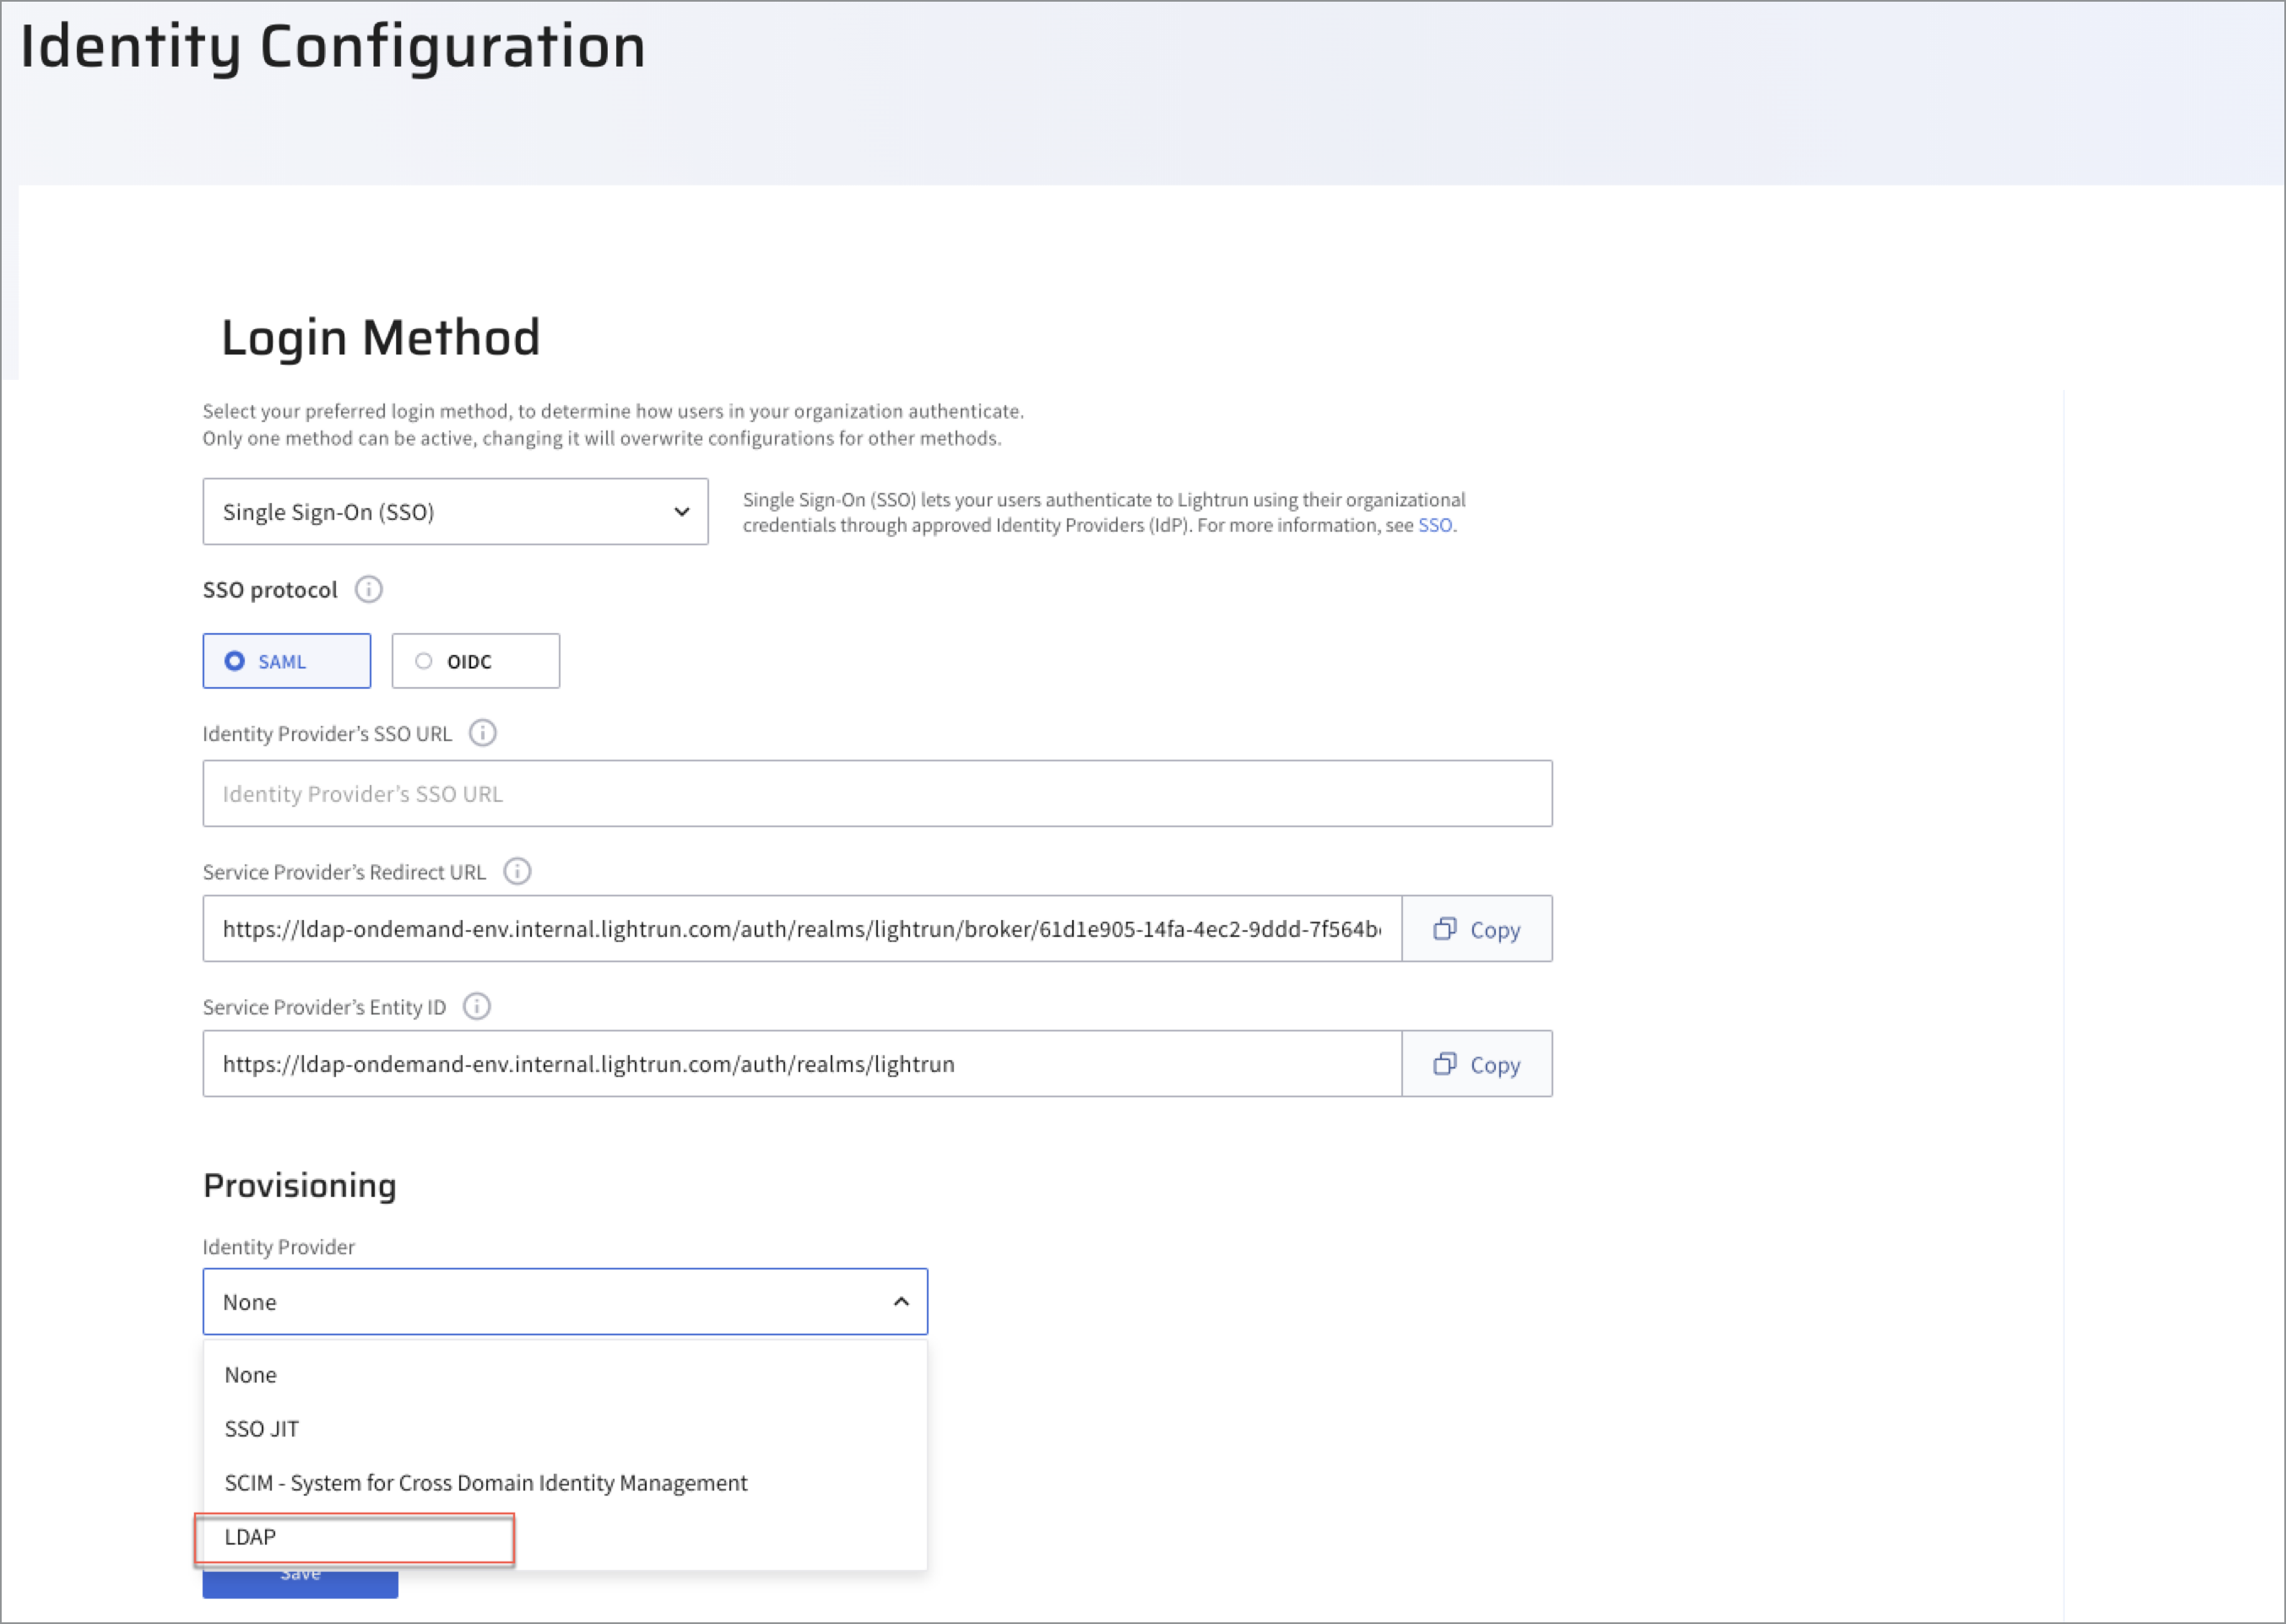
A list of LDAP-specific parameters is displayed.
-
Configure these LDAP-specific fields.
Obtain the required values from your directory service provider or system administrator. All fields are mandatory. If you are using Microsoft Active Directory, your IT team can supply the correct values based on your organization's directory structure and security settings.
- Connection URL: The URL used to connect to your LDAP server, including the protocol, hostname, and optionally a port number.
Click Test Connectivity to validate the connection to your LDAP server.
Example:
ldap://demo-ldap-test.
- Enable StartTLS: Enables StartTLS to upgrade an insecure LDAP connection to a secure one using TLS (typically over port
389).
-
Enable Use simple bind authentication: Uses simple bind authentication, (transmitting the user's DN and password in plain text). Only use this method over a secure connection (TLS or StartTLS).
- Enter the Bind DN: The full Distinguished Name (DN) of the service account used to connect to the LDAP directory. This account must have read access to the relevant LDAP entries.
- Set the Bind Credentials: The password for the service account specified in the Bind DN.
- Users DN: The base DN from which the system begins searching for user entries in the LDAP directory. All user records must exist under this DN for authentication and provisioning to succeed. Example attribute: mail (represents the user’s email).
-
User Search Filter: [Supported from version 1.64.1] Define a custom LDAP filter to control which user entries are included during synchronization.
Use standard LDAP filter syntax to match only the desired users.
- Example (by users):
(&(objectClass=user)(!(userAccountControl:1.2.840.113556.1.4.803:=2)))
- Example (by group):
(memberOf=CN=DevTeam,OU=Groups,DC=example,DC=com)
This field is optional. If left blank, all user entries under the defined base DN will be considered.
- Example (by users):
-
Username LDAP: The LDAP attribute used for user login. Its value matched against the login input to identify the user.
Example:
Attribute: mail.
-
RDN Attribute: The Relative Distinguished Name (RDN) attribute used when identifying or creating user entries in LDAP. It forms part of the user’s full DN as is often the same as the Username LDAP attribute (for example,
uidorsAMAccountName).Example:
uid=jdoe,ou=users,dc=example,dc=com.
- UUID LDAP: The attribute that uniquely identifies a user in LDAP (for example,
entryUUID,objectGUID). This ensures consistent user identity across synchronization cycles. User Object Classes: One or more object classes that define the schema for user entries (for example,inetOrgPerson,organizationalPerson).
-
Full synchronization period: The interval, in minutes for full synchronization between the LDAP directory and Lightrun. During this process, all users and groups under the configured base DNs are re-synced.
Default:
30minutes.
- Connection URL: The URL used to connect to your LDAP server, including the protocol, hostname, and optionally a port number.
-
Click Save.
Note that you can perform manual synchronization, by clicking Sync Now.
You will get the following message, indicating the number of users that have been imported and updated.

The LDAP users are automatically added to the User Management page in the Lightrun Management Portal.
-
To view them, navigate to Identity and Access Management > Users.
Note that in the User Management table, the Managed By column indicates that the users are managed by LDAP. Users are read-only and cannot be manually added or invited through the UI.
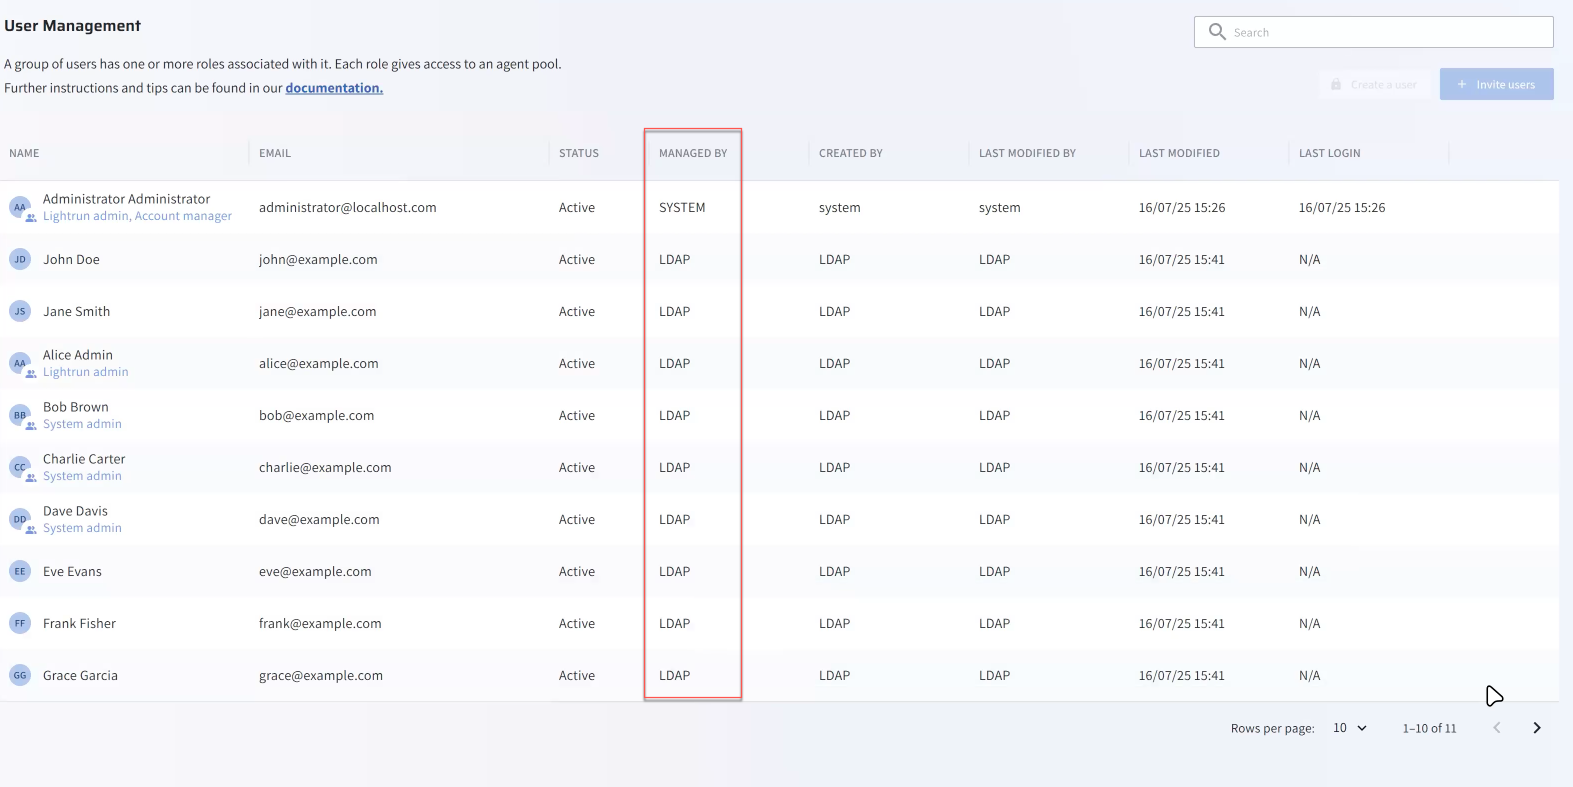
Once a user is provisioned by LDAP, they are automatically added to the User Management page in the Lightrun Management Portal and the following applies:
- Users will be marked as managed by LDAP and locked for editing, similarly to SCIM.
- The user's properties and assigned roles will be locked. Only group assignments will remain editable and are expected
to be assigned manually in Lightrun. This means that roles will only be assigned through LDAP group-to-role mappings.- If, during provisioning, the user’s email already exists in Lightrun, the existing user will be overridden and changed to be managed by LDAP (with all of the above restrictions applied).
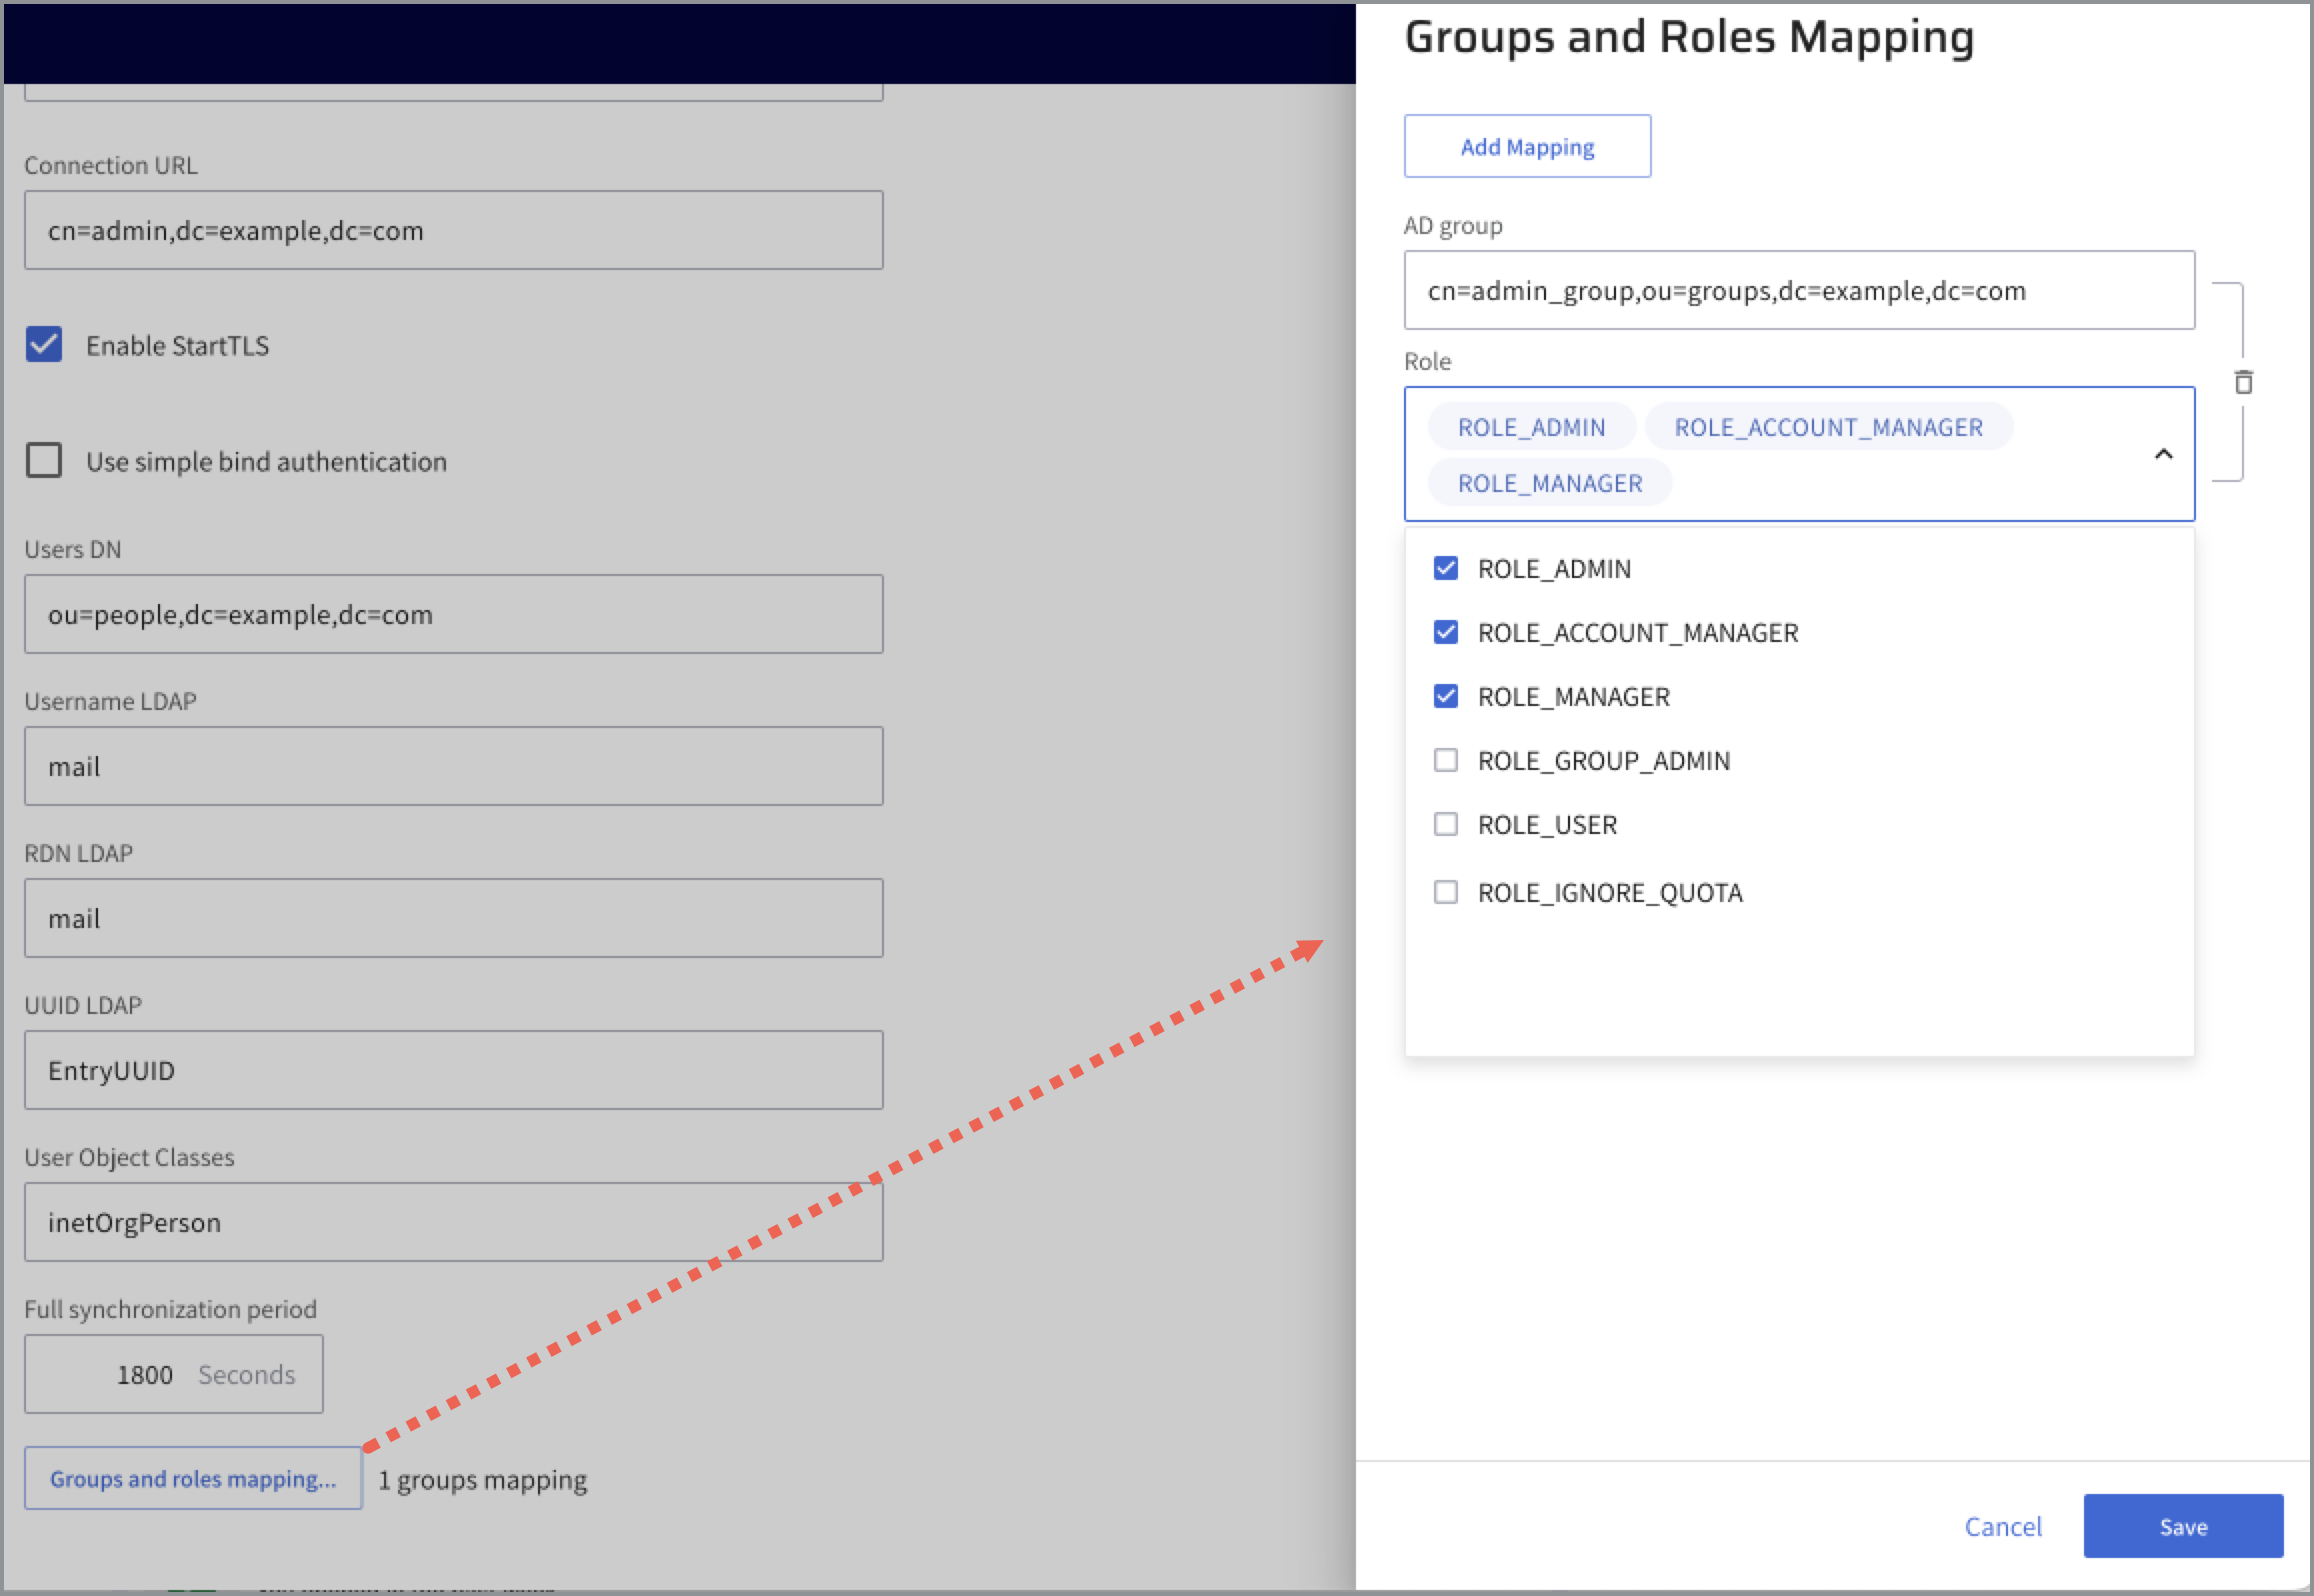
Set up group and role mappings🔗
Group and role mappings let you control which Lightrun roles are assigned to LDAP users based on their directory groups. Once LDAP is enabled, Lightrun roles can only be assigned through these mappings. If no mapping is defined, users are assigned to the default Lightrun user role.
-
Under the LDAP section, click Groups and roles mapping….
The Group and Roles Mapping dialog opens.
-
Click Add Mapping.
-
From the AD group drop-down list, select the LDAP group that you would like to map to the predefined Lightrun roles.
You can add one or more roles.
-
Click Save.
The mapping is added to the list and the dialog closes.
-
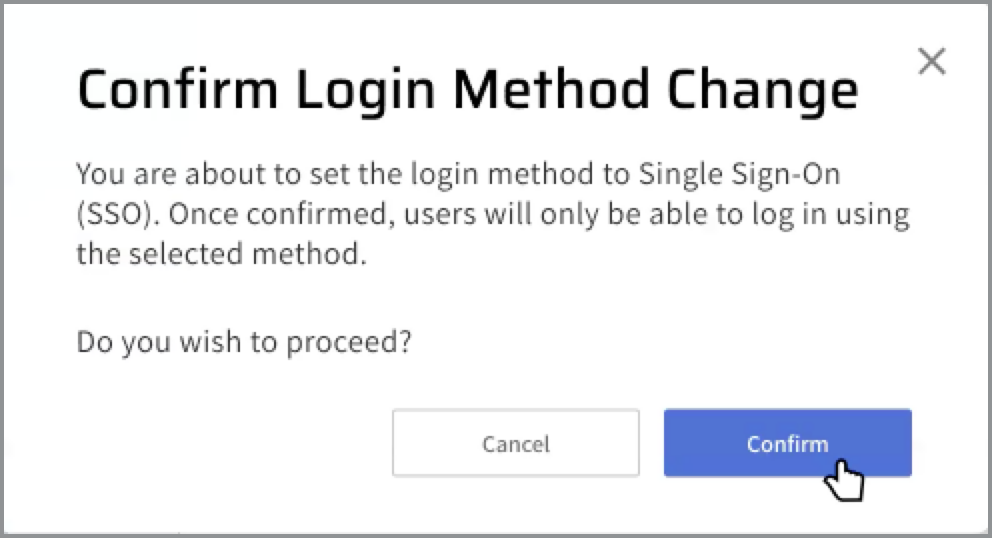
In the main LDAP page, click Save.
The Confirm Login Method Change dialog opens.
-
Click Confirm.
LDAP provisioning is now fully set for your Lightrun deployment.
Return to your LDAP setup and confirm that the Lightrun parameters are set correctly and that the user name, last name and email attributes are mapped correctly to Lightrun.
Deactivate LDAP in the Ligthrun Management Portal🔗
- Log in to your Lightrun account.
- Navigate to the Identity and Access Management tab > Identity Configuration > Provisioning section.
- From the Identity Provider drop-down list, select None or any alternative system.
- Click Save. Changes are automatically applied to the users.
-
To view the changes, navigate to Identity and Access Management > Users.
The User Management page opens.
-
Verify the following:
- The Status column shows the LDAP users are set as Deactivated.
- The Managed by column has changed from LDAP to System.