Deploy Lightrun on AWS Lambda with Lambda layers🔗
Overview🔗
To take advantage of Lightrun’s functionality in your AWS Lambda function, you must deploy Lightrun’s agent library with your project. One of the ways to import the additional code (frameworks, SDKs, libraries, and more) into a Lambda function is to bundle the function with an AWS Lambda Layer.
In this tutorial, you will learn how to package the Lightrun Node.js agent into a Lambda layer and integrate the packaged agent into your Node.js AWS Lambda function.
Note
These instructions are valid only for AWS Lambda functions deployed as a .zip file archive.
Prerequisites🔗
This tutorial assumes that you have:
- A Lightrun account.
- An AWS account.
Create a Lambda layer🔗
An AWS Lambda Layer is a .zip file archive containing libraries, configuration files, dependencies, etc., that you can import into your Lambda function at runtime.
To create an AWS Lambda layer for the Lightrun Node.js agent,
-
Compile the Lightrun Node.js agent into a
.zipfile archive.Compile the Lightrun Node.js agent into a .zip archive
To compile the Lightrun Node.js agent into a zip file archive.
- Create a new directory that will be used to store the Lambda layer.
mkdir lambda_layer cd lambda_layer - Initialize NPM in the new directory. A
package.jsonfile will be generated for the directory.npm init -y - Install Lightrun
npm install lightrun - Add the following build script to the generated
package.jsonfile."scripts": { "build": "npm install && mkdir -p nodejs && cp -r node_modules nodejs/ && zip -r layers.zip nodejs" } - Generate your
.zipfile archive.Anpm run buildlayers.zipfile will appear in thelambda_layerfolder.
Important
Installed dependencies in a Node.js Lambda layer must be stored in a
nodejs/node_modules/{our libraries}ornodejs/<node-version>/node_modules/{our libraries}file path for the dependencies to be discovered by a Node.js Lambda function. You can learn more about Lambda layer paths here. - Create a new directory that will be used to store the Lambda layer.
-
Create a Lambda layer with the
.zipfile archive. You can do this in two ways:-
Create a Lambda layer via the AWS console
To create an AWS Lambda layer from your AWS console.- Navigate to the AWS Lambda console, and open the Layers page of the console.
- Click Create Layer.
- Specify a name for the new Lambda Layer.
- Upload the generated
layers.zipfile. - Select the compatible architecture and runtime for your
.zipfile (we will be using thex86_64architecture andNode.js 24.xas our preferred runtime environment). - Click Create.
The new Lambda Layer is now available to your Node.js Lambda functions.
-
Create a Lambda layer with the AWS CLI
Important
The following instructions assume that you have the AWS CLI installed on your local machine. Follow the instructions here to install and set up the AWS CLI on your local machine if you haven’t already.
To create an AWS Lambda layer with the AWS CLI, run the following command in your terminal.
aws lambda --region us-east-1 publish-layer-version --layer-name 'Lightrun_Package_node' --compatible-runtimes 'nodejs24.x' --zip-file fileb://layers.zipChange
Lightrun_Package_nodeto your preferred layer name, changeus-east-1to your preferred region, andnodejs24.xto your desired Node.js runtime environment. If the deployment is successful, you should get a response similar to the following in your terminal.{ "Content": { "Location": "<aws_location_key>", "CodeSha256": "xlEgSfODxZDY/vL9lBg09JASgNIsC+AlMfHpFdRgyNo=", "CodeSize": 10172940 }, "LayerArn": "<layers_arn>", "LayerVersionArn": "<layers_version_arn>", "Description": "", "CreatedDate": "2025-11-26T05:41:01.684+0000", "Version": 1, "CompatibleRuntimes": [ "nodejs24.x" ] }Note
Note the
LayerVersionArnkey that was highlighted above, the key will be required for attaching the created Lambda layer to Lambda functions with the AWS CLI.
-
Share the Lambda layer to your application🔗
After compiling the Lightrun Node.js agent into a .zip file archive and uploading it to AWS as a Lambda layer, the next step is to add the Lambda layer to the Lambda functions. You can do this in two ways:
Add the Node.js agent Lambda layer to your application via the AWS Console🔗
If you have already deployed your Node.js function to AWS, you can easily attach the Lambda layer to the Lambda function in your AWS Console. To do that,
-
Open the Functions page in your AWS Lambda console, and select the relevant Lambda function.
-
Navigate to Configurations > Environment variables > Edit.
-
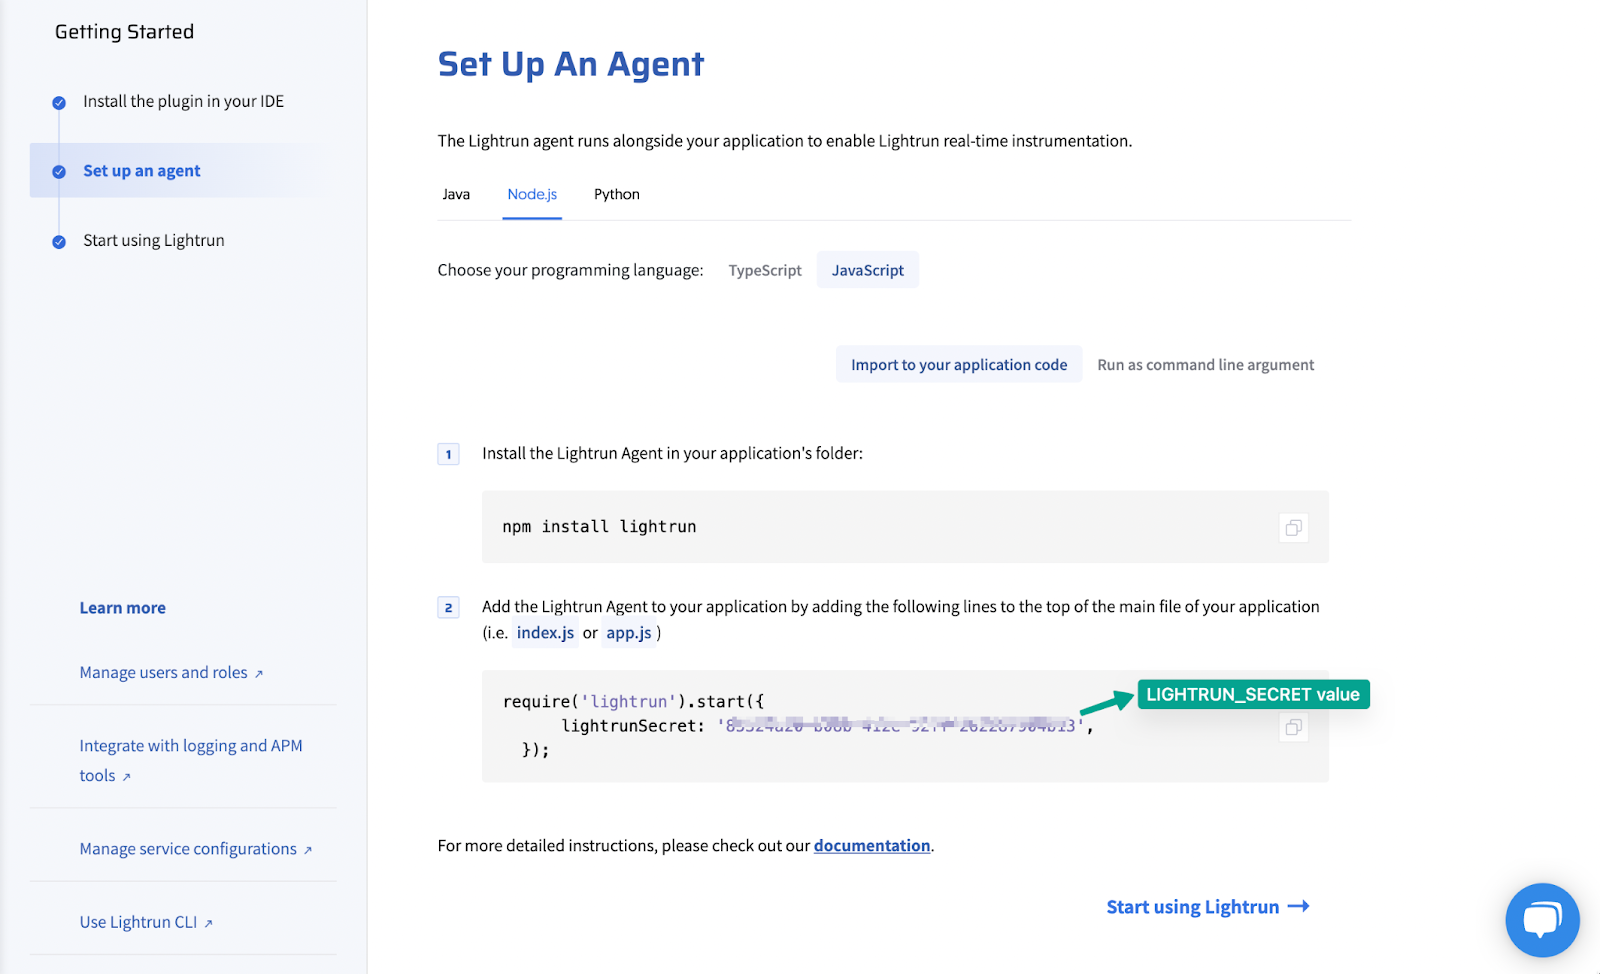
Set the variable name to
LIGHTRUN_SECRETand copy the value from your management portal.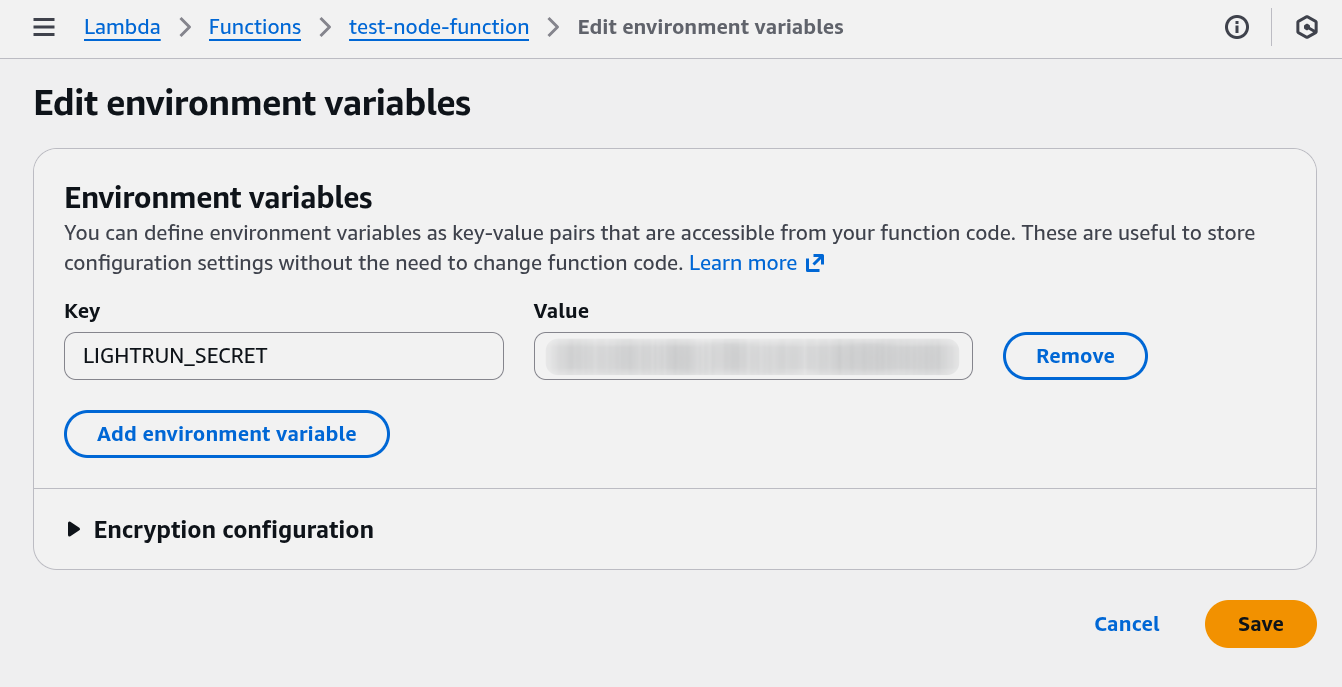
-
Wrap your Lambda function Code source with the
lightrun/lambdamodule. Thelightrun/lambdamodule ensures that the Lightrun agent is enabled before calling the serverless function, and also disables the Lightrun agent when the function call finishes so that it can properly handle the next call to the serverless function.const lightrun = require("lightrun/lambda"); const handlerFunc = async (event, context) => { // <lambda function source code here> } exports.handler = lightrun.wrap(handlerFunc, { metadata: { registration: { displayName: "<lambda_function_name>", tags: ['<lambda_function_name>'] } }, agentLog: { logsPath: "", level: "info" } } );Note
Change
<lambda-function-name>to your Lambda function's name. -
Click Deploy to update the code source.
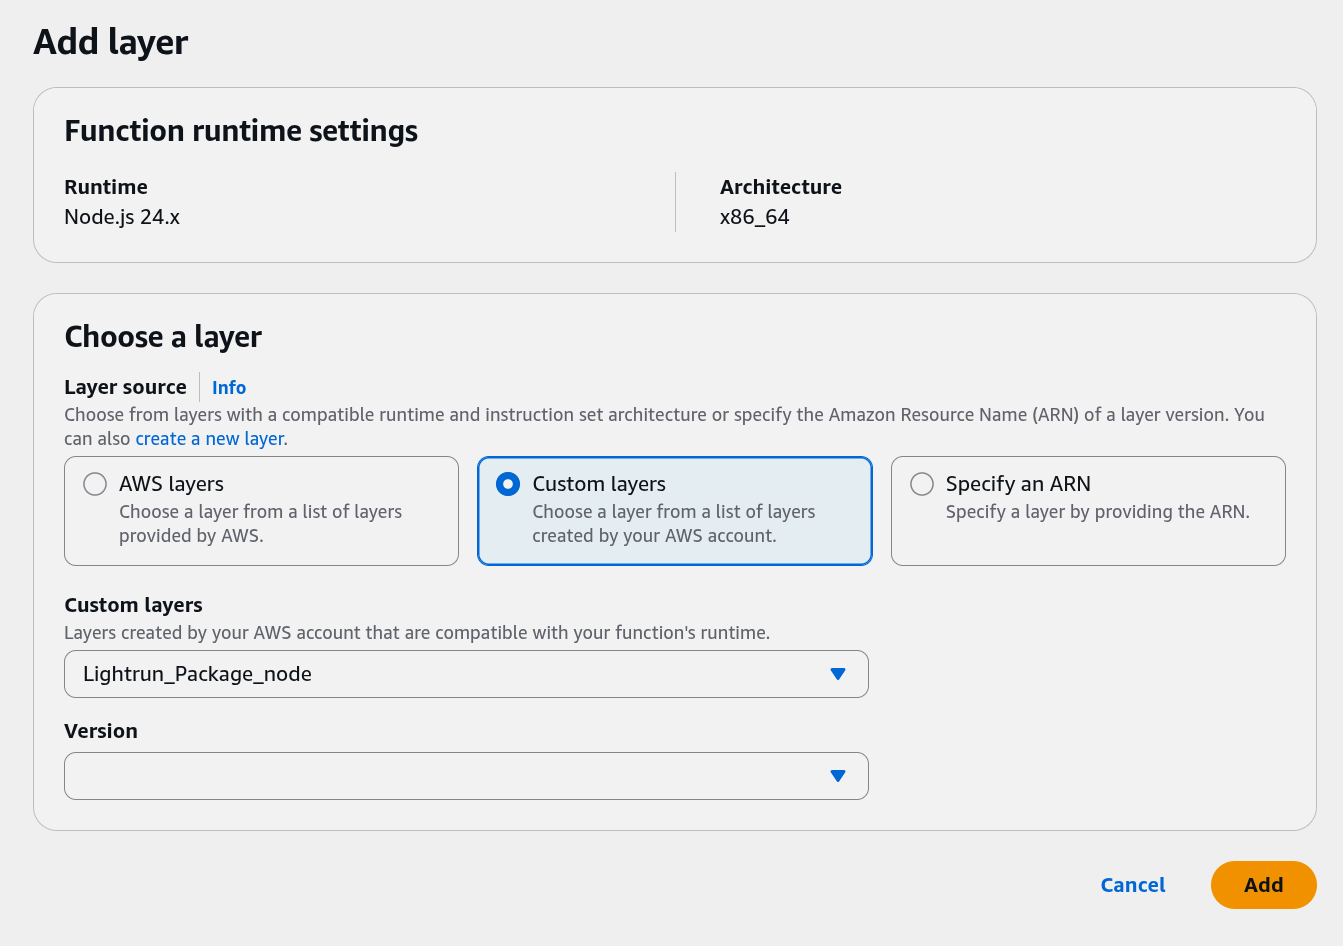
- Scroll down to the Layers section, and select Add a layer.
- Click Custom layers and select the appropriate layer from the drop-down list.
-
Pick a version and click Add to attach the layer to your Lambda function.
Important
AWS Lambda functions are event-driven short-running programs with a maximum execution time of 15 minutes. To debug AWS Lambda functions with the Lightrun Node.js agent:
-
Specify
lightrunWaitForInit: trueandlightrunInitWaitTimeMs: 10000in the Lightrun Node.js agent configuration. These two configuration parameters will block the lambda function execution till first time breakpoints are fetched from the Lightrun server and ensures that the Lightrun agent has time to communicate with the Lightrun server before the short-running application disconnects. -
Apply Metadata tags that include the name of your Lambda function. By adding our function’s name as a metadata tag, we can attach Lightrun actions to agents created whenever the Lambda function is invoked, even before the Lambda function is invoked. This is because an action bound to a metadata tag is implicitly attached to all agents possessing that tag.
Add the Node.js agent Lambda layer to your application from the AWS CLI🔗
Note
- The following instructions assume that you have the AWS CLI installed on your local machine. Follow the instructions here to install and set up the AWS CLI on your local machine if you haven’t already installed it
- Ensure that you have configured all the permissions required to run an AWS Lambda function and created a role for the Lambda function. Learn more about the permissions needed to deploy a Lambda function here. Follow the instructions here to create a Lambda execution role for your Lambda function.
If you haven’t deployed your Lambda function to AWS, you can attach the Lambda layer to your application during deployment with the AWS CLI. To deploy your Lambda function with the deployed Lambda layer.
-
Wrap your Lambda function code with the
lightrun/lambdamodule. Thelightrun/lambdamodule ensures that the Lightrun agent is enabled before calling the serverless function, and also disables the Lightrun agent when the function call finishes so that it can properly handle the next call to the serverless function.const lightrun = require("lightrun/lambda"); const handlerFunc = async (event, context) => { // <lambda function source code here> } exports.handler = lightrun.wrap(handlerFunc, { metadata: { registration: { displayName: "<lambda_function_name>", tags: ['<lambda_function_name>'] } }, agentLog: { logsPath: "", level: "info" } } );Note
Change
<lambda-function-name>to your Lambda function's name.Important
AWS Lambda functions are event-driven short-running programs with a maximum execution time of 15 minutes. To debug AWS Lambda functions with the Lightrun Node.js agent:
-
Specify
lightrunWaitForInit: trueandlightrunInitWaitTimeMs: 10000in the Lightrun Node.js agent configuration. These two configuration parameters will block the lambda function execution till first time breakpoints are fetched from the Lightrun server and ensures that the Lightrun agent has time to communicate with the Lightrun server before the short-running application disconnects. -
Apply Metadata tags that include the name of your Lambda function - By default, a new Lightrun agent is created whenever the Lambda function is invoked. By adding our function’s name as a metadata tag, we can attach Lightrun actions to agents created whenever the Lambda function is invoked, even before the Lambda function is invoked. This is because an action bound to a metadata tag is implicitly attached to all agents possessing that tag.
-
-
Deploy the Lambda function with the AWS CLI. You can do this in two ways:
-
Deploy the Lambda with .zip file archives.
To deploy a Lambda function as a .zip file archive,- Zip the function file.
zip function.zip index.mjs - Run the following command to deploy the .zip file archive.
aws lambda create-function \
--region us-east-1  \
--function-name test-nodejs-function \
--zip-file fileb://function.zip \
--role <lambda_execution_role_arn> \
--handler index.handler \
--runtime nodejs24.x --timeout 10 --memory-size 512 \
--layers <LayerVersionArn> \
--environment Variables="{LIGHTRUN_SECRET=<LIGHTRUN_KEY>}"
Important
Update the command with the following values:
--function-name- Lambda function name.--role- Lambda execution role ARN. (Follow the instructions here to create a Lambda execution role for your Lambda function.)--runtime- Preferred Node.js runtime environment.--layers- Lambda layer Version ARN.--environment Variables- Lightrun secret Keys.
You should get a response similar to the following if your deployment was successful.
{ "FunctionName": "test-nodejs-function", "FunctionArn": "arn:aws:lambda:us-east-1:291863071383:function:test-nodejs-function", "Runtime": "nodejs24.x", "Role": "arn:aws:iam::<iam-user>:role/lmb", "Handler": "index.handler", "CodeSize": 412, "Description": "", "Timeout": 10, "MemorySize": 512, "LastModified": "2025-11-26T06:26:02.712+0000", "CodeSha256": "BIHB4PNQKcX8d4i+Wiz0fWIlE/GxULKZe055AZHqFuw=", "Version": "$LATEST", "Environment": { "Variables": { "LIGHTRUN_SECRET": <LIGHTRUN_KEY> } }, "TracingConfig": { "Mode": "PassThrough" }, "RevisionId": "38f85b5e-8d8c-4c23-a4bc-598e407f0da9", "Layers": [ { "Arn": "arn:aws:lambda:us-east-1:<iam-user>:layer:Lightrun_Package_node:1", "CodeSize": 10172940 } ], "State": "Pending", "StateReason": "The function is being created.", "StateReasonCode": "Creating", "PackageType": "Zip", "Architectures": [ "x86_64" ], "EphemeralStorage": { "Size": 512 } } - Zip the function file.
-
Deploy the Lambda file as an AWS SAM application.
Prerequisites
The following instructions assume that you have the AWS SAM CLI and Docker installed on your local machine.
To deploy the Lambda function by packaging it as an AWS SAM template.
- Add a
template.yamlfile to thenode_lambda_functionfolder.touch template.yaml - Add the following yaml to the
template.yamlfile.AWSTemplateFormatVersion : '2010-09-09' Transform: AWS::Serverless-2016-10-31 Resources: NodeFunction: Type: AWS::Serverless::Function Properties: Handler: index.handler Runtime: nodejs24.x Role: <lambda_execution_role_arn> Layers: - <LayerVersionArn> Environment: Variables: LIGHTRUN_SECRET: <LIGHTRUN_KEY> - Run the following command to build the SAM template.
sam build - Run the following command to deploy the SAM template.
sam deploy --guided
Important
Update the
template.yamlfile with the following values.NodeFunction- change to your preferred Lambda function’s name.Role- Lambda execution role ARN. (Follow the instructions here to create a Lambda execution role for your Lambda function.)Runtime- Preferred Node.js runtime environment.Layers- Lambda layer Version ARNEnvironment/Variables- Lightrun secret Keys
- Add a
-
Verify things are working🔗
To verify that a Lightrun agent has been added to your Lambda function correctly,
- Verify that a new agent with your Lambda function name is created anytime your Lambda function runs and dies immediately when your Lambda function stops.
- Verify that a tag with your Lambda function name has been added to your Lightrun account.
Agent Lifecycle: Cold Start and Warm Start Behavior🔗
Understanding how the Lightrun agent operates during Lambda function cold starts and warm starts is essential for optimizing performance and managing server communication efficiently.
Cold Start vs. Warm Start🔗
AWS Lambda functions execute in two distinct modes:
- Cold Start - Occurs when AWS initializes a new execution environment for your Lambda function. This happens when the function is invoked for the first time, when AWS scales to handle increased traffic, or when the function has been idle long enough for AWS to terminate the previous execution environment.
- Warm Start - Occurs when AWS reuses an existing execution environment from a previous invocation. After a cold start, Lambda execution environments may remain active for minutes or hours, depending on AWS's internal resource management policies. During this time, the environment is in a dormant state until the next invocation.
Agent Initialization Strategy🔗
The Lightrun agent employs an optimized initialization strategy to minimize overhead and reduce unnecessary server communication.
Cold Start Behavior🔗
During a cold start, the Lightrun agent:
- Initializes and starts up within the new execution environment
- Registers with the Lightrun Server
- Fetches all active breakpoints from the server
- Remains resident in memory for subsequent invocations
This initialization occurs only once per execution environment. Starting a new agent on every function invocation would be computationally expensive and inefficient, so the agent persists across multiple warm starts within the same execution environment.
Warm Start Behavior🔗
During a warm start, the agent:
- Reuses the existing agent instance from the previous invocation
- Fetches breakpoints from the Lightrun Server only if more than 1 minute has elapsed since the last fetch
- Skips server communication entirely for rapid consecutive invocations
This intelligent caching mechanism ensures that multiple consecutive function calls do not generate redundant requests to the Lightrun Server. The 1-minute fetch interval is configurable on the server side through deployment parameters.
Connection Management🔗
The Lightrun agent does not maintain a persistent connection to the Lightrun Server. This design decision reflects the typical characteristics of Lambda functions:
- Lambda invocations are usually short-lived (lasting seconds to minutes)
- Persistent long-polling connections would be inefficient for short execution windows
- The agent uses a pull-based model to fetch breakpoints on-demand
Agent Expiration Configuration🔗
When the Lightrun agent runs inside a Lambda function, its expiration time on the Lightrun Server is set to 30 minutes. This extended expiration period prevents the agent from being prematurely removed from the server while the Lambda execution environment is dormant between invocations, ensuring that the agent remains registered and available for the next warm start.