Install the Lightrun Java agent🔗
The Lightrun agent is at the core of the Lightrun platform. It's the component that communicates requests for runtime observability to your running code, and gathers and relays the requested data back to the Lightrun Server, and eventually the developer's IDE.
Before running the agent, it must be installed on the system where your code to be monitored is running, and its credentials must be declared either inside an agent.config file, or as environment variables entered from the command line.
Before you begin🔗
- This document is intended for Java developers working with JDK 8+.
- Before you proceed with the installation, review the JVM agent system requirements here.
-
Alpine Support:
- When downloading the Lightrun agent, make sure you select the correct OS based on the OS of your base image. If, for example, you're using
openjdk:17-alpinein theFROMline of your image, you should use the Lightrunalpineagent.
-
To run the Lightrun Java agent on an Alpine operating system, ensure
libstdc++is installed on the system.apk add libstdc++
- When downloading the Lightrun agent, make sure you select the correct OS based on the OS of your base image. If, for example, you're using
Important
Make sure no debugger is connected when using Lightrun.
The Lightrun Java agent cannot run in parallel with another debugger, such as JDWP. If the application is started with -agentlib:jdwp or another JDWP-based tool is attached, Lightrun instrumentation may fail.
You can install the Lightrun Agent using one of following methods:
To get started, download the Lightrun agent.
Downloading the Lightrun Java Agent🔗
If you haven't yet done so, please sign up for a Lightrun account.
Our onboarding flow will direct you to download the agent. You can also download the Lightrun JVM Agent from the Management Portal.
Download the agent🔗
- Log in to the Management Portal.
-
Copy the download script from the Install the Agent section.
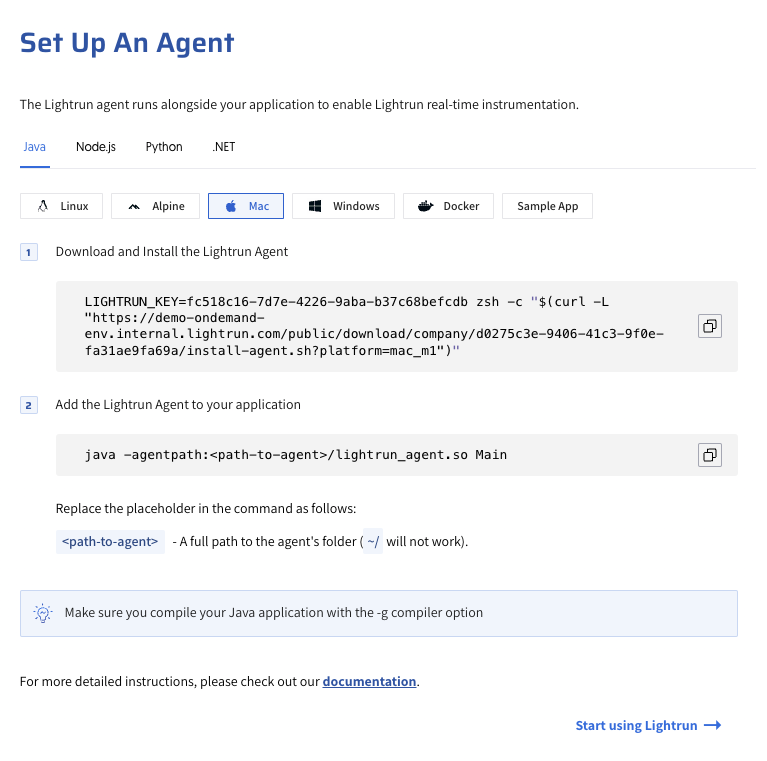
-
Open a terminal and navigate to the directory where your project folder is located.
- Paste the copied script into your terminal and click the enter or return key to download.
Now that you have downloaded the agent, you can proceed to use it.
Run directly🔗
On completion of the agent download, from your terminal, enter the following command:
java -agentpath:<path-to-agent>\lightrun_agent.so -jar <your-jar-file> RestofArgumentsHere
Replace the placeholders in the command as follows:
<path-to-agent>: The full path to the agent's folder (~/will not work)<your-jar-file>:The full path to the application to be run with the agentRestofArgumentsHere: Any relevant configuration options.
See the example in this video:
Optional
To cause all launched Java processes automatically to be attached to an agent, you can add the JAVA_OPTS environment variable.
From the terminal, enter the following command (replace the agentpath value with the path to the Lightrun agent):
export JAVA_OPTS=-agentpath:/path/to/agent/lightrun_agent.so
Run with Docker🔗
Docker containers are ephemeral.
If you were to create a shell into a Docker container (by docker exec -it <container-id>, for example) and add the Lightrun files there, they would disappear the next time the container would spin up due to the ephemeral nature of that container.
Instead, we suggest you install Lightrun by adding it to the underlying Docker image directly, i.e. by "baking" the agent into the image.
The following example displays how to add the Lightrun Agent to the Dockerfile:
FROM openjdk:11

WORKDIR /opt/lightrun
ENV LIGHTRUN_KEY=<LIGHTRUN_KEY>
RUN bash -c "$(curl -L "https://app.lightrun.com/public/download/company/<ORG-ID>/install-agent.sh?platform=<your-base-image-os>")"

COPY prime.jar /app/prime.jar

CMD ["java", "-agentpath:/opt/lightrun/agent/lightrun_agent.so", "-jar", "/app/prime.jar"]
Important
Post Installation instructions:
- Ensure that the
agentfolder is located in the Docker image build path, i.e. it is present in the current working directory when you're runningdocker build . -t <image-name>. <LIGHTRUN_KEY>environment variables: Available from the Lightrun Management Console under the Install an Agent section. Do note that for production use, it's a good idea to persist that secret in an external secret managment solution, like HashiCorp Vault.
Optional
To cause all launched Java processes automatically to be attached to an agent, you can add the JAVA_OPTS environment variable.
From the terminal, enter the following command (replace the agentpath value with the path to the Lightrun agent, after it has been downloaded).
export JAVA_OPTS=-agentpath:/path/to/agent/lightrun_agent.so
Run with IntelliJ🔗
You can attach the agent also when running your application from IntelliJ:
-
Go to the Run/Debug Configuration of your application.
-
Add the following agent argument to the VM options field.
-agentpath:/path/to/agent/lightrun_agent.so -
Replace the
agentpathvalue with the path to the Lightrun agent.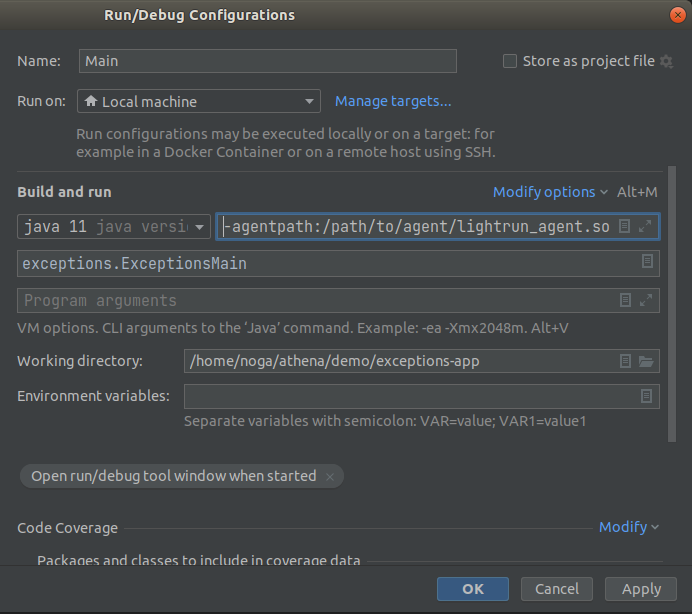
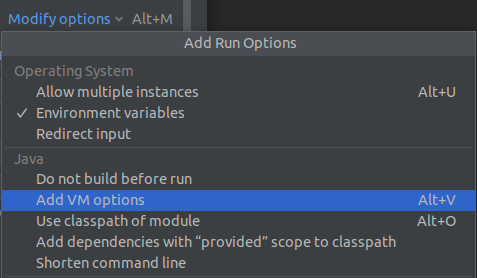
-
If the VM options field is not available, choose Modify options and add the field.
Java Agent post-installation🔗
- If you cannot see the agent in your plugin or the management portal, please use the troubleshooting guide or contact us.
- You can customize the agent configuration at any time. To apply the changes, the application must be restarted. For more information, click here.
Adding support for Java debugging symbols🔗
Important
Most Java compilers exclude debugging symbols by default to reduce the generated binary size and improve performance and optimization. This action can prevent Lightrun from working as the Lightrun agent needs to find several symbols, including your project's variables, to insert Lightrun actions into your project.
To ensure that the required debugging information is included in your compiled files, you must add the following debug options to your Java compiler.
- -g:source
- -g:lines
- -g:vars
You can learn more about the debugging symbols here. For more information on specifying debugging symbols in your Maven or Gradle project, see Build tools (Maven and Gradle)
Note - The added debug options do not impact compiler optimization or performance; they only enhance the bytecode with additional debug information.