Configure the Autonomous Debugger global settings for your organization🔗
You can configure global settings for the Autonomous Debugger feature that apply to all users using the AI Debugger in the Lightrun plugin. These settings, available on the Autonomous Debugger Global Settings page in the Lightrun Management Portal, include selecting an AI model and enabling integrations such as Jira.
Supported environments and versions🔗
- JetBrains IDEs: Available on demand starting in version 1.55 for Java, JavaScript, and TypeScript.
- VS Code IDE: Fully supported starting in version 1.61.
- .NET and Python: Fully supported starting in version 1.62.
- Management Portal enable/disable toggle: Available from version 1.59, regardless of the configured AI model.
Supported AI model providers🔗
The Lightrun Autonomous Debugger uses an AI model that analyzes data, recognizes patterns, and makes predictions or decisions to automate and enhance tasks. By default, it is set to use Lightrun’s OpenAI account.
- OpenAI: By default, the Autonomous Debugger uses Lightrun's OpenAI as the default AI model provider. No configuration is required.
- Customer OpenAI: Requires adding your API key.
- Private Azure OpenAI Service: Requires copying a few values from your Private Azure deployment.
Enable the Autonomous Debugger in your organization🔗
- Log in to the Lightrun Administration Portal.
-
In Settings, navigate to the AI Debugger > Global Settings.

-
Toggle the AI Debugger switch to enable the feature.
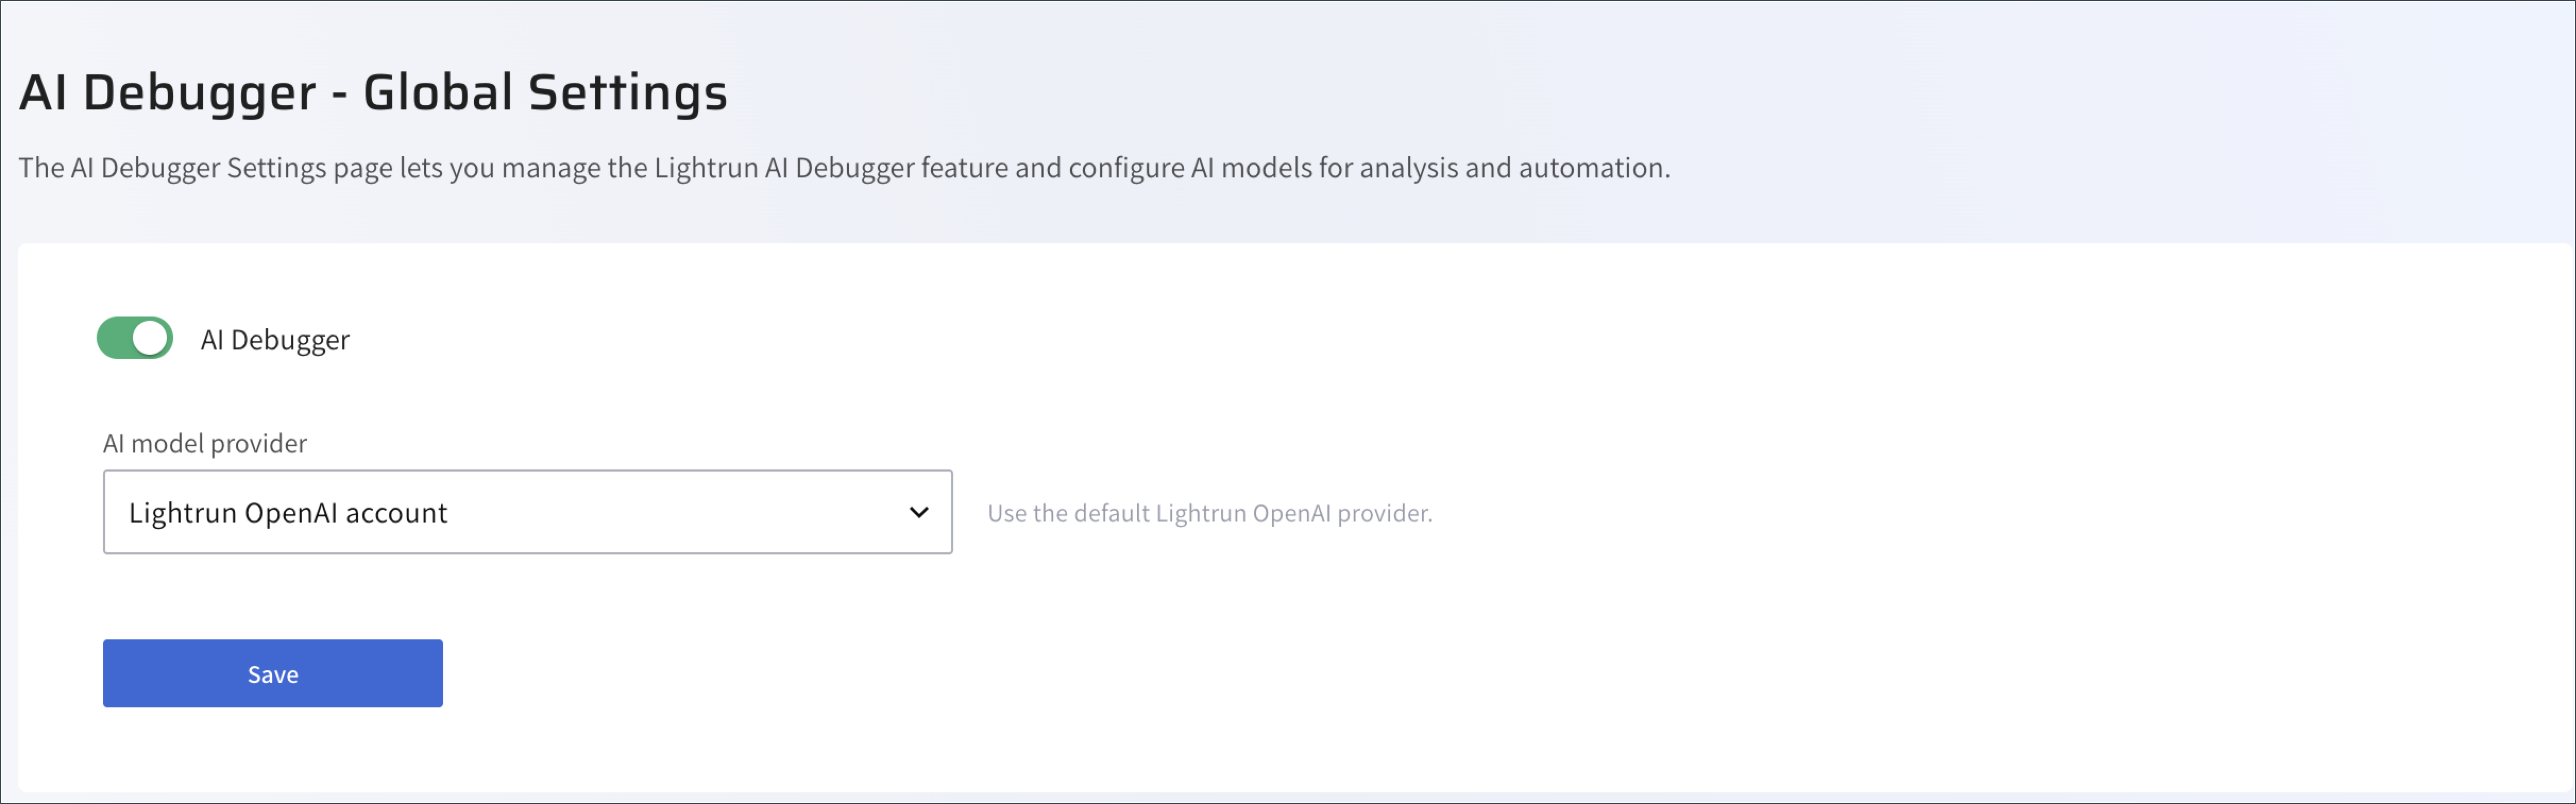
In the AI provider model list, the Lightrun OpenAI account is selected as the default.
-
Click Save
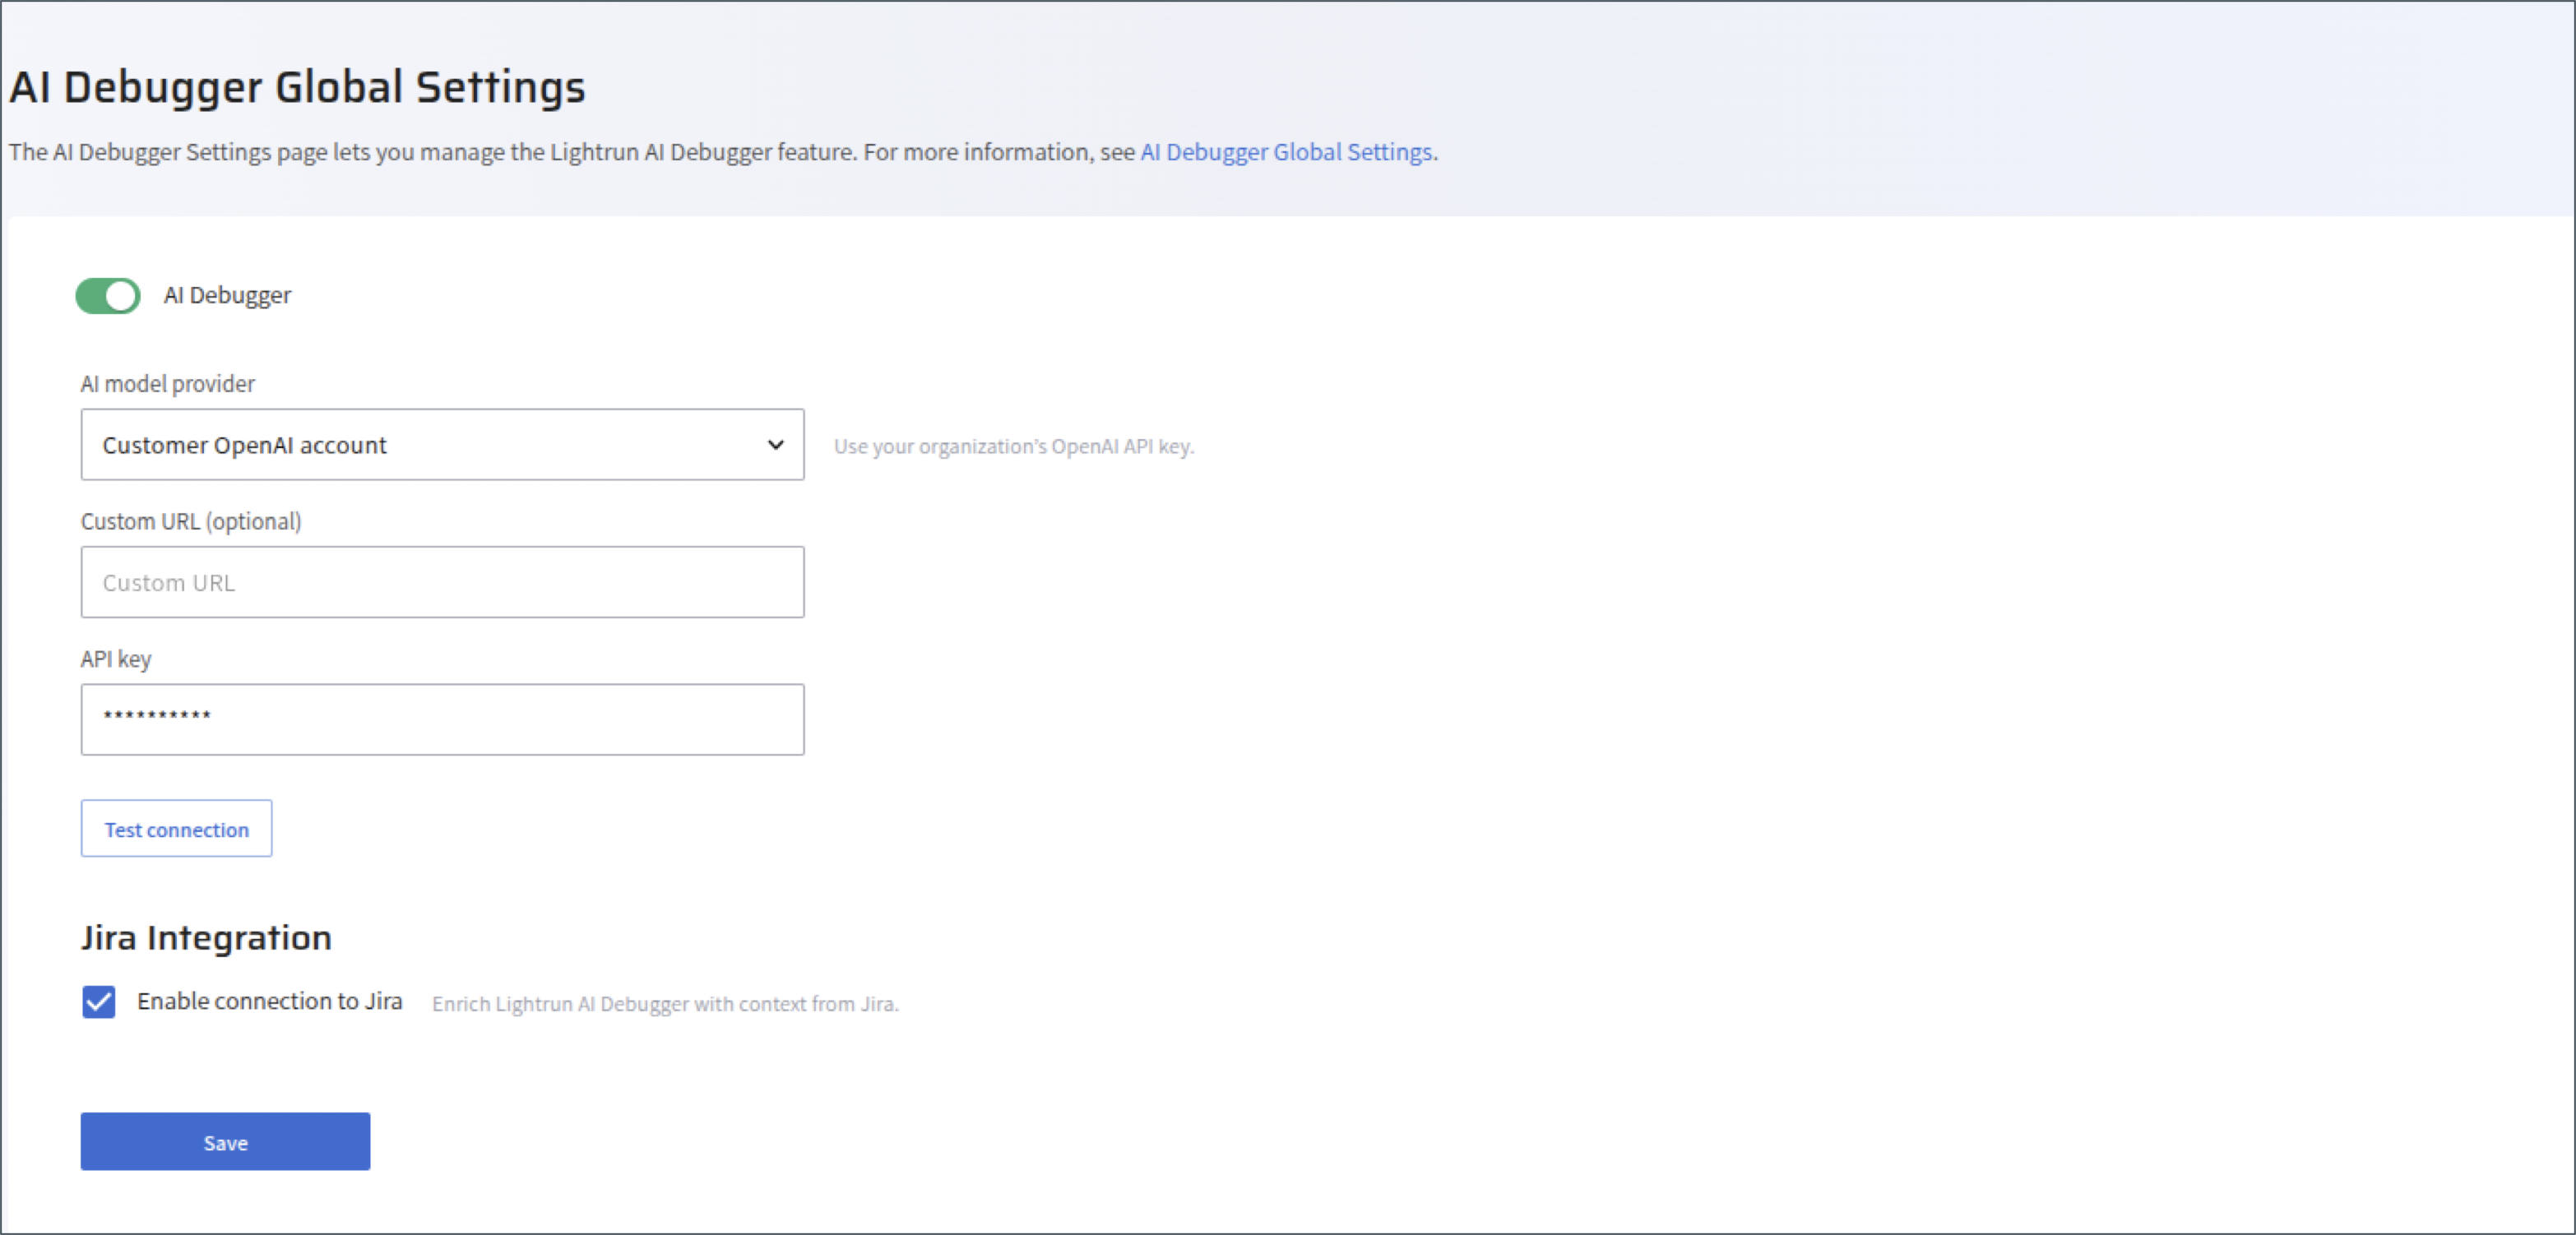
Set your organization's OpenAI account as the AI model provider🔗
To use your company’s OpenAI account, you will need to obtain your company’s API Key.
- Log in to the Lightrun Administration Portal.
- In Settings, navigate to the AI Debugger General Setting tab.
- Toggle the AI Debugger switch to enable the feature.
-
From the AI model provider list, select Customer OpenAI account.
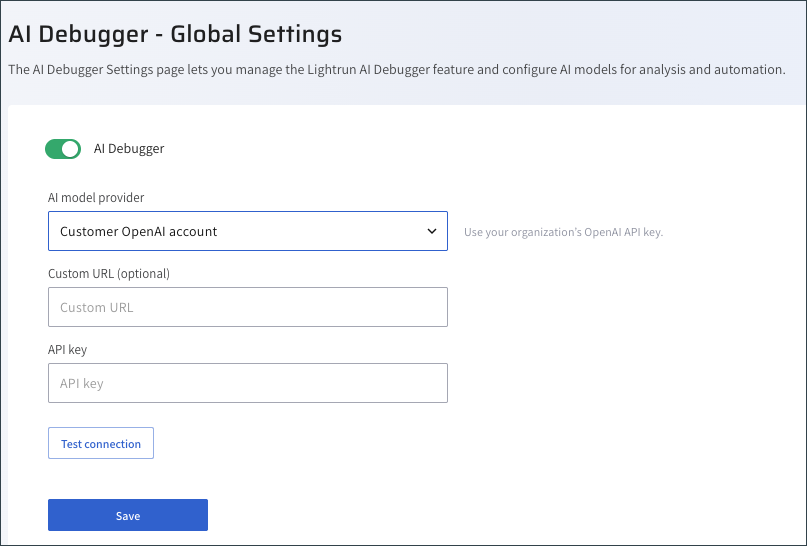
-
(Optional) In the Custom URL field, enter your URL.
- (Mandatory) In the API Key field, paste your company’s API Key.
- Click Test connection to validate that you can connect to your OpenAI account.
- Click Save.
Set Microsoft Azure OpenAI as your AI model provider🔗
You can choose to set up your own OpenAI account using your Private Azure OpenAI service. To set up the model, you are required to enter a number of settings that are required to be obtained in Azure.
Prerequisites🔗
- Deploy gpt-4o and text-embedding-3-small modelstabs=global-standard%2Cstandard-chat-completions#embeddings) on your Azure OpenAI service.
- Make sure the new deployments have full capacity allocated. For more information, see Manage Azure OpenAI Service quota.
Stage 1: [Azure AI Foundry] Obtain the Azure API parameters🔗
- Log in to https://ai.azure.com/.
-
In the left navigation bar, click Models + endpoints.
The Manage deployments of your models and services opens.
-
Click Get endpoint.
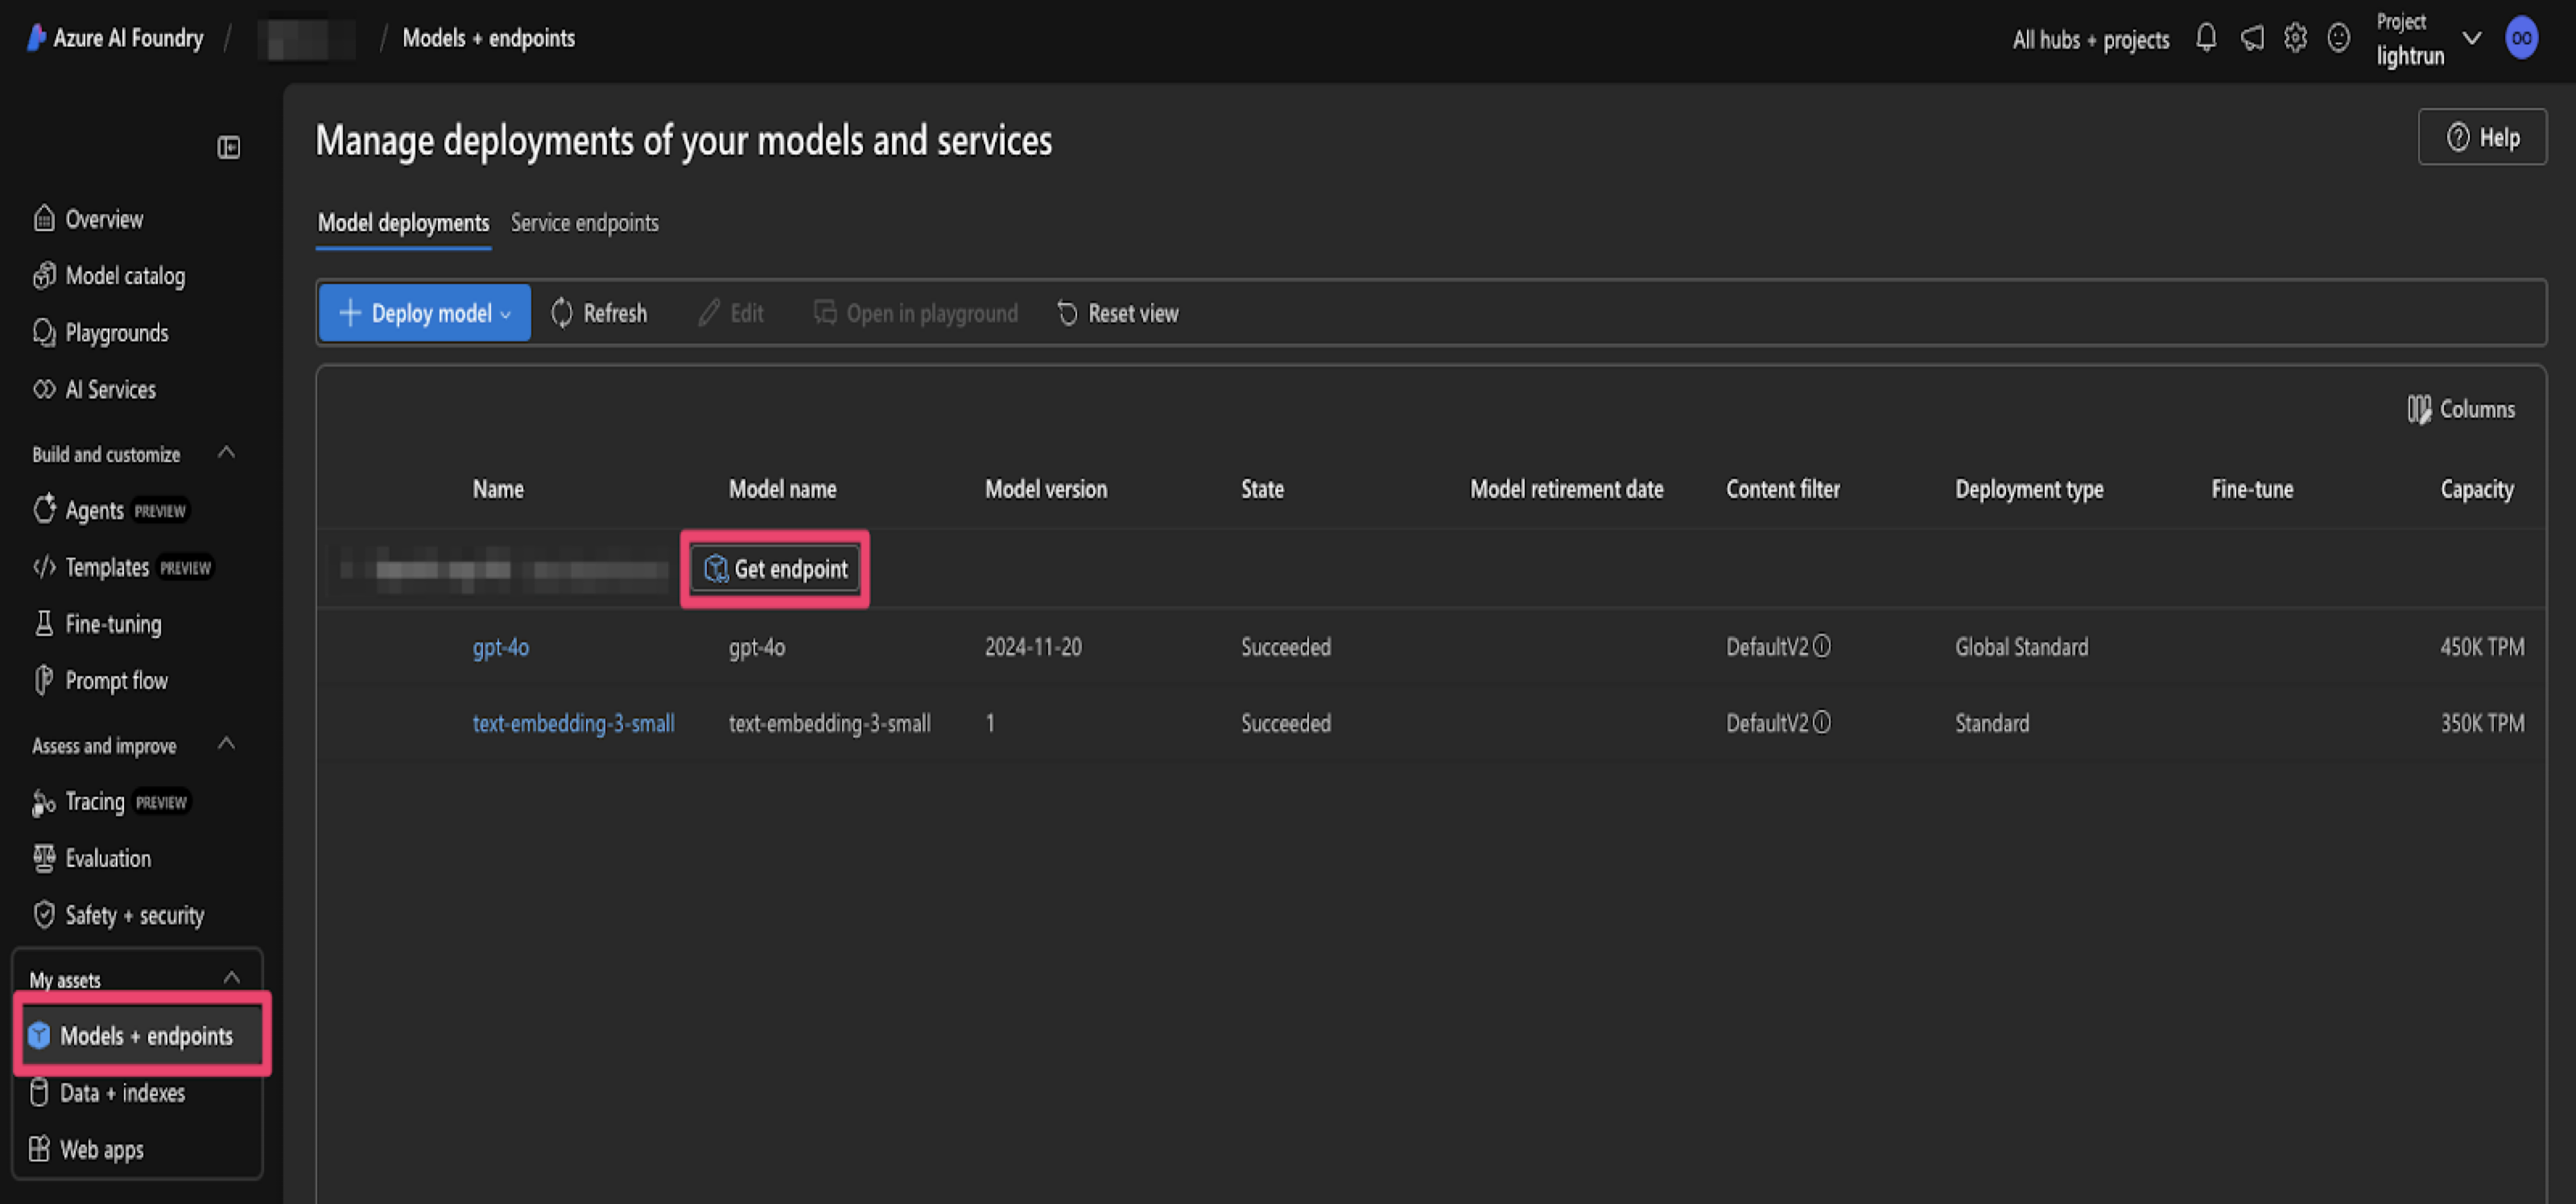
-
Copy the key.
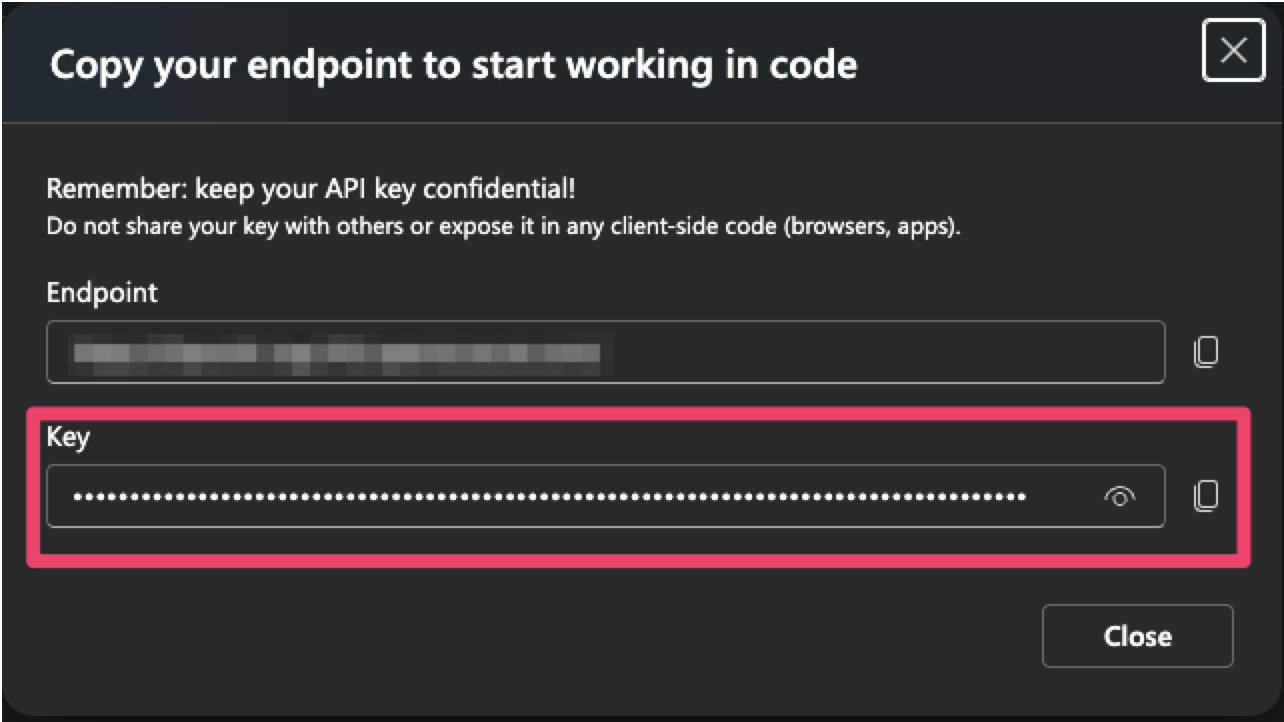
-
Copy the Completion and Embedding deployment names.
a. In the left navigation bar, click the Models+endpoints page.
A list of available deployed models is displayed.
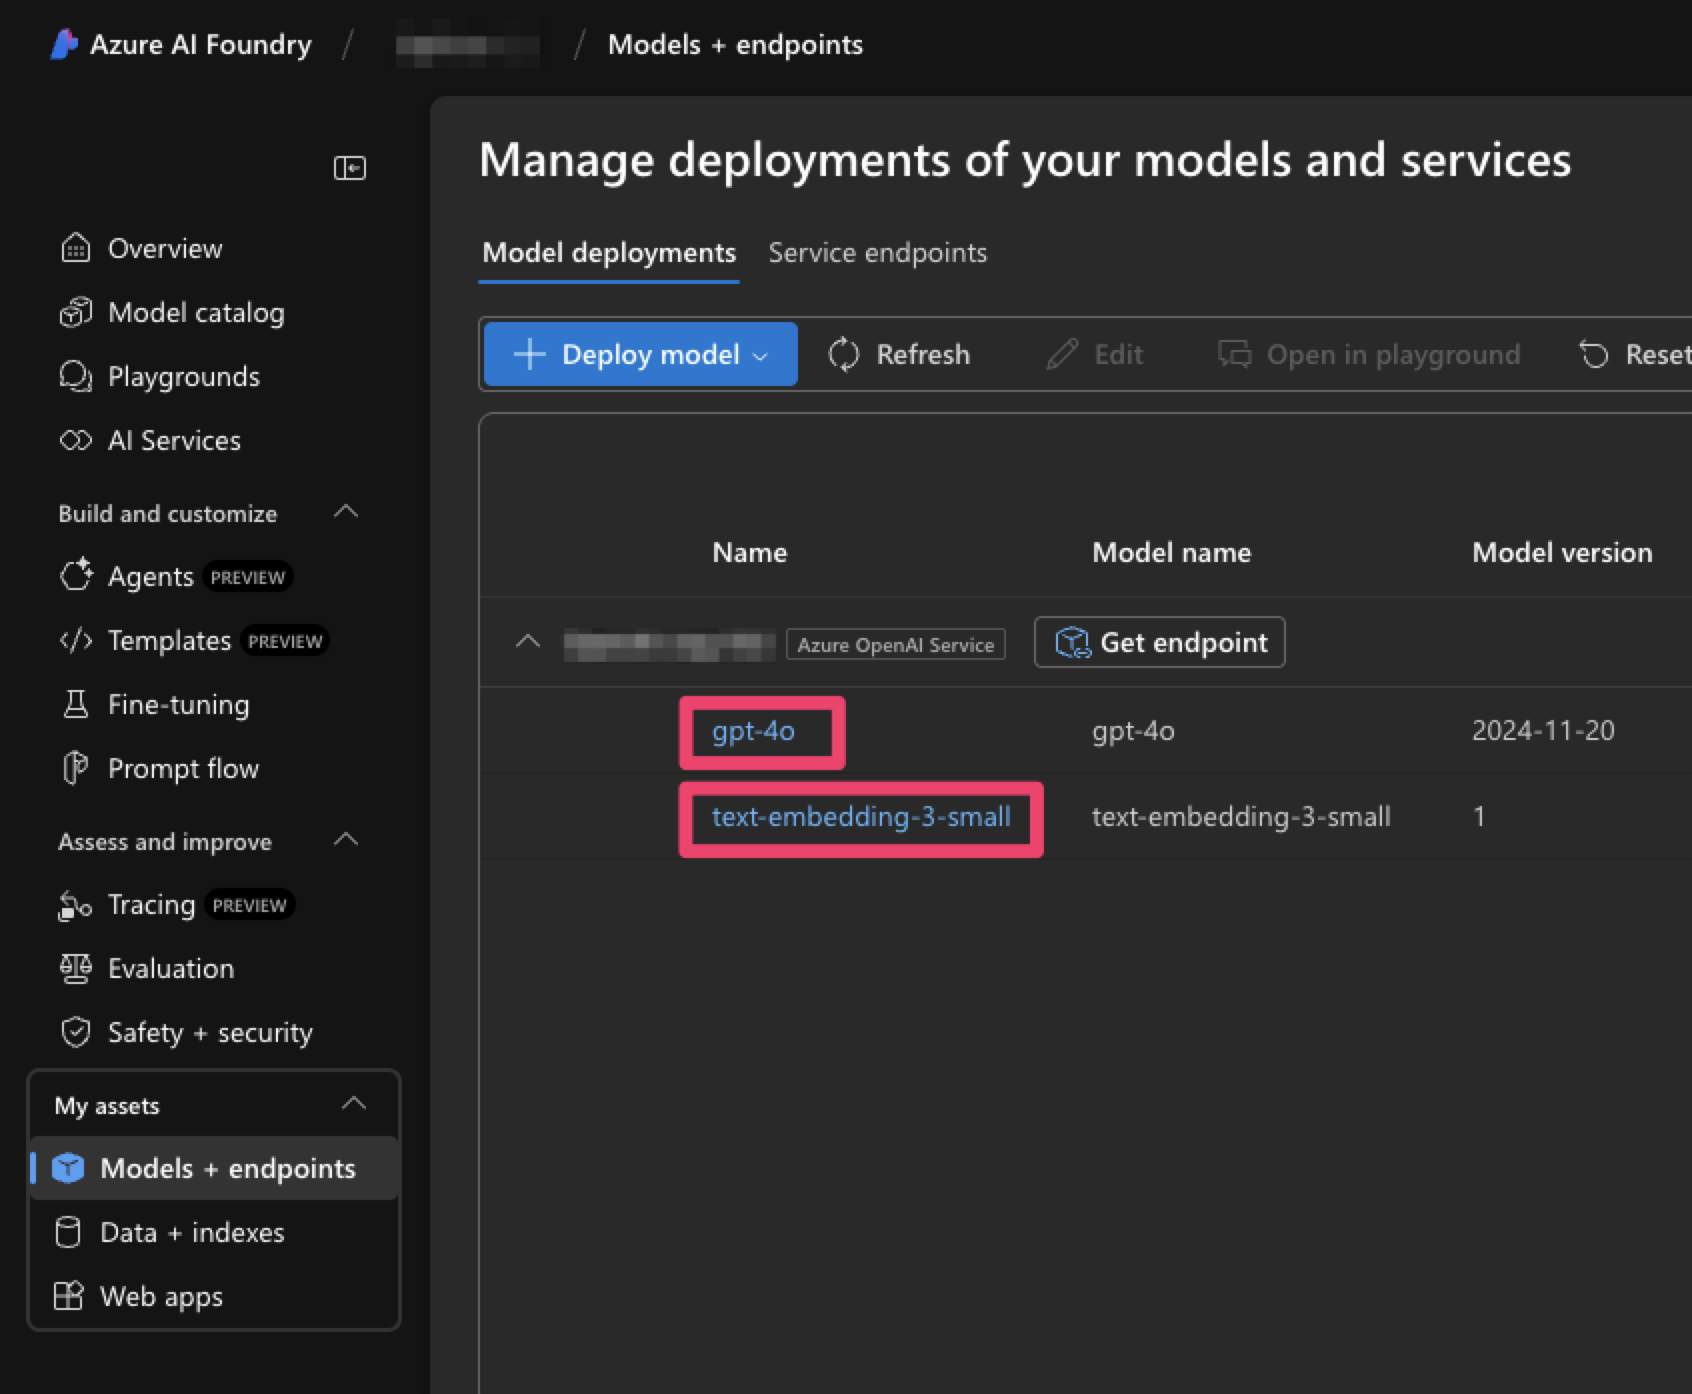
b. Copy the gpt-4o model deployment name to be pasted in the Completion deployment name field.
c. Copy the text-embedding-3-model deployment name, for the Embedding deployment name field. Note that under certain circumstances, the names could be gpt-4o and text-embedding-3-small respectively.
-
Copy the Endpoint. Do not use the endpoint shown in the Get endpoint dialog. Instead, retrieve the endpoint from the Azure portal as follows:
1. Go to the Azure portal in https://portal.azure.com/.
2. Click the Azure AI services and then the Azure OpenAI links.
3. Select the same deployment selected in the previous steps.
4. In the left navigation pane, navigate to Resource management, and select Keys and Endpoint.
The Keys and Endpoint dialog opens.
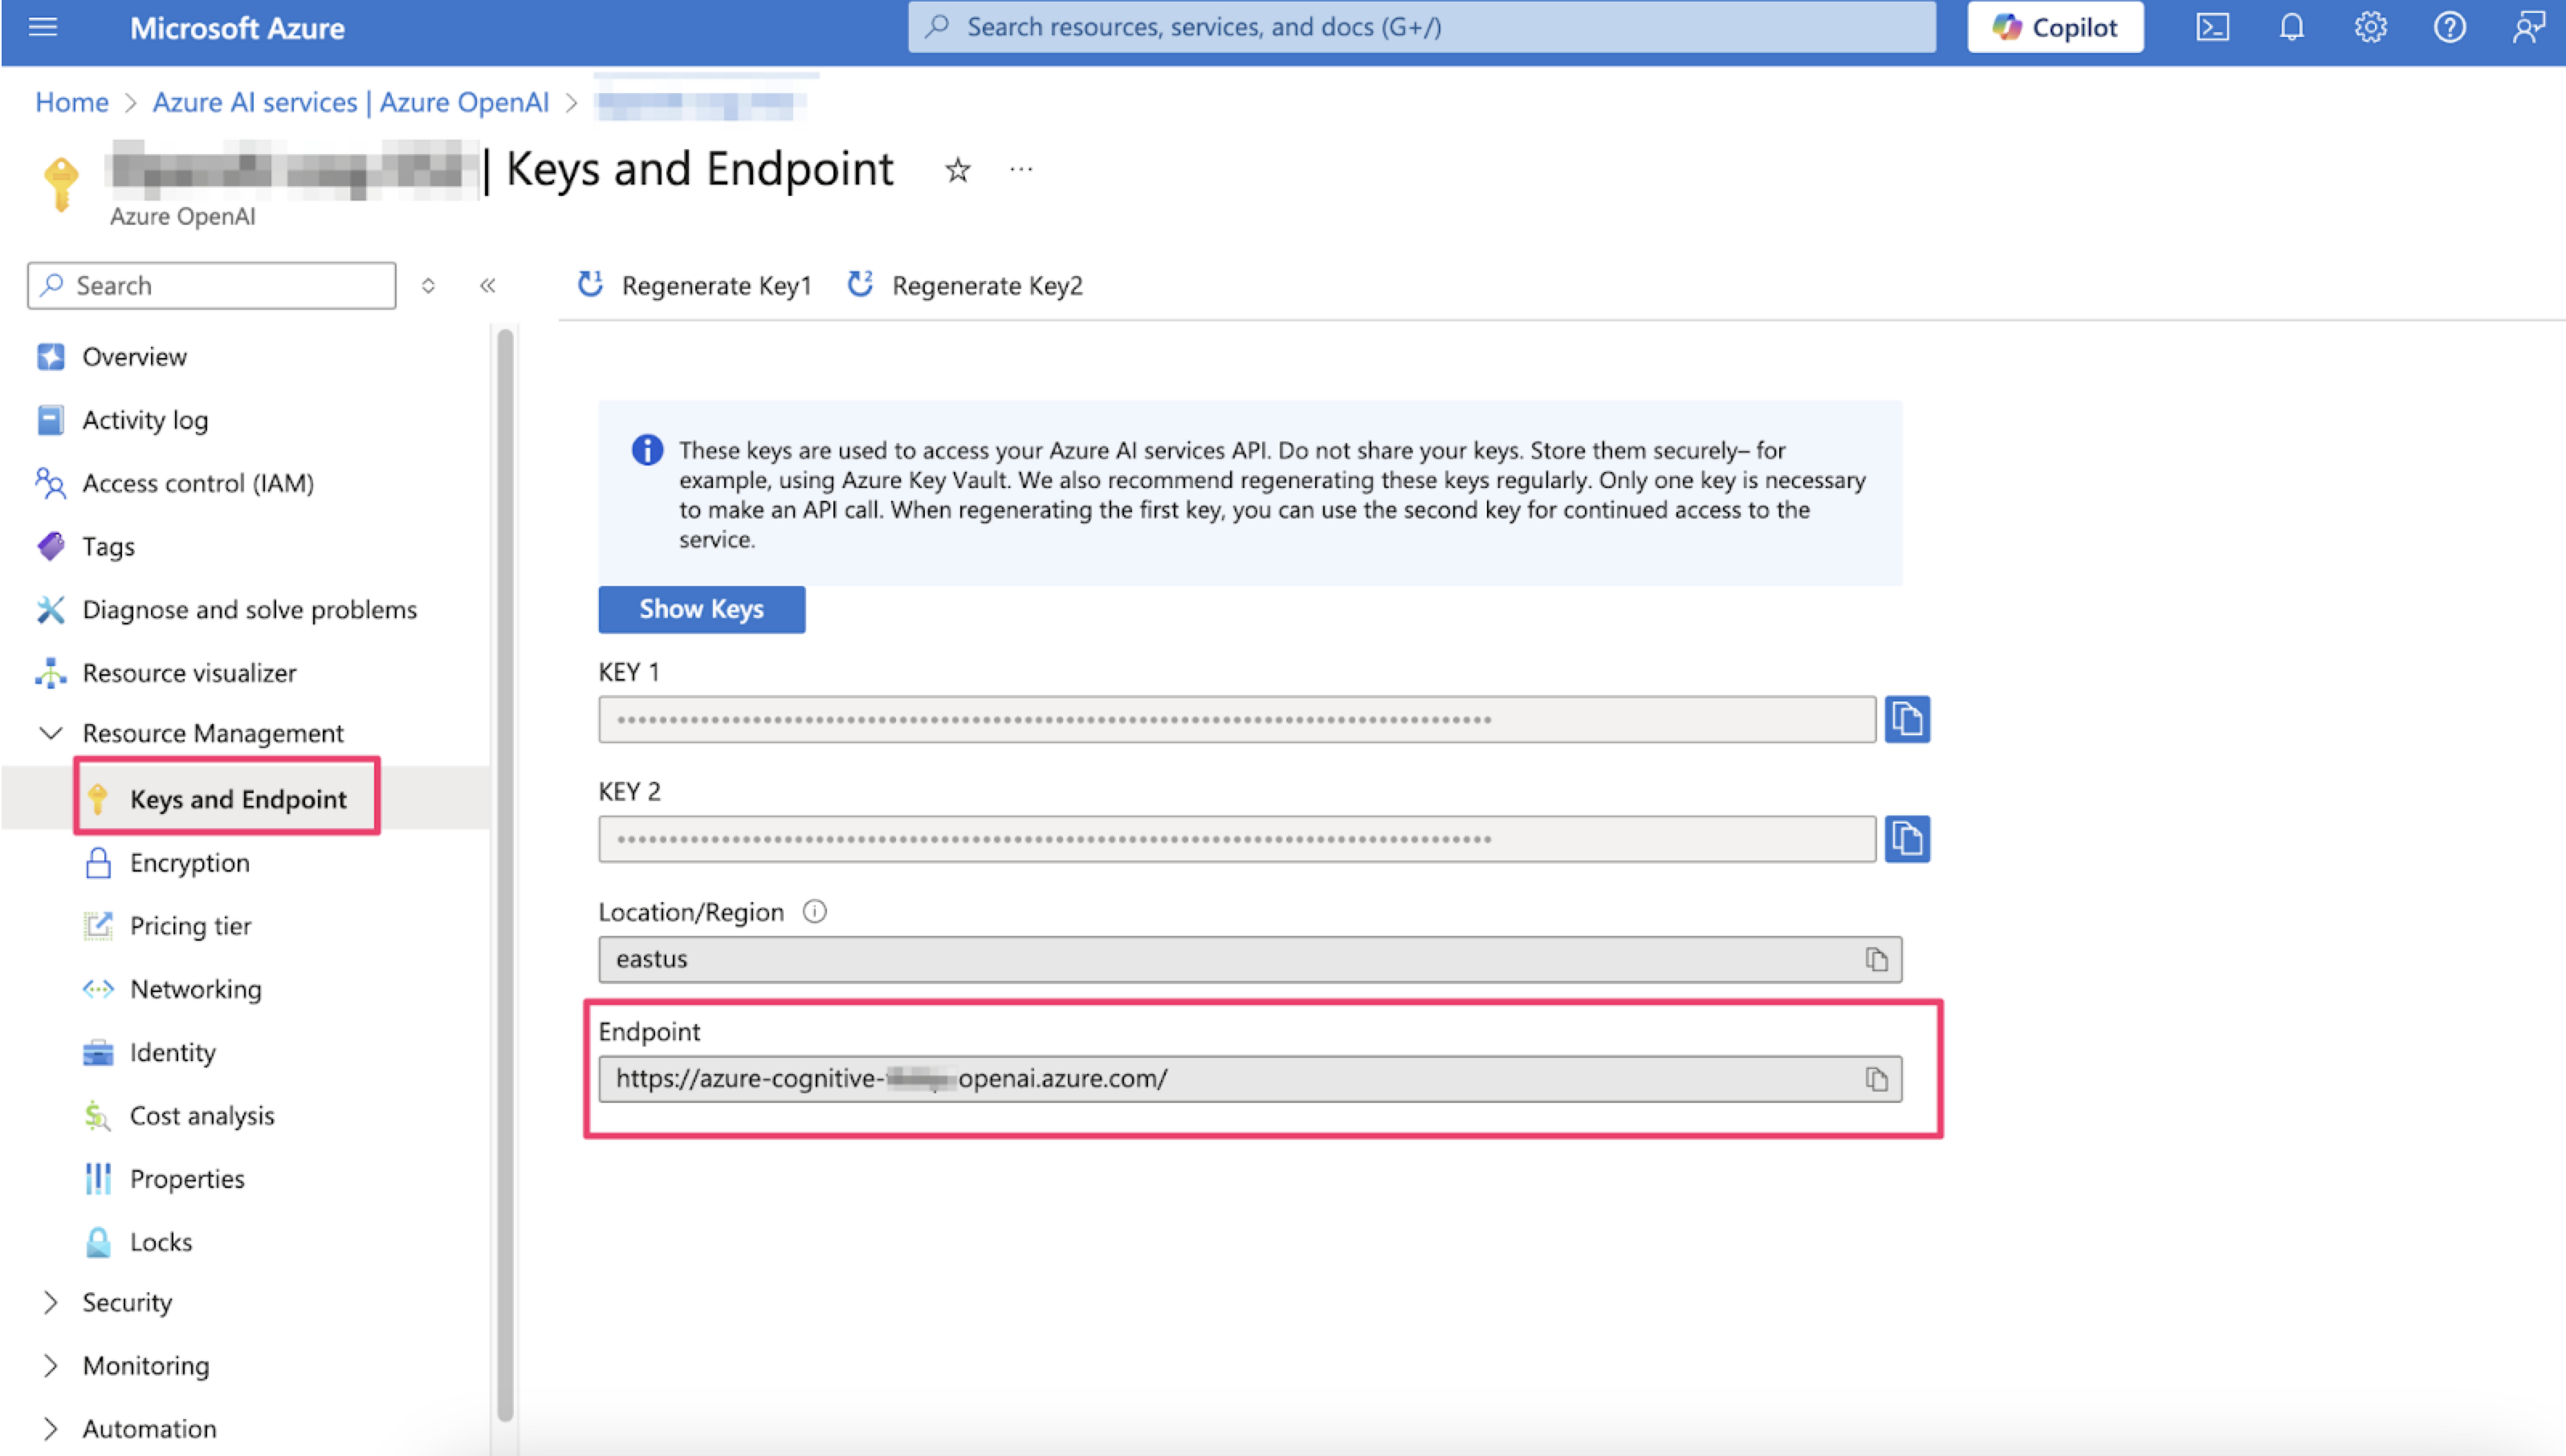
5. Copy the Endpoint which should match the following syntax:
https://azure-cognitive-XXXXX.openai.azure.com/.
Stage 2: Configure Azure OpenAI in the Lightrun Management Portal🔗
- Log in to the Lightrun Administration Portal.
- In Settings, navigate to the AI Debugger General Setting tab.
- Toggle the AI Debugger switch to enable the feature.
-
From the AI model provider list, select Private Azure OpenAI service.
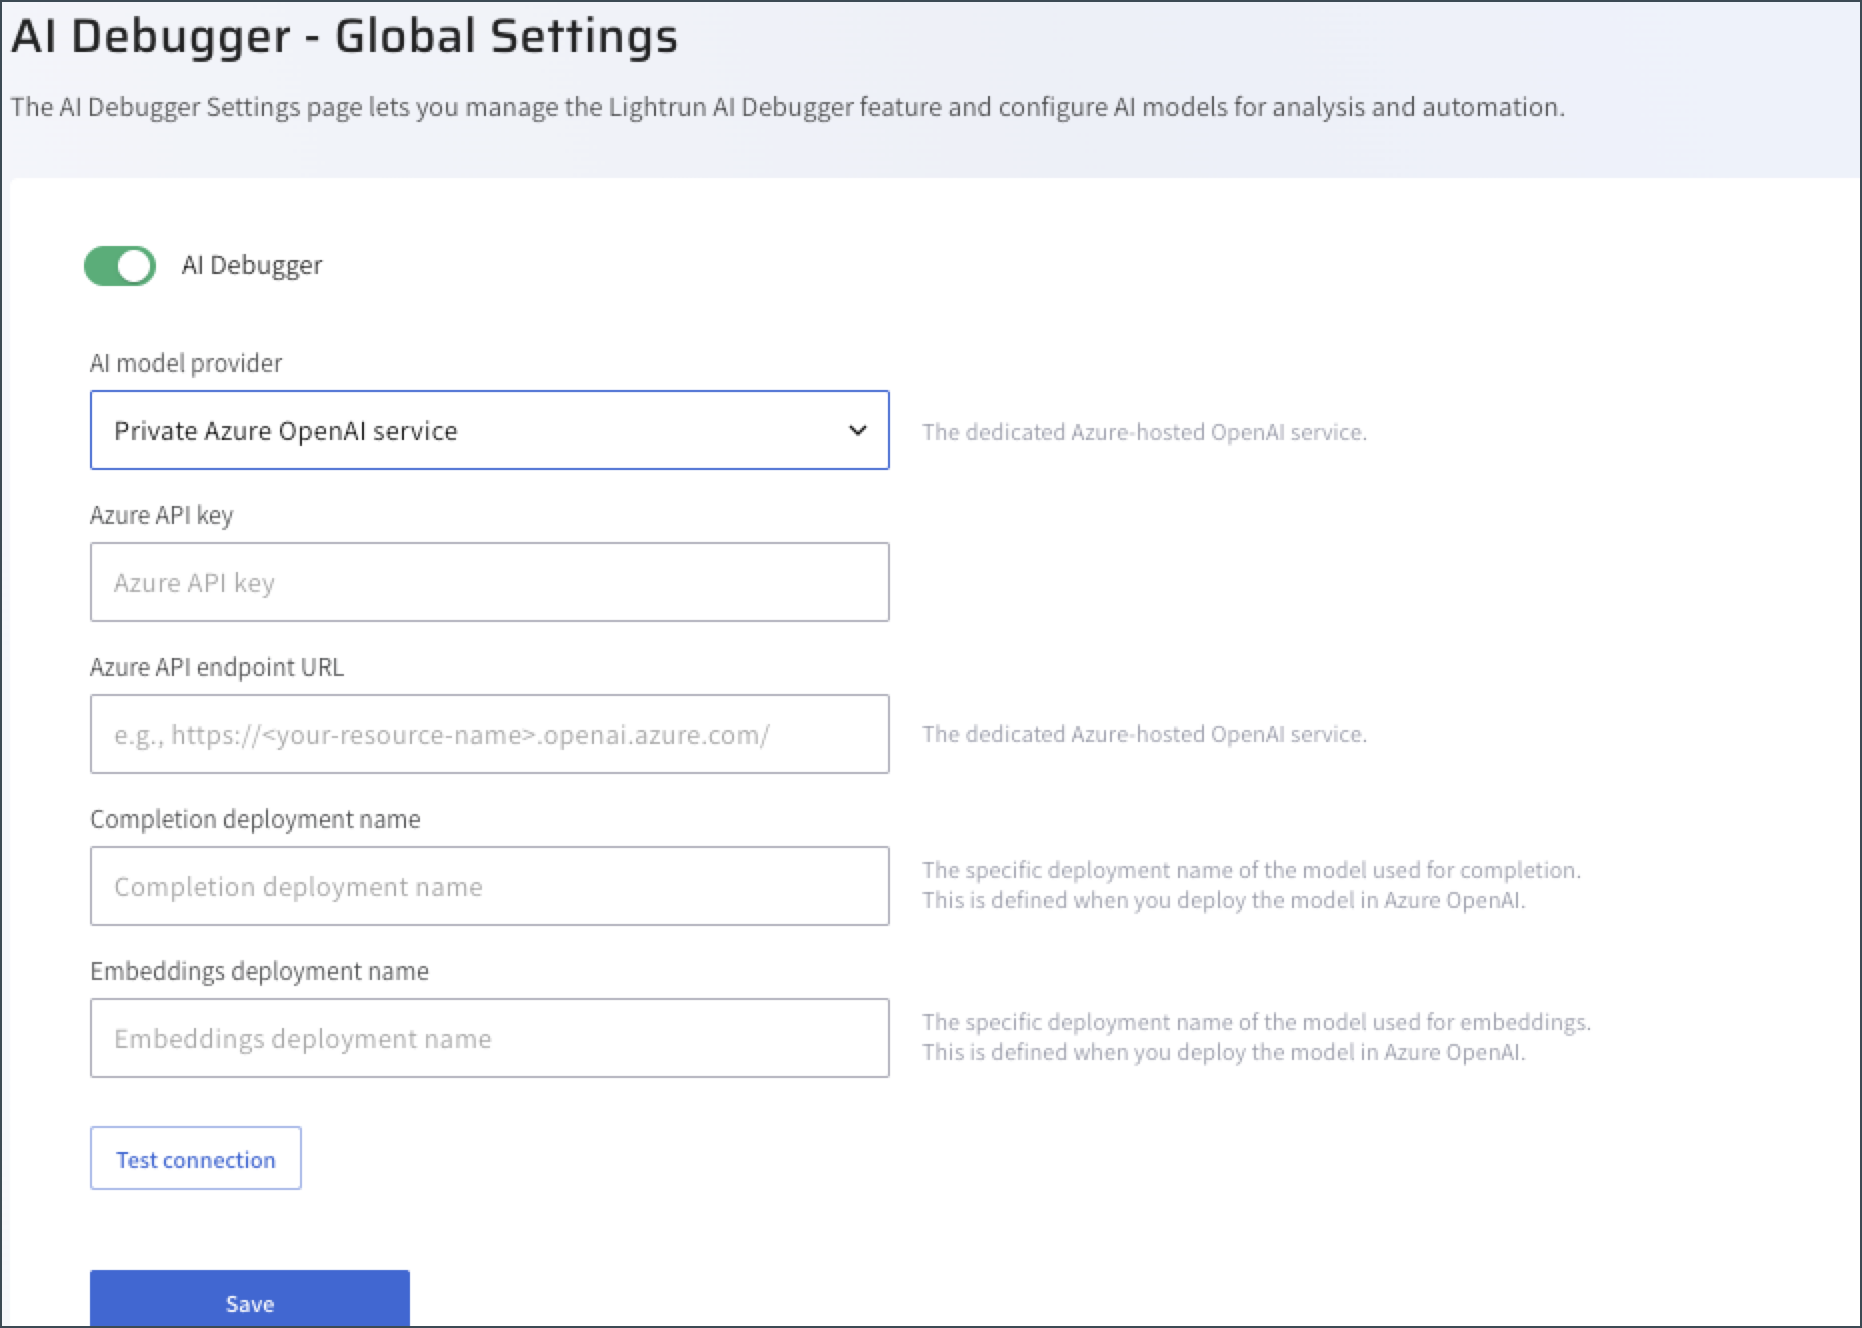
-
Paste the parameters you copied in Stage 1 from your Azure AI Foundry environment.
Parameter Description Azure API Key Your Azure Key. Azure API endpoint URL The URL for the Azure Endpoint, which is used for sending API requests. Completion deployment name The deployment name for the Azure gpt-4o model, which is used for generating text completions. Embeddings deployment name The deployment name for Azure text-embedding-3-model, which is used for generating vector embeddings. -
Click Save.
Populate Autonomous Debugger with your Jira instance data🔗
Note
Supported in the JetBrains plugin starting from version 1.62. For single-tenant and self-hosted deployments, contact Lightrun Support to configure this feature in your organzation.
Jira integration is enabled by default for your organization in the Global Settings page in the Lightrun Management Portal. Administrators can disable or re-enable this integration as needed. When enabled, users receive a connectivity request in their Lightrun plugin with the option to connect to their organization's Jira instance. For more information on how users connect Jira to the Autonomous Debugger in the plugin, see Debug using the Autonomous Debugger in JetBrains.
-
Log in to the Lightrun Administration Portal.
-
In Settings, navigate to the AI Debugger > Global Settings.
-
Toggle the AI Debugger switch to enable the feature.
-
Validate that the Enable connection the Jira toggle is enabled.