Work with Lightrun Snapshots in the VS Code IDE🔗
A snapshot is a virtual breakpoint that doesn't block your code from running. Unlike traditional breakpoint, snapshots collect the stack trace and variables without interrupting the application at all.
Once you've added a snapshot, you can view the output directly from the IDE.
Prerequisites
To use the plugin, ensure that:
- An agent is attached your application.
- The plugin is installed in your local VS Code instance.
- The Plugin ia authentication against your Lightrun account.
- The source code file for your running application is opened in VS Code.
Add a snapshot🔗
Note
- From version 1.57 for SaaS users, the
Hit Limitfield behaviour has changed and an additional field has been addedDistribute hit results evenly across agents. To learn more, see table below.
- From version 1.58, the Insert a Snapshot option from the list has been renamed to Add Snapshot.
-
To add snapshot, select one of these methods:
-
From the Agents or Tags method:
-
From either the Agents or Tags tab, select an agent or tag and click the Add Action icon.
The ACTIONS and METRICS menu opens.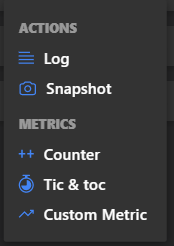
-
Under ACTIONS, select Snapshot to open the Insert a Snapshot dialog.
-
-
Directly in the code line
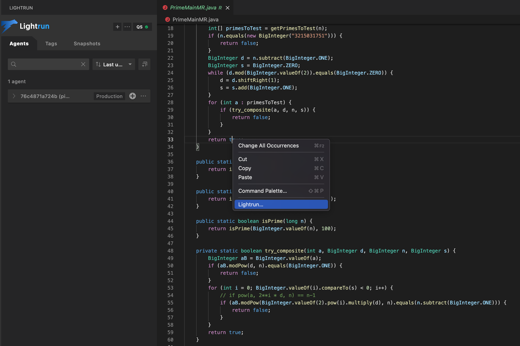
- Go to the line in your application source code where you want to insert the snapshot.
-
Right-click to open the VS Code context menu.
-
From the VS Code context menu, click Lightrun.
The VS Code Command Palette opens with a list of Lightrun plugin options. -
From the Command Palette, select Add Snapshot.
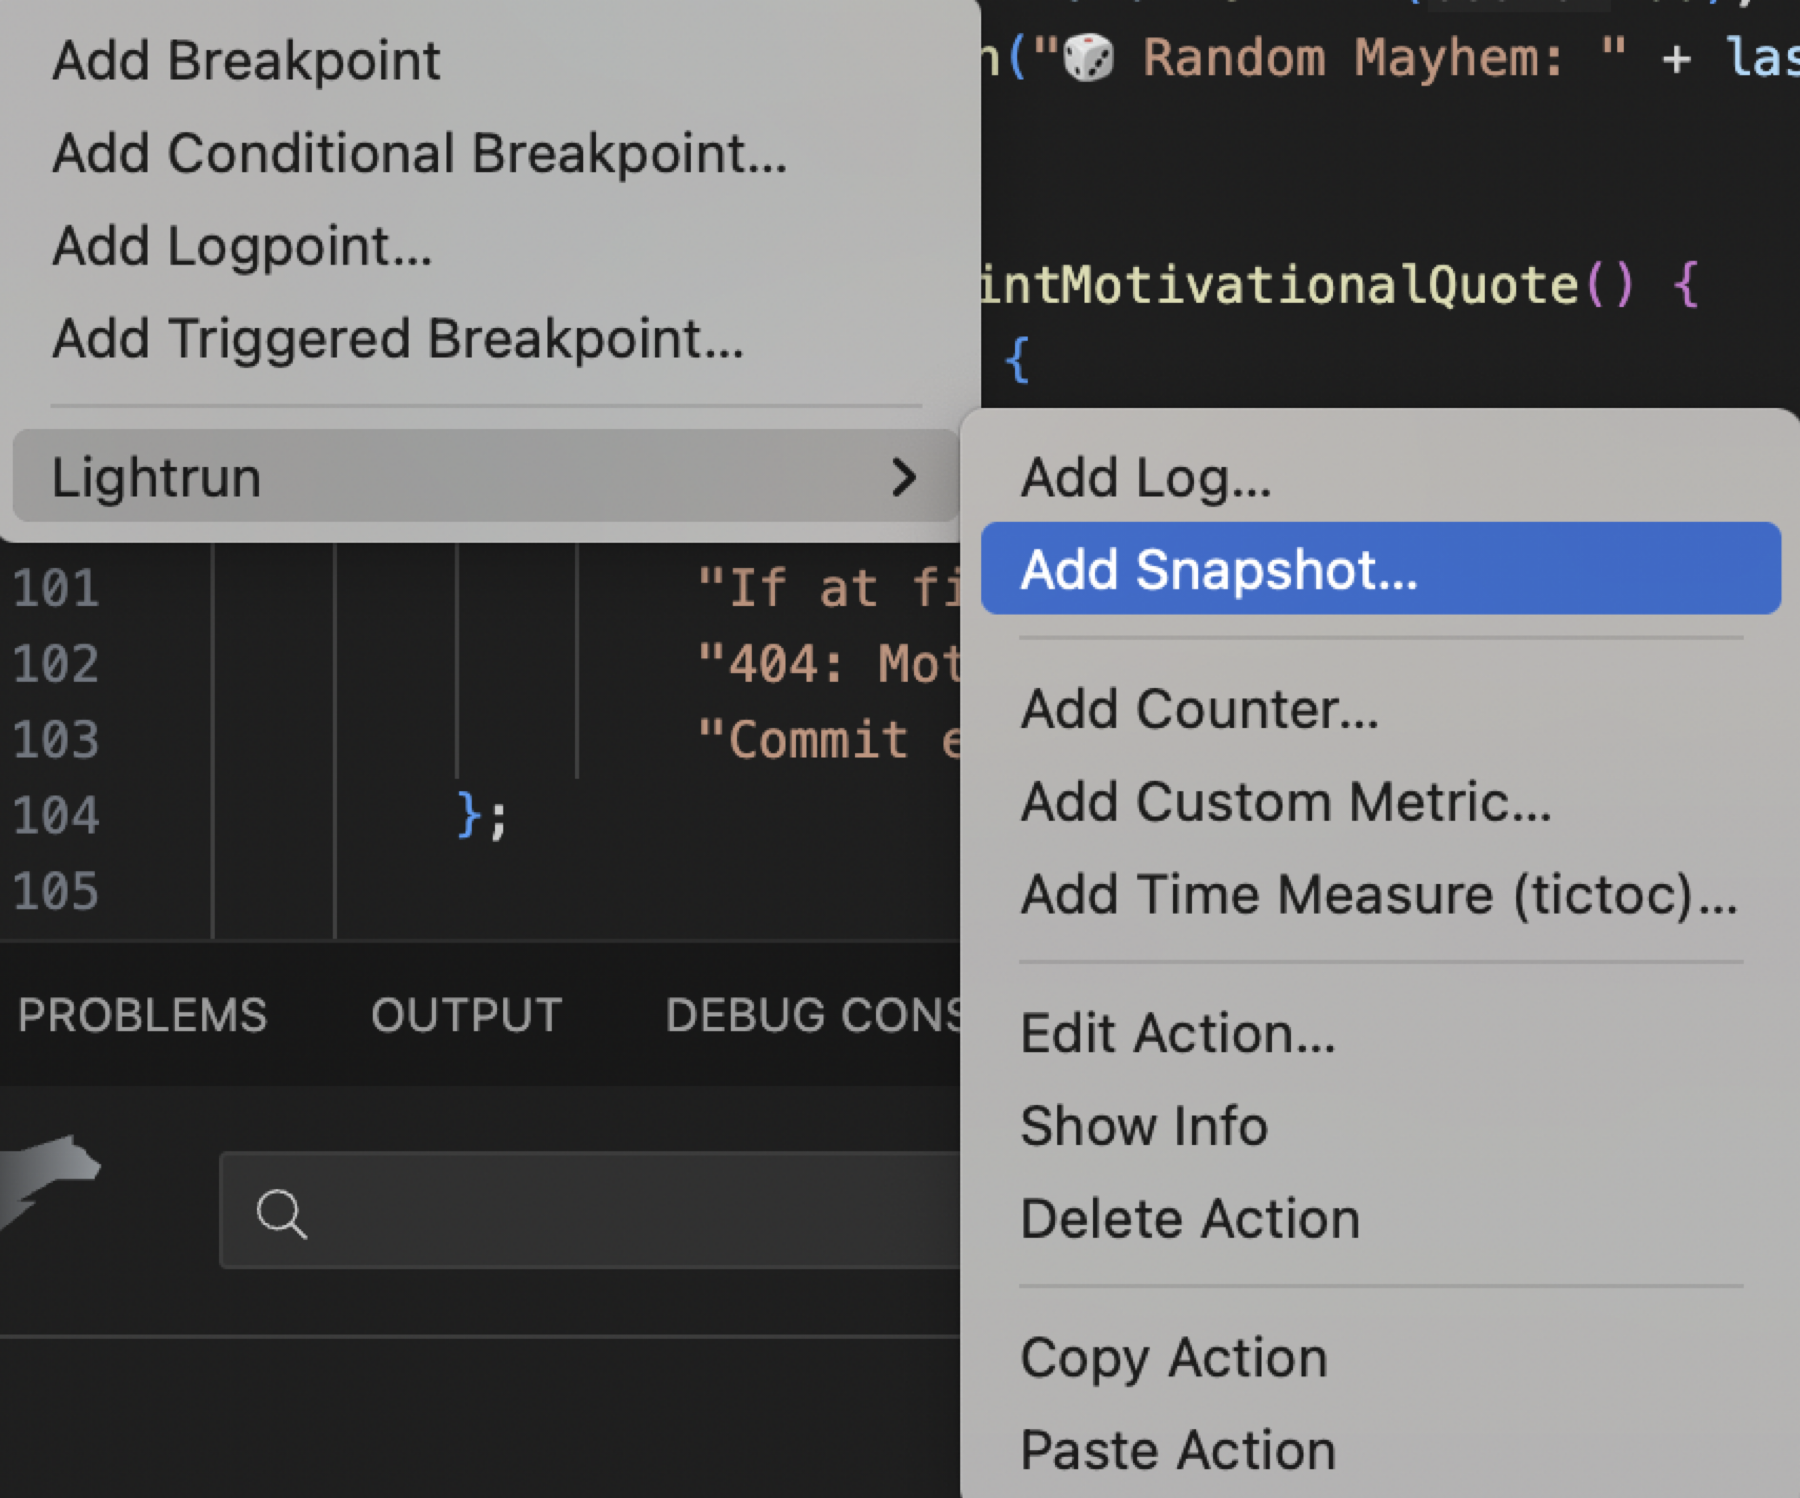
The Insert a Snapshot dialog opens.
-
-
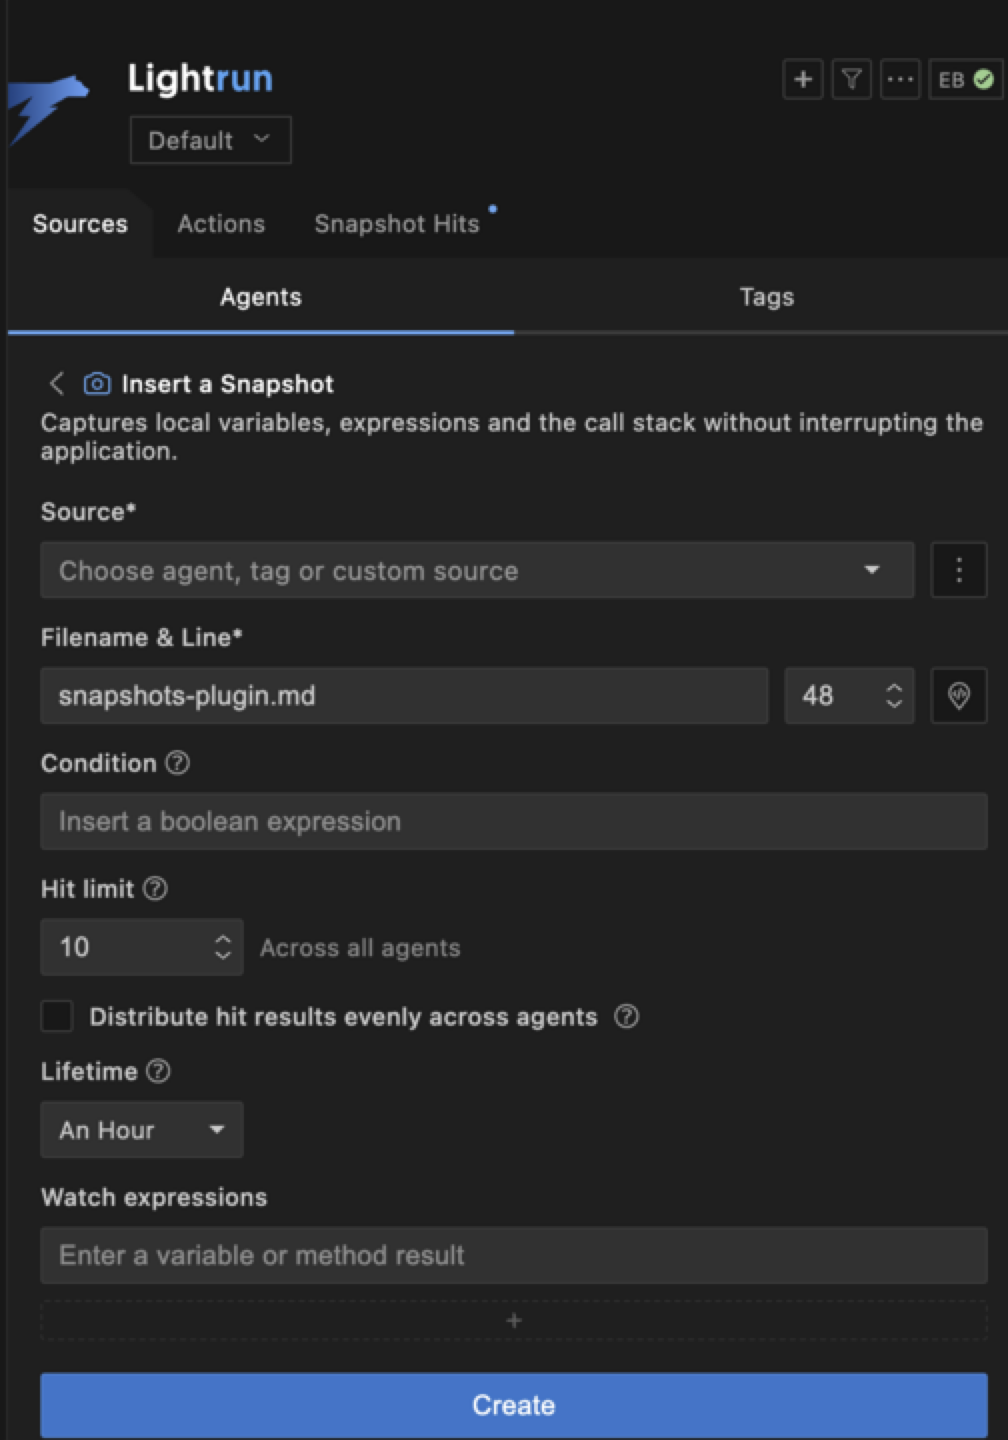
In the Insert a Snapshot dialog complete the fields, as follows:
Fields Description Source From the available options in the dropdown list, bind the action to a specific agent, tag, or custom source.
Tip: You can click the Custom source icon to create a new custom source.Filename & Line The source code file into which you're inserting the action. The default path is to the source code file from which you're currently working. Condition The condition of an ifstatement, used to limit the execution of the action.
For example, The conditionmyVar % 7 == 0limits the action (log, snapshot, metric) output so that it only prints for variables that are divisible by 7.Hit Limit The maximum number of times the snapshot should be taken during the lifetime of the action; default = 1.
Note that from version 1.57, SaaS users will experience the following field behaviour: The maximum number of hit results across all agents (not per agent). By default, results are collected using a "first-come" approach: hits results are accepted in the order they arrive, regardless of which agent they come from. The default maximum is 10 hits.Distribute hit results evenly across agents Supported from 1.57. When the checkbox is selected, results are collected using a distributed approach, distributing the hit load more evenly across agents. This behaviour depends on the relationship between the max total hits value and the number of active agents:
- Max hits > agent count: Hits are divided as evenly as possible.
Example: max hits = 10, agent count = 5 → each agent contributes up to 2 hits.
- Max hits < agent count: Each agent can contribute up to 1 hit.Lifetime The time after which the action ceases to track code behavior and is automatically disabled; default = 1 hour. Target Select your preferred action output taget. You can pick either:
- Stdout - Logs are routed only to your application's standard output.
- Plugin - Logs appear in the Lightrun Console, the Lightrun Management Portal, and configured integrations.
or both options at once.Watch experessions Variables or method results to be displayed in the snapshot stack trace. Click + to add additional watch expressions. An expression that you define to be monitored as part of the snapshot. You can evaluate complex expressions, such as methods. -
Click Create to add the snapshot.
Upon snapshot creation:
- In the editor area, the
 icon appears next to the selected code line.
 - In the Lightrun plugin, either the Tags or Agents tab opens and the requested agent or tag is expanded, with the snapshot action appearing below it.
- In the editor area, the
View snapshot data🔗
After you add a snapshot to your code, and a snapshot hit is captured:
- A notification that a snapshot was captured appears in the on the bottom right edge of VS Code.
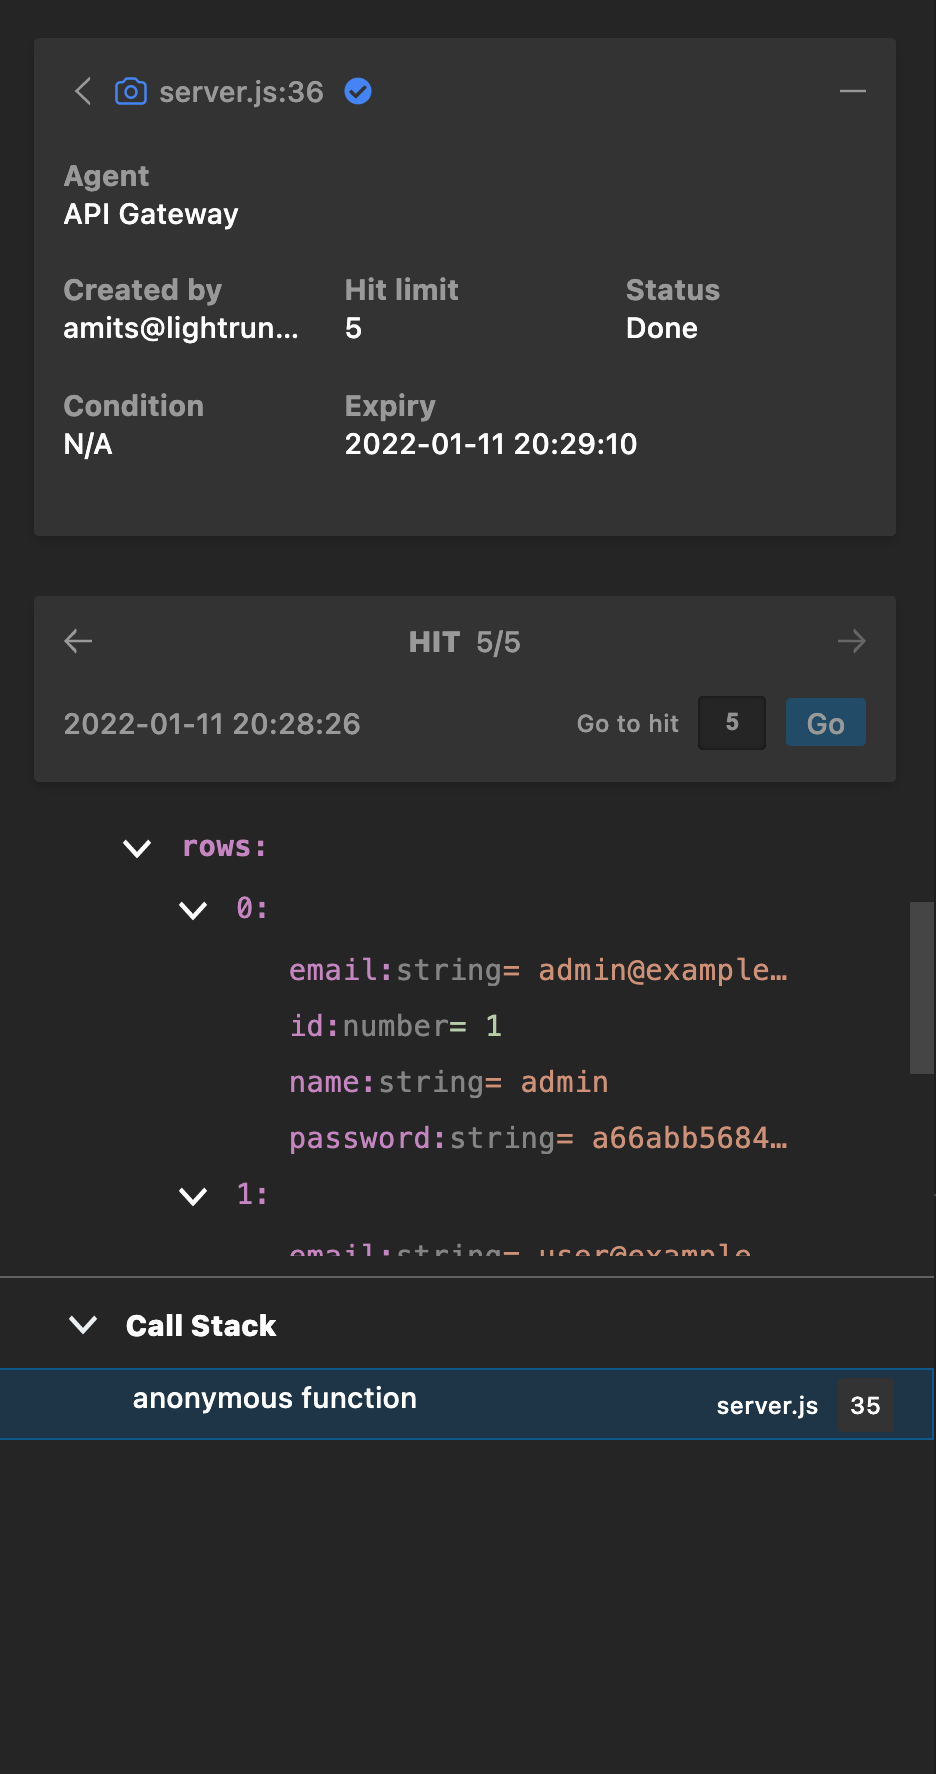
- The snapshot variables and stack trace appear under the Snapshots tab in the Lightrun plugin.
View Snapshot variables and stack traces:
-
To open a snapshot, use either option A or B:
Option A - From either the Agents, Tags, and from the list, select the relevant snapshot.
Option B - Open the Snapshots tab and, from the list, select the relevant snapshot.The snapshot view window opens in the Snapshots tab.
-
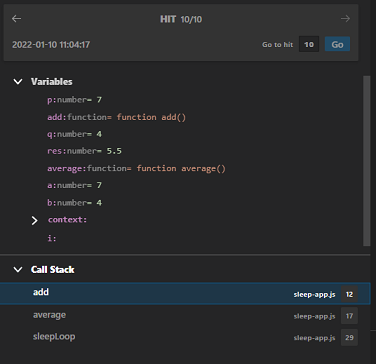
To expand the snapshot data view, click the (>) icons, next to Variables and Call Stack.
- To view snapshot hits within a series, click the ← and → arrows to cycle through the series or enter a snapshot hit number in the Go to hit box and click Go.
- To view details of a specific frame within a snapshot hit, in the Call Stack pane, click on the relevant stack trace variable or method. In the example below, the add method is selected, and the relevant variable values displayed.
Info
Viewing snapshots from the Lightrun Management Portal is described here.
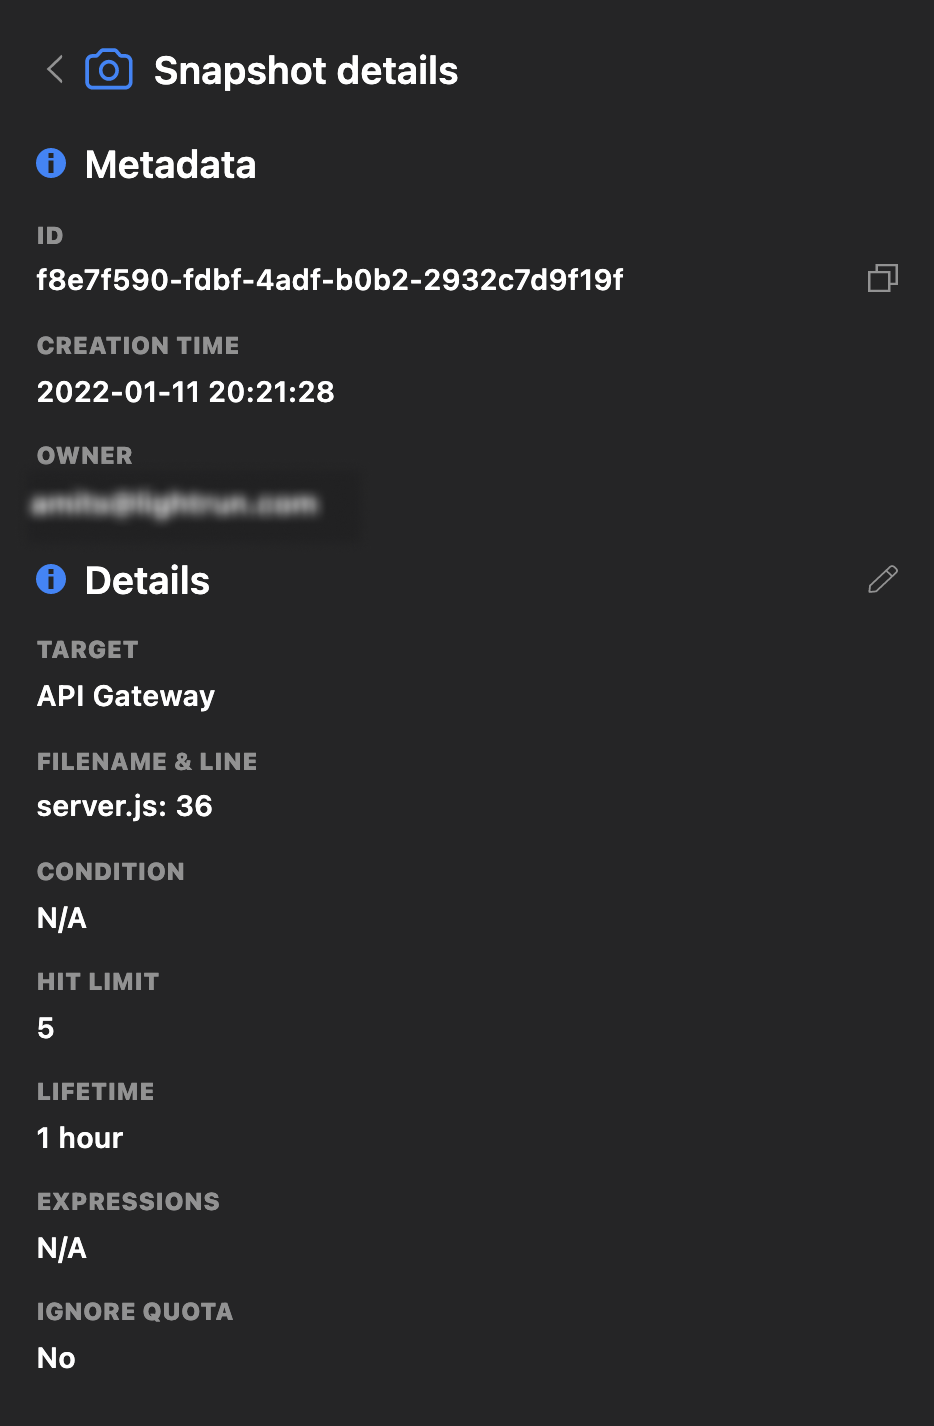
View and edit a snapshot configuration🔗
After you have created a snapshot, you can view and edit its configuration.
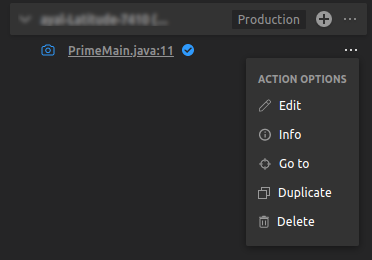
- In the Lightrun plugin, depending on the target, select either the Agents or Tags tab.
- Next to the Snapshot entry, click the Snapshot Options menu icon (...) and select Details.
The Snapshot details window opens.
- To edit the configuration, click the edit icon
 .
.
The Edit a Snapshot dialog opens. - In the respective fields, enter new values for line number, condition, hit limit, and so on.
Duplicate a snapshot action🔗
- Hover your cursor over the relevant snapshot in the Lightrun sidebar.
-
Right-click and select Duplicate.
The Insert a Snapshot dialog opens, displaying the data of the duplicated snapshot.
-
Update any necessary details, such as modifying the code line or adjusting settings.
-
Click Create to save the duplicated snapshot.
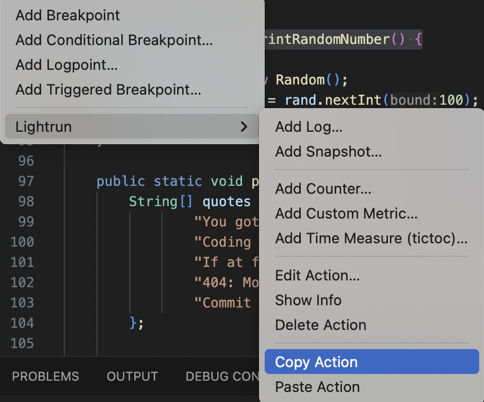
Copy and paste a snapshot🔗
-
Go to the line in your application source that contains the snapshot to be copied. Make sure to use the source code version currently deployed to your remote app (where the agent is attached).
-
Right-click to open the VS Code context menu.
-
From the VS Code context menu, click Lightrun.
The VS Code Command Palette opens with a list of Lightrun plugin options.
-
From the Command Palette, select Copy Action.
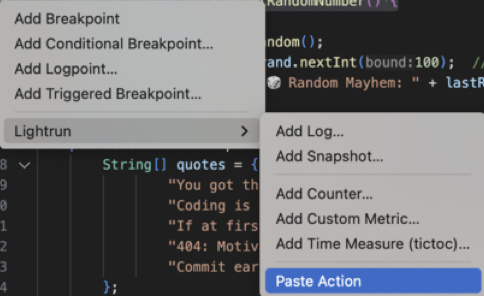
-
Go to the line inyour applicationsource code where you'd like to paste the copied log.
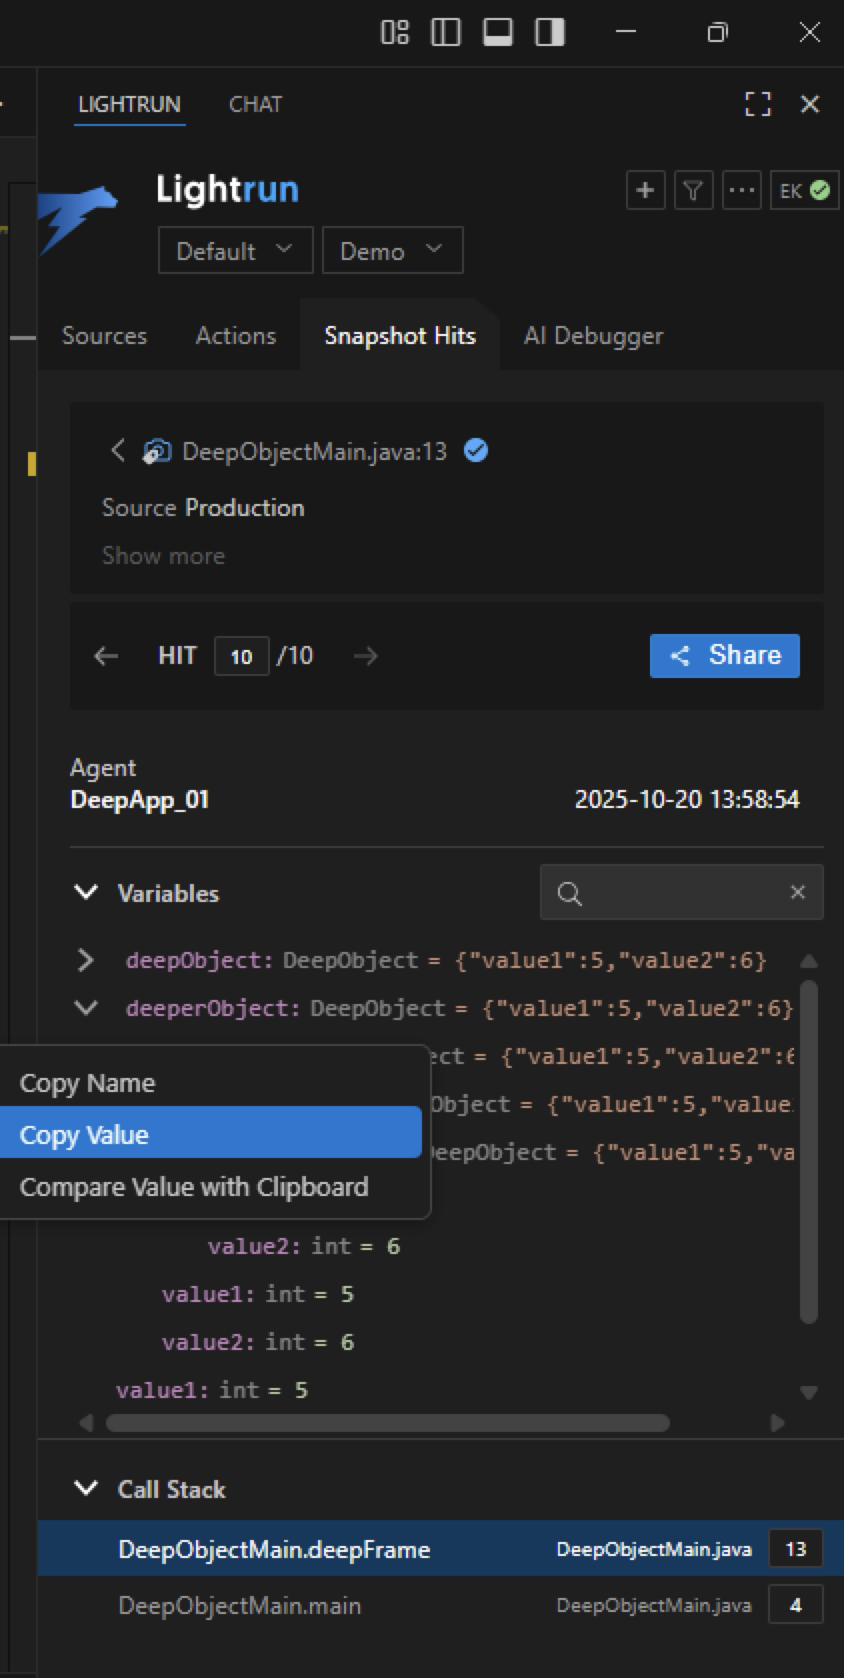
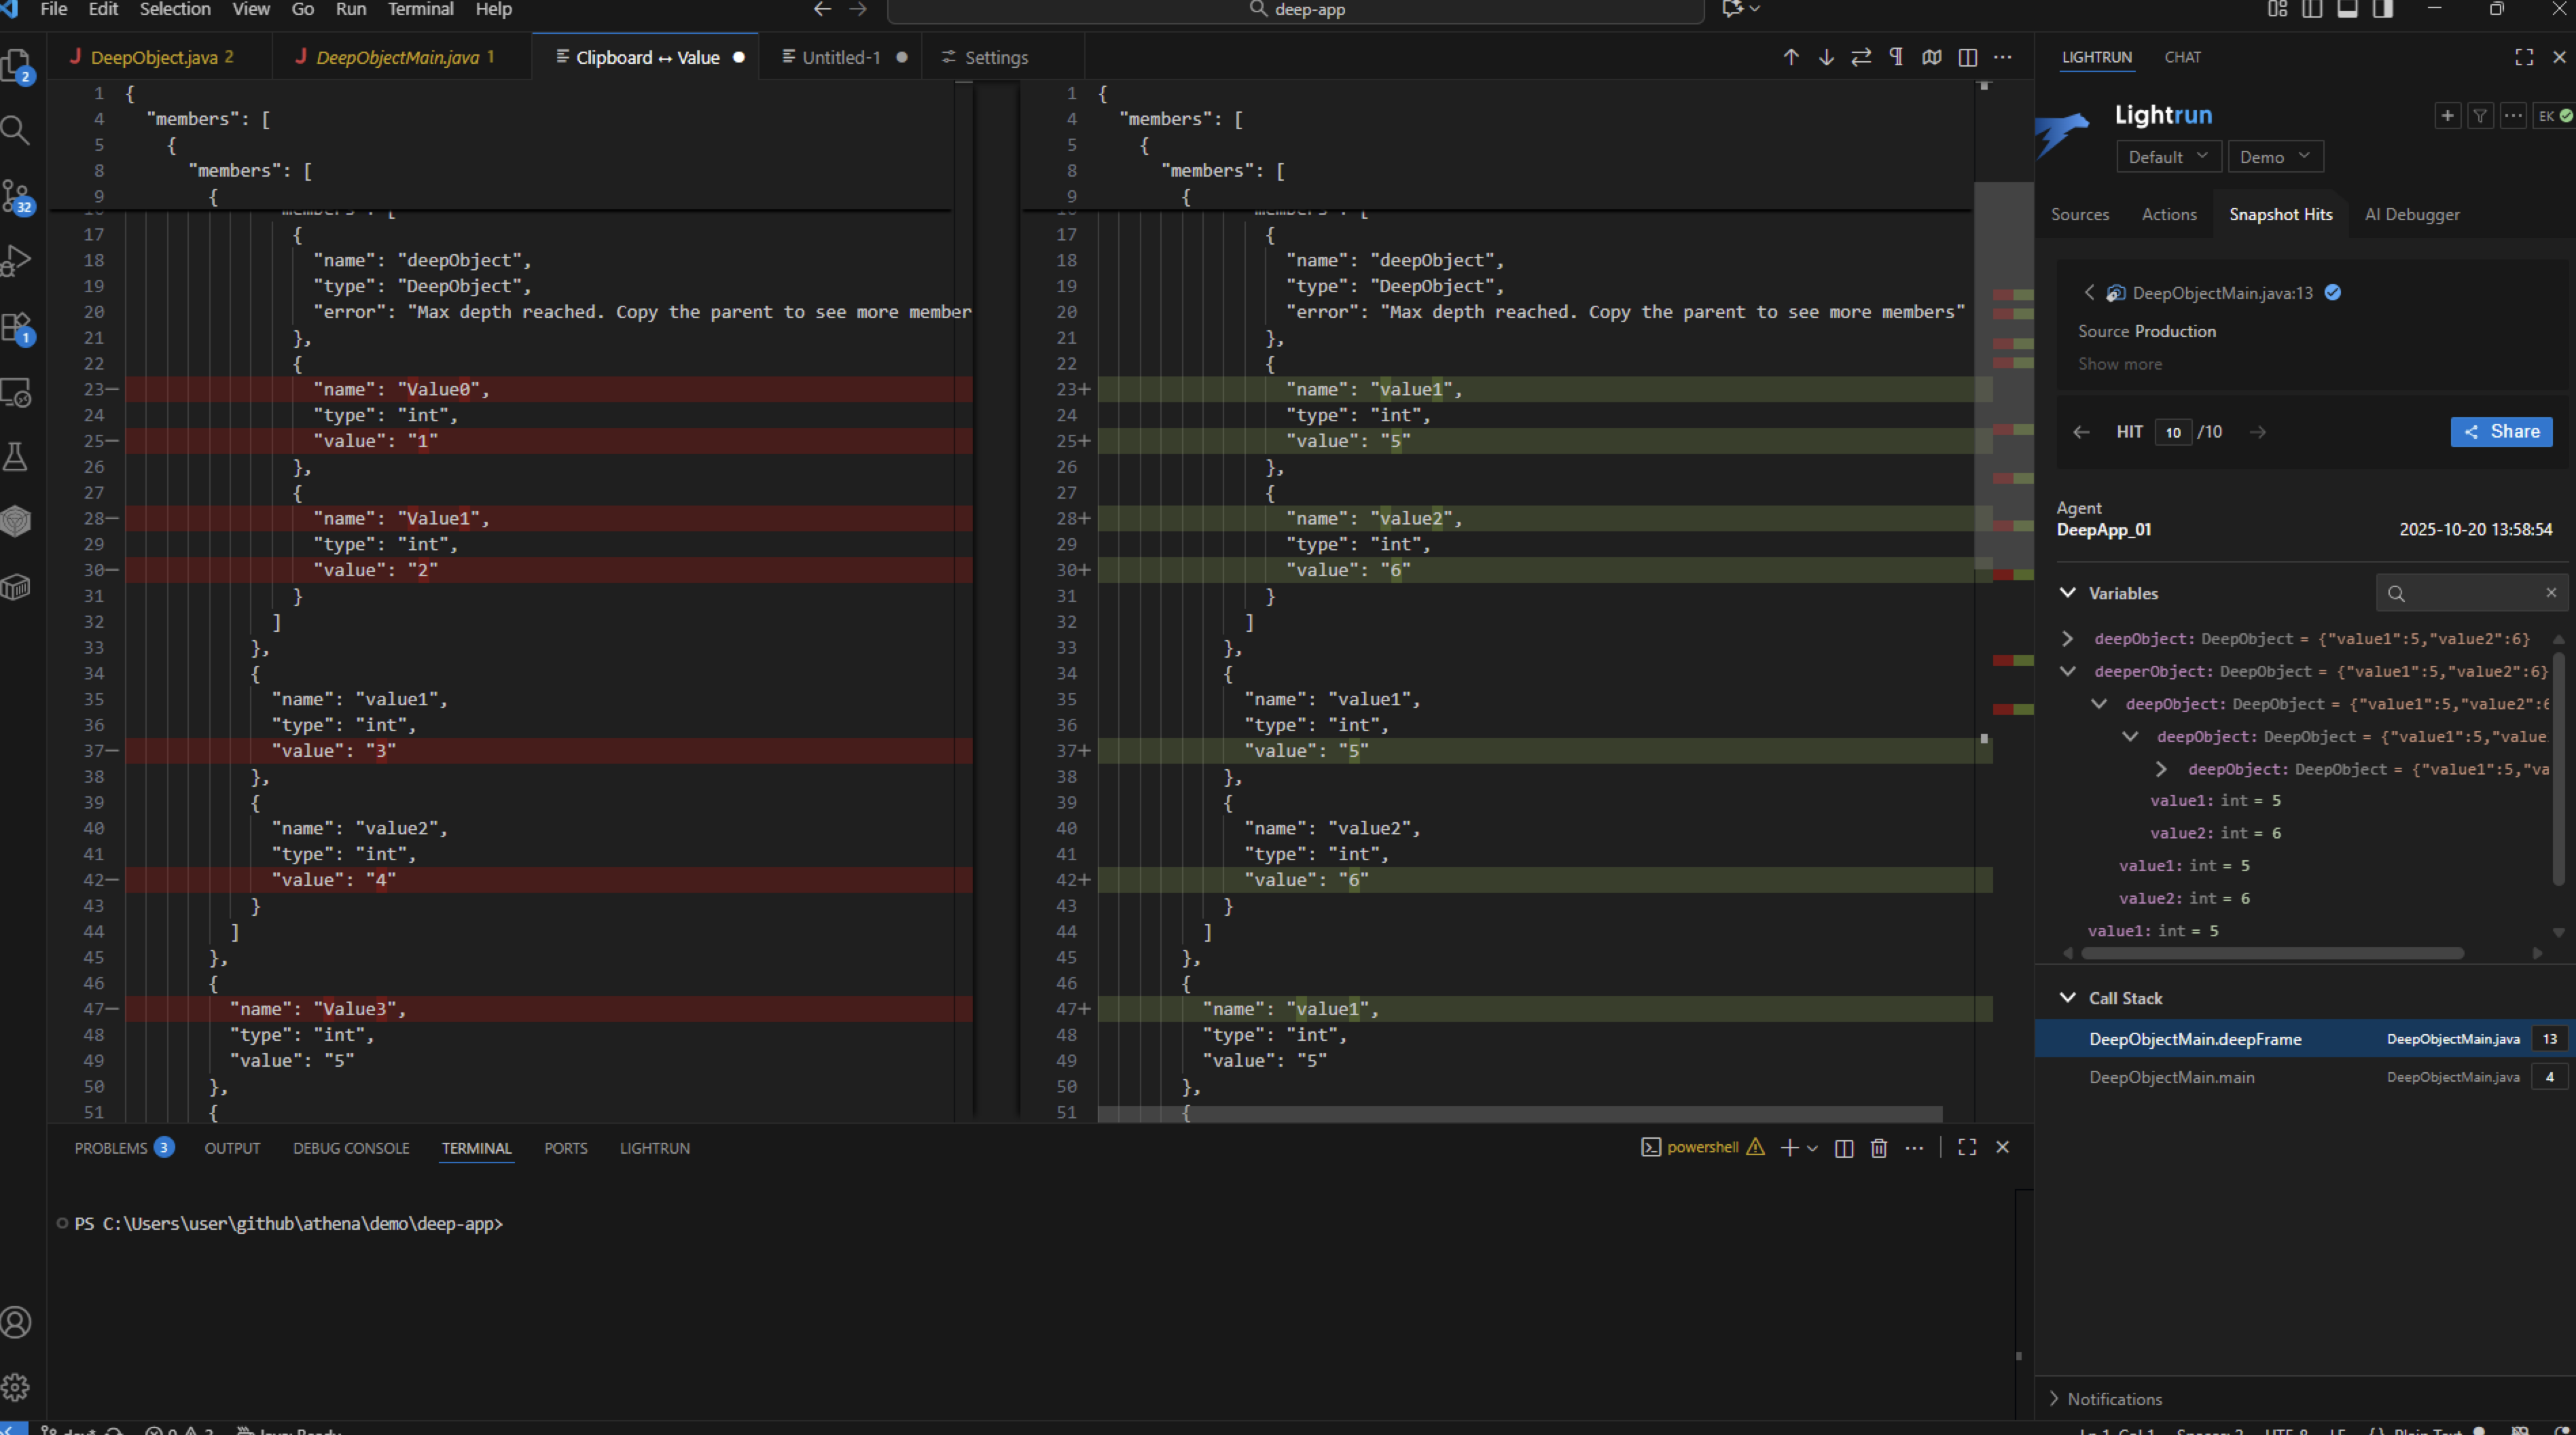
Compare snapshot hit variable values in clipboard🔗
- Select the Snapshot Hits tab in your VS Code Lightrun plugin.
- Select a hit.
- Select a Frame and access the Variables section.
-
Click the value of a variable, right-click, and select Copy Value.
-
Select another variable value, right click, and select Compare Value with Clipboard.
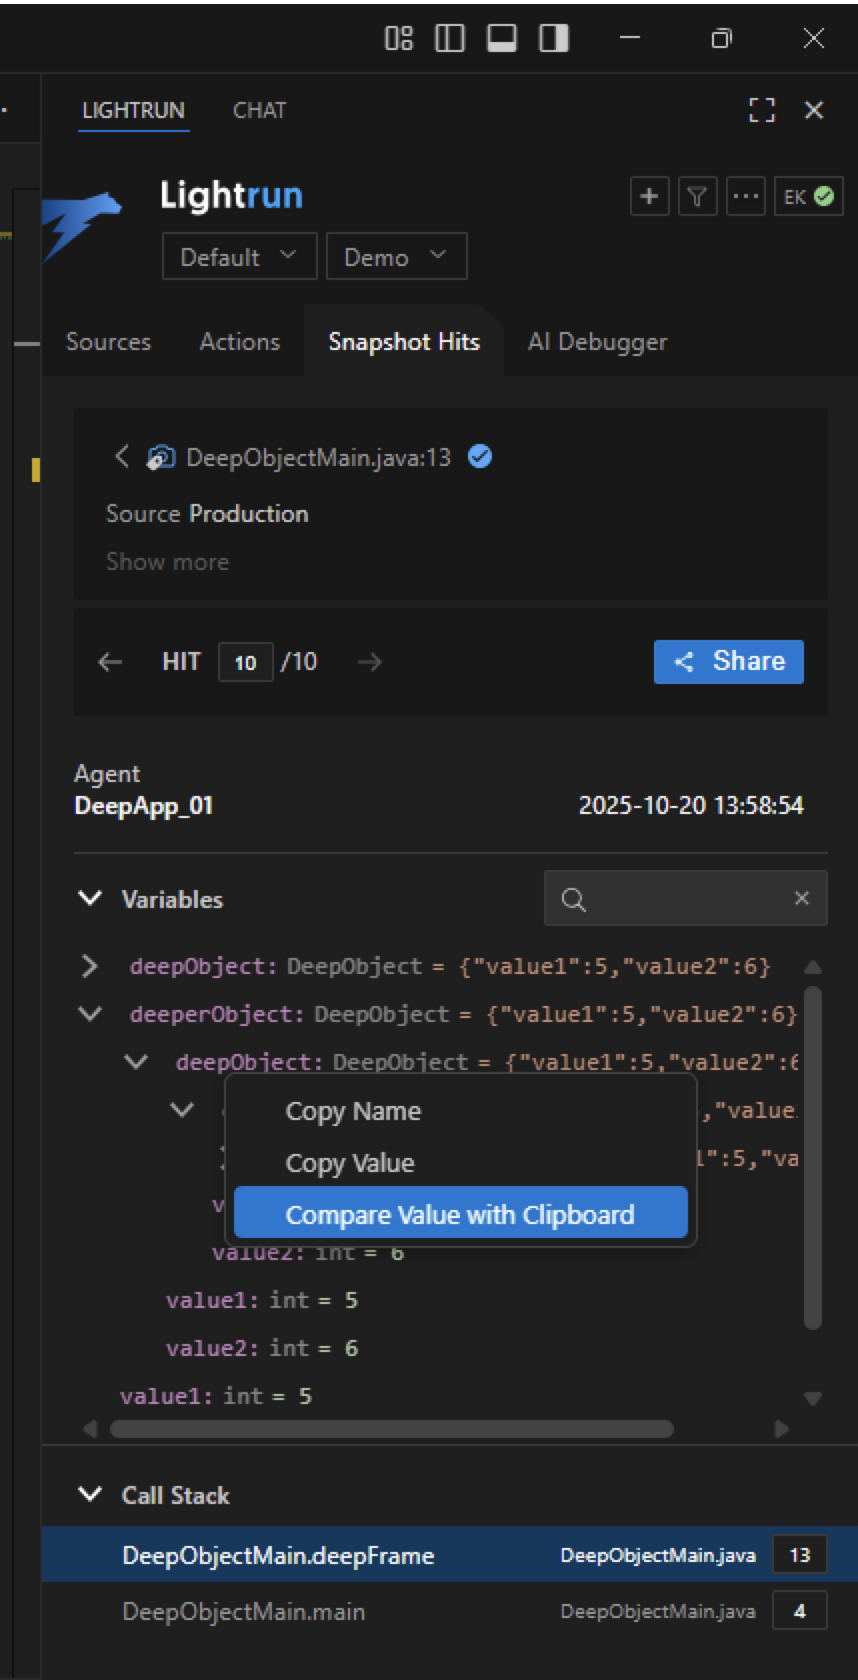
The Clipboard vs Selected value view opens with the hightlighted differences and the number of detected changes diplayed.
Export snapshot data🔗
Once a snapshot hit has been captured, it is possible to export the snapshot data for analysis in another IDE. Lightrun allows you to export the data of all available snapshots in your system, or the data of a single snapshot at once.
Export your snapshot data🔗
- Select the Snapshot tab in your VS Code Lightrun plugin.
- Click the MORE OPTIONS menu icon (...) next to the search field and the SORT BY dropdown.

- Click Export Full Data in the menu that appear. Pick your preferred storage location and click select to export the snapshots.
- A
.lrsnapshotfile will be saved in the selected location.
Export all snapshot hit frames and variables data as JSON🔗
- Select the Snapshot tab in your VS Code Lightrun plugin.
-
Click the MORE OPTIONS menu icon (...) next to the search field and the SORT BY dropdown.

-
Select Export as JSON.
-
Select your preferred storage location and click Save to export the snapshot data.
The following is an annotated example of an exported snapshot hit JSON structure.
{
"actionHitInfo": {
    "hitId": "<unique ID of this snapshot hit>",
    "agentId": "<ID of the Lightrun agent that captured the snapshot>",
    "actionId": "<ID of the snapshot action>",
    "capturedAt": "<ISO timestamp of when the snapshot was taken>"
},
"frames": [
    {
    "frameIndex": <position of this frame in the call stack>,
    "file": "<path to the source file>",
    "line": <line number where the snapshot was triggered>,
    "method": "<fully qualified method name>",
    "arguments": [
        {
        "name": "<name of the argument or object>",
        "type": "<fully qualified class name>",
        "members": [
            {
            "name": "<field or property name>",
            "type": "<data type of the field>",
            "value": "<captured value at runtime>",
            "members": [
                // nested fields if the value is an object
            ]
            }
        ]
        }
    ]
    }
]
}
Export a single snapshot data🔗
- Select the Snapshot tab in your VS Code Lightrun plugin.
- Next to the Snapshot entry, click the Snapshot Options menu icon (...) and select Export. Pick your preferred storage location and click select to export the snapshot data.
- A
.lrsnapshotfile will be saved in the selected location.
Load a Snapshot file in your VS Code IDE🔗
- Select the Snapshot tab in your VS Code Lightrun plugin.
- Click the MORE OPTIONS menu icon (...) next to the search field and the SORT BY dropdown.
- Click Load Snapshots. Navigate to the snapshot file location and select the
.lrsnapshotfile to load the snapshot details in your IDE.